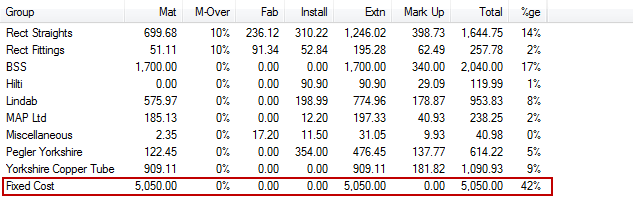
The Estimate Summary Group Summary screen provides an overall view of the Estimate - It details an in depth breakdown of Material, Fabrication and Installation costs for each Costing Group in the Estimate.
To access the Estimate Summary select File 
Estimate Summary or alternatively use the Utility Bar for quick access.
As shown below, the Costing Group is broken down into Supplier Names and default Costing Groups assigned automatically from manufactured items. Rect Straights and Rect Fittings are pre-defined by default, whereas the Manufacturer names (Georg Fischer, Hattersley, Lindab etc) come from the Item Price List assignment Supplier Name field.
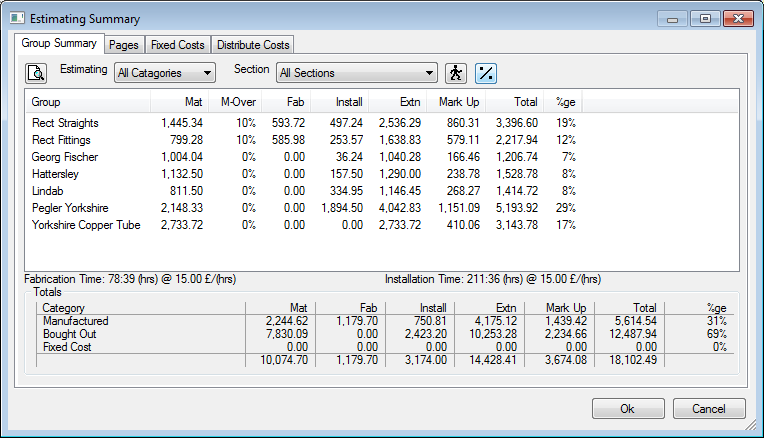
Overall Fabrication and Installation hours are detailed with breakdowns of Nett and Gross costs shown in the lower section of the Estimate Summary. The Mark Up column shows the amount of Overhead assigned to the current job.
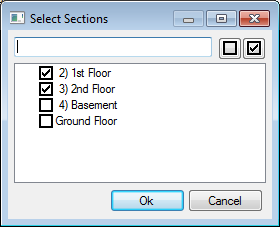
Clicking the Sections drop down allows additional filters of the view to be performed. Allowing for individual Section costs or a combination of multiple section costs using the Define Mixed Sections option. This provides the opportunity to select multiple sections and displays a combined breakdown in the summary for that selection.
Other filters for Estimating Summary are applied using the Estimating All Categories drop down field. For example this enabled a quick snapshot for Total installation of Bought Out or Manufactured items.
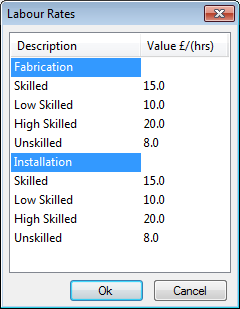
Adjusting Labour

- Labour Rates icon allows access to all the Labour Rate values in the database. As the quotation would be using an Archive Job (ESJ file), the Labour Rate values can be altered for specific needs. A typical example could be that the job is a supply only in which Installation labour can be set to zero for each of the categories under Installation and this would eliminate Installation costs amongst all items in the job and provide a total cost minus installation. Alterations to the values of Labour Rates fields only effects the current job and can be are instantly represented in the Estimate Summary once confirmed.
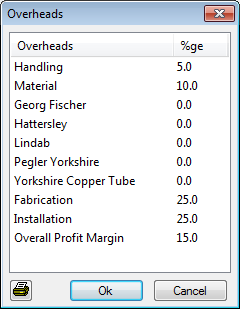
Adjusting Overheads
 - The Overheads icon allows access to the various percentages preset in the Costing Database
Overheads settings. These are adjustable per quotation if using an archived Job (ESJ file type). Each Supplier that has an item entered within the job is displayed for application of percentage increase or decrease along with the other core categories.
Fixed Costs
Fixed Costs can be allocated to the quotation from the Fixed Costs tab of the Estimate Summary. Users are able to specify existing Fixed Costs, which are created and preset from the Costing Database
Fixed Costs screen or alternatively create new Fixed Costs from clicking the New icon and typing a description. Once the Description has been entered, the Cost can now be assigned for how much the fixed cost is using the default currency.
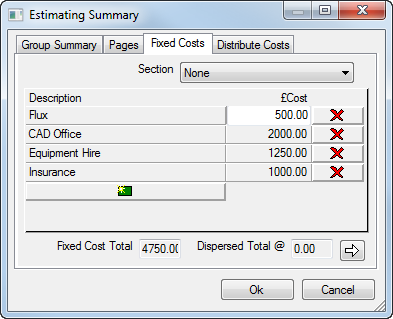
Users wanting to assign Fixed costs to a particular section are able to drop down the list of existing sections from the top and select the Section required. Users can create the Fixed Cost in that particular section which when filtered from the Group Summary, will detail the additional cost on that section. The total of all Fixed Costs will be displayed when no filter is used.

The last option on the Fixed Costs tab is for Dispersing. Fixed Costs if wanting to be hidden and included into the rates of the items, can be spread across the job items by selecting the Disperse button at the lower right of the dialogue.

Once the Disperse Total button is selected, the Total of the Fixed Costs will be spread across ALL items and display the estimated percentage growth of each item.
To undo and remove all Dispersions, select the Distribute Costs tab and click the Clear All Gross Cost Modifications Now button  .
.
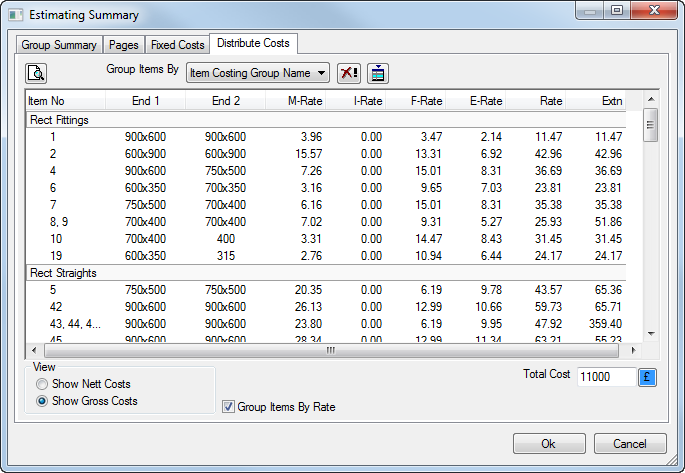
Distribute Costs
The quotation can be modified further using advanced distribution of costs. This is done from selecting the Distribute Costs tab within the Estimate Summary.
The Total Cost of the quotation can be re-valued and overridden if required. Rounding up or down for example. By re-valuing the quotation and typing in a new Total Cost at the lower left of the Distribute Costs dialogue, the symbol 
highlights to show there has been modifications made.
Selecting this symbol will distribute the new total throughout the job and a prompt is displayed to confirm this is what you want to do (Change the price of the quotation).

Selecting No will cancel the change and revert the quotation back to its original price.
Selecting Yes will prompt for a sectional split of where the affected cost is wanting to be assigned to.
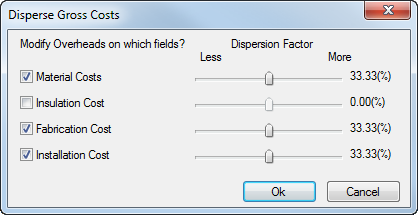
The user is able to preference the weight of where the difference in price is to be allocated. Selecting and de-selecting the tick options activate/de-activate the various categories. The example above shows an even split across 3 categories Material, Fabrication and Installation. If the quote was altered by £ 900 negative or positive, each category will be affected £ 300 +/- to arrive at the new Total specified.
Click OK to confirm the change in costs or again Cancel if wanting to withdraw the change completely and revert back to the original price estimated.
After application of the Costs change, the Group Summary will display the typed in Total.
To remove these changes and revert back to the original price, select the
similar to how you would remove the Fixed Costs dispersal from the Distribute Costs tab.