The Item Report Builder is a powerful tool for reporting information on screen or printing item information on the items that exist in the job. The following basic guidelines are intended to help achieve the best results.
Accessing the Item Report Builder
Reports are accessed in the following methods for all applications unless stated.
- Select File
 Print Layout Item Reports.
 - CADmep+ users type REPORTS at the command line, this can also be accessed via the Shift/ Right Click menu CADmep Cam/Print Report LayoutItem Reports.
- The command line prompts: Select objects
- Type ALL or use any of the normal AutoCAD selection methods and confirm.
- CADmep+ users type REPORTS at the command line, this can also be accessed via the Shift/ Right Click menu CADmep
- The Item Report Builder dialogue is now displayed.
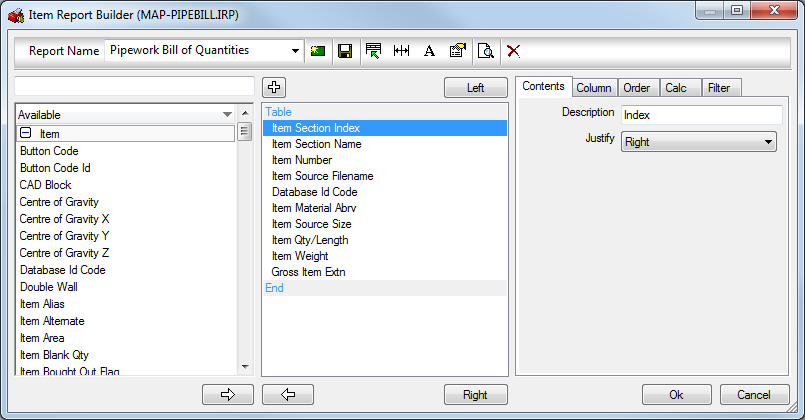
The are a number of pre-configured Reports available from the 'Report Name' drop-down menu, once selected, the report can be tailored to suit. Making amendments to the report can be previewed before acceptance by clicking the Print Preview icon 
from the top toolbar. Providing their are items in the job, the Print Preview enables the user to see the end result which constructing the report.


|
Create a New report. This will prompt if to copy existing report in view. |

|
Save the report and rename the report filename |

|
Edit the Header Layout |

|
Auto Resize Columns to Fit the page. |

|
Font options |

|
Additional Report Option (see below) |
|
|
Print Preview the report in view. |

|
Delete the selected Report in view. |
The following procedure is our recommended way in which you should tackle report generation.
Sorting the Report
Decide which print objects you are using and add all of these from the Available list on the left. Highlight and move across to the central column using the arrow 
button. To remove unwanted print objects, select the object and use the arrow pointing left.

Move all print objects in their correct order, from Top to Bottom = Left to Right reading on the report. Use the 
 buttons to move the print objects.
Selecting the Order tab and cycling through each of the print objects enables you to apply a Sort Order as shown above. Sort Priorities left at 0 will be ignored when the report is calculating the order. The highest priority is 1 which will be the first sort by print object. The print objects should have an incremental number for the order in which they are required to be sort by when displaying/printing the report.
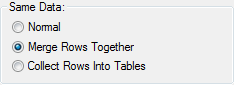
Collecting Tables
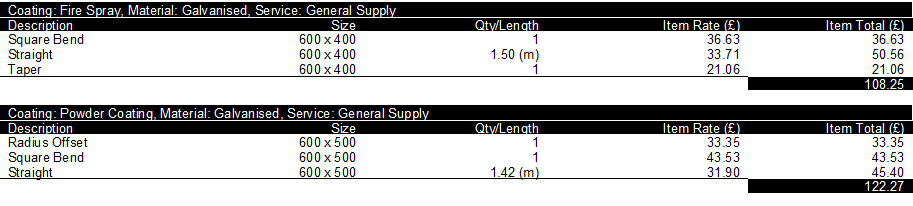
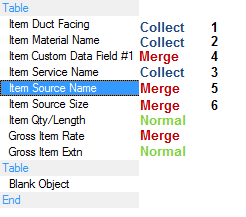
Print objects can be collected to produce tables of the same data. Select Collect Rows Into Tables for each print object wanting to be grouped and ensure these are moved to the top of the table. In the example Item Duct Facing, Material and Service Name are all moved to the top of the table and then Collected. These also have Sort Priority 1, 2 and 3 assigned respectively so all the Item data is sorted into these categories on the report. Item Duct Facing (1) is the First Sort Priority meaning that all items with particular facings are to be grouped together and sorted by the Facing name, then by Material (2) and finally by Service (3). Example below:
All collected data does not need to be displayed in the table data too, so as these are collected into tables, can be set to "0" value for their column size from the Column tab. HINT: Use "hidden" print objects by applying a column size of Width = "0" from the Column tab, meaning this object can still be sorted by but not displayed.
Merging Data for Calculating Quantities/Lengths
Once data is collected and the Sort priorities are identified and applied, the data is now ready for merging for its quantities or prices. If we have multiple quantities of the same item it maybe that the report is required to total these up and display on one report row providing a total of the items quantity or price.
Each print object in the report needs to be investigated and decisions are required on whether to Merge the rows together or leave as Normal for calculating. The general rule is that if you DON'T want the field to be totalled* then set it to be merged. Remember that if a field is merged and the data is different on separate lines then it won't be merged. The Sort priority should be acted upon in order to get the data together, this is important when attempting to merge.
* numeric fields get totalled as a number, string fields get totalled as a comma delimited list.
Collect Rows Into Tables: Will Group the data together into their own table sets. see Collecting Tables above.
Merge Rows Together: Once sorted into the order, this can be used to merge rows of the same data together. For example Merge has been used on Item Source Name, Item Source Size as these can be the same when items are sorting under each other. This will merge of the of sorted data together as one row entry.
Normal: This is used on Print objects wanting to be calculated. The example above shows Item Qty/Length and Gross Item Ext set with the property Normal. When the merging of rows occurs, the Data in these two fields when met with the others are to be totalled and calculated together.
Examples
Creating a prompted filter Report
Add the field (e.g. Section) to the report. Go to the filter tab for that field. Enter a filter such as "Item Section = <section>"
The user will now be prompted for "section" every time they do the report.
Remember, grouped objects will include the Group: before the name. Wildcards can be used if they don't want to enter the group, e.g. "*: floor".
Creating a custom title on a table
Add a blank field to the report and in its description type "=Description" then just collect by that field and set it's width to zero.
Creating a blank line between tables
Note there is a possibility where this doesn't always work. Add a blank table between reports. If that fails put a blank object in the table and group by it with description "=".