The Arc command draws arcs using three different points. There are four ways of creating arcs, which are described below.
3 Points (Keyboard Shortcut: ARC) The simplest type of arc. This prompts for three points and joins them with an arc.
- From the menus select New > Arcs > 3 Points or click on the 3 points icon
 or type ARC in the program.
 - The software will prompt the user to enter the first point of the Arc. This can be selected by the mouse or entered into the program as X - Y co-ordinates.

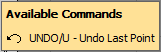
- When the first point has been entered the user will be prompted to enter the second pointy of the Arc, there will also be the option to Undo the previous command. This can be carried out either by typing U and Enter in the program or by using the CTRL + Z shortcut.

- An indicator for the third point will now appear, tracing out the final path of the Arc and following the movements of the mouse. Right Click to place the final point, or enter a set of values. Note: Opus will now carry on prompting for second and third points to continue the arc in the same way. Right-click to finish drawing the arc.
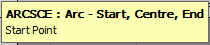
Start, Centre, End (Keyboard Shortcut: ARCSCE) This method creates an arc allowing the user to specify the centre of the circle as the second point.
- From the menus select New > Arcs > Start, Centre, End or click on the Arc: Start, Centre, End icon
 or type ARCSCE in the program
 - The software will prompt the user to enter the Start Point of the Arc. This can be selected by the mouse or entered into the program as X - Y co-ordinates.
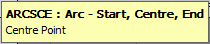
- When the first point has been entered the user will be prompted to enter the Centre point of the Arc. This can be selected by the mouse or entered into the program as X - Y co-ordinates.
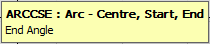
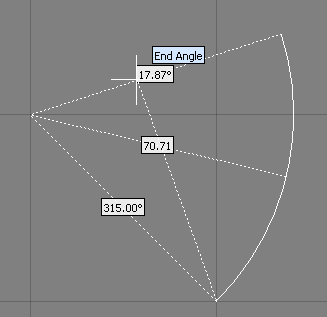
- When the Centre point has been entered the user will be prompted to enter the End Angle, There will also be a box displaying other available commands, in this case there is the option to make the arc run Anti-Clockwise or Clockwise.

- An indicator for the third point will now appear, tracing out the final path of the arc with the movements of the mouse. Click to place the end of the arc, or enter an angle.
Start, End, Centre (Keyboard Shortcut: ARCSEC) This method is similar to the previous method, but differs by prompting for both ends of the arc before the centre.
- From the menus select New > Arcs > Start, End, Centre or click on the Arc: Start, End, Centre icon
 or type ARCSEC in the program.
 - The software will prompt the user to enter the Start Point of the Arc. This can be selected by the mouse or entered into the program as X - Y co-ordinates.
- When the first point has been entered the user will be prompted to enter the End point of the Arc. This can be selected by the mouse or entered into the program as X - Y co-ordinates.

- The program will then prompt for the Centre Point and an Available Commands box will appear giving the alternate command to switch from Anti-Clockwise to Clockwise.

- An indicator for the centre of the arc will now appear, tracing out the final path of the arc with the movements of the mouse. Click to place the Centre of the arc, or enter an X - Y co-ordinate relative to the End Point.
Centre, Start, End (Keyboard Shortcut: ARCCSE) Similar again to the previous two methods, this will first request the centre point, and then the two end points of the arc.
- From the menus select New > Arcs > Centre, Start, End or click on the Arc: Centre, Start, End icon
 or type ARCCSE in the program.
 - The software will prompt the user to enter the Centre Point of the Arc. This can be selected using the mouse or entered as an X - Y co-ordinate.
- The software will then prompt for the Start Point of the Arc, this can be selected using the mouse or entered as an X - Y co-ordinate, relative to the Centre position, this then determines the radius of the Arc.
The software will then prompt for the End Angle which is determined by a line from the Centre that passes through the 3rd point. The resulting Arc is created Anti Clockwise from the Start Point. An Available Commands box will appear giving the Alternate command to switch from Anti-Clockwise to Clockwise rotation for the Arc Angle.