The Offset Edge Loop Tool lets you insert two edge loops on either side of any edge(s) you select. An edge loop is a path of polygon edges that are connected in sequence by their shared vertices. The parallel edge lines formed by an edge loop traverse the extent of the edge selection. Duplicating edges in this fashion is useful when you want to add localized detail to a polygonal mesh on either side of a single edge or line of edges.
Mesh Tools > Offset Edge Loop Tool > 
These are descriptions for the Offset Edge Loop Tool options. This feature works either as a tool or an action. The differences between the options are noted in the description below.
- Delete edge
-
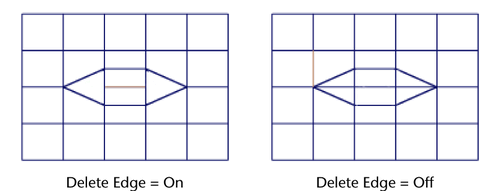
When offsetting edges on a partial interior edge loop the new polygons that get created at either end of the loop can be three-sided. When Delete edge is turned on the start and end edges of the loop are deleted to maintain a four-sided topology on the mesh. The Delete edge option is not available when the Tool Completion - Automatically option is turned on.

- Insert with edge flow
-
Lets you insert edge loops that respect the curvature of the surrounding mesh. This option is disabled by default, but you can toggle Insert with edge flow by selecting and deselecting Edge Flow from the marking menu (
 +
+  +
+  ). Tip: To quickly insert edge loops with edge flow, temporarily activate Insert with edge flow by holding
 each time you select the edge(s) where you want the edge loops to be offset. See Create edge loops that are offset from an edge.
 - Adjust Edge Flow
-
Enter a value or adjust the slider to change the shape of the edges before they are inserted.
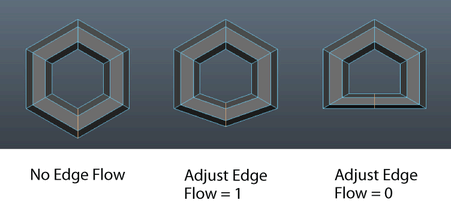
Set Adjust Edge Flow to 1 to transform the surface curvature of the edges to respect the curvature of the surrounding mesh. At 0 the selected edges move to the middle of the other nearby edges, creating a flat surface.
- Edge offset
-
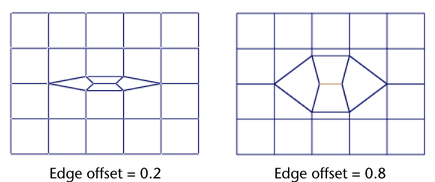
Edge offset is only available when Offset Edge Loop is set to work as an action. This option determines the distance the offset edges will be positioned on either adjacent side of the selected edge. The Edge offset units are based on a percentage of the distance between the selected edge and the adjacent edges on either side. For example, setting the Edge offset to 0.5 (default) positions the offset edges halfway between the selected edge and the original adjacent opposite edges.

- Start/end vertex offset
-
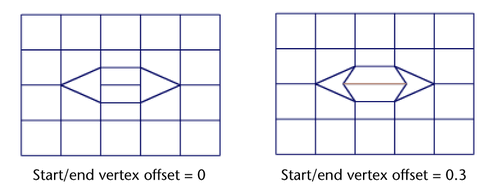
Determines the distance that the two vertices on either end of the selected edge (or a series of connected edges in an edge loop) will be offset inwards or outwards from their original position on the selected edge. The default Offset is 0. The Start/end vertex offset units are based on a percentage of the length of the selected edge.

Both Offset attributes can be edited using the Attribute Editor or the Channel Box by editing the PolyDuplicateEdge node.
- Smoothing angle
-
Specifies whether or not the inserted edges along the edge loop are automatically softened or hardened when the operation is complete. When the Smoothing angle is set to 180 (default) the inserted edges will appear soft. When the Smoothing angle is set to a value less than 180, the inserted edges will appear hard.
Tool completion
The Tool completion setting is only available when Offset Edge Loop is set to work as a tool.
- Automatically
-
When the Automatically option is turned on (default) new edges are immediately inserted across the edge selection as soon as you click, drag to position the edge locator, and then release your mouse button. When Automatically is selected the Delete Edge option is not available.
- Press enter
-
When Press enter is selected the offset edge preview line remains until you press
 or
or  and select Complete Tool from the marking menu. Using the Press enter setting is useful when you want to select and offset a partial edge loop or a multidirectional edge loop path. Note:
When the Tool completion - Press enter is selected you can double-click to select an entire edge loop across a polygon mesh (similar to when using the Select Edge Loop Tool) and then position the offset edge preview locator. Double-clicking an edge when Tool completion - Automatically is on immediately inserts the offset edges in a location you may not want.
Maintain position
The Maintain position options specify how new edges are inserted on the polygon mesh.
- Relative distance from edge
-
When the Maintain position is set to Relative distance from edge (default) the dotted preview locator is positioned along the selected edge based on a percentage distance along the selected edge. For example, if you click and then drag the selected edge to a location that is approximately halfway along the selected edge, the dotted preview locator appears approximately halfway between all of the other edges along the selected edge ring.

- Equal distance from edge
-
When Maintain position is set to Equal distance from edge, the dotted preview locator is positioned along the selected edges at an absolute distance based on where you click on the first edge. When the length of edges is highly variable, the tool uses the shortest edge to determine the maximum distance the preview locator can be moved. This option is useful if you want the new edges inserted at a specific distance from existing edges. For example, when you want to control any subsequent edge creasing you may perform on the mesh.
Note:The distance the preview locator can move is limited by the length of the shortest edge on the associated edge ring. If the locator quickly snaps to either edge it may indicate a shorter edge in the edge ring that is limiting the placement.
