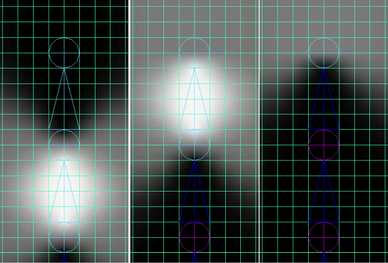
Binds geometry to any transform node or hierarchy of nodes such as an empty group node or a locator. For example, you can create a deformation effect by binding a polygonal mesh to locator nodes that are connected to the CVs of a spline curve.
Using the Smooth Bind Options, you can limit the number of joints that influence nearby skin points and limit the range of influence for joints.
See also Bind smooth skin.
Skin > Smooth Bind > 
Opens the Smooth Bind Options, letting you set the following options.
- Bind To
-
Specifies whether to bind to an entire skeleton or only to selected joints. Select from the following options:
- Joint Hierarchy
-
Specifies that the selected deformable objects will be bound to the entire skeleton, from the root joint on down through the skeleton’s hierarchy, even if you have selected some joint other than the root joint. Binding the entire joint hierarchy is the usual way to bind a character’s skin.
This is the default.
- Selected Joints
-
Specifies that the selected deformable objects will be bound to only the selected joints, not the entire skeleton.
- Object Hierarchy
-
Specifies that the selected deformable geometry is bound to the entire hierarchy of the selected joint or non-joint transform node, from the top node down through the entire node hierarchy. If there are any joints in the node hierarchy, they are also included in the bind. With this option, you can bind entire pieces of geometry to nodes like groups or locators.
Note:When using the Object Hierarchy option, you can only select joints or objects that cannot be skinned (for example, group nodes or locators—not pieces of geometry) as the initial influences in the bind.
- Weight Distribution
-
When you paint weights , Maya re-normalizes weight values after each stroke, scaling the available weights (those that already have some value and are not locked), so that the vertex weights still add up to 1.0. When possible, weights are scaled based on their existing value.
In situations where all other unlocked, available weights are zero, this setting lets you determine how Maya creates new weights during normalization.
Select from the following:
- Distance
-
Calculates new weights based on the distance of the vertex from the various influences to which it is skinned. Closer joints are given a higher weight. (This is the default).
- Neighbors
-
Calculates new weights based on the influences affecting the surrounding vertices. This prevents the vertex from getting weights to every joint in the skeleton, and gives it similar weights to the surrounding vertices. Only supported for polygon meshes.
- Allow Multiple Bind Poses
-
Lets you set whether you want to allow multiple bind poses per skeleton. This option can be useful if you are binding multiple pieces of geometry to the same skeleton.
When on, you can bind the separate pieces using different bind poses for each. When off, you must bind all pieces of geometry with the skeleton in the same bind pose.
- Max Influences
-
Specifies the number of joints that can influence each skin point on your smooth skin geometry. Default is 5, which produces good smooth skinning results for most characters. You can also limit the range of joint influence by specifying a Dropoff/Falloff Rate.
- Maintain Max Influences
-
When on, your smooth skinned geometry cannot have, at any time, a number of influences greater than that specified by Max Influences.
For example, if Max Influences is set to 3, and you paint or set weights for a fourth joint, one of the weights of the other three joints is set to 0 to maintain the total number of weighted influences specified by Max Influences.
This limits the redistribution of weights to a specific number of influences, and ensures that the primary joints are the ones that receive the weights.
Note:If you turn on Maintain Max Influences in the Attribute Editor, the skin weights are not modified until you reassign them by clicking Update Weights.
- Remove Unused Influences
-
When on, weighted influences that would receive a zero weighting are not included in the bind. This option is useful when you want to reduce the number of calculations for your scene to increase playback speed.
Note: The Optimize Scene Size Options also let you remove any zero weighted influences from your character’s skin bind. You can turn on Unused Skin Influences in the Remove Unused section. - Colorize Skeleton
-
When on, bound skeletons and their skin vertices are colorized so that vertices appear the same color as the joints and bones that influence them.
Note:You can change the colors of individual joints and bones from the Display > Wireframe Color window.
- Include hidden selections on creation
- Turn on to have the bind include geometry that is not visible, as by default, bind methods must have visible geometry to complete the bind process successfully. However, there are times when the geometry is not visible but you may still want the bind to succeed regardless of the mesh visibility state.
To avoid backwards compatibility issues, we added an explicit option that includes hidden geometry during the bind.
- Dropoff Rate
-
(Available only when Bind Method is set to Closest in Hierarchy or Closest Distance.)
The influence each joint has on a particular point varies with the distance between the skin point and the joint.

This option lets you specify how rapidly the influence of each joint on skin points decreases with the distance from the joint (and the joint’s bone). The greater the Dropoff Rate, the more rapid the decrease in influence. The lower the Dropoff Rate, the further the influence of each joint. Use the slider to specify values between 0.1 and 10. You can enter values up to 100, but values between 0.1 and 10 are ideal for most situations. The default is 4, which provides good deformation effects for most characters.
Note: If the joint has a bone, the influence of the joint extends along the entire bone, from the center of the joint to the end of the bone. The joint’s influence can extend to all the points near the entire length of the bone. If the joint is an end joint (has no bone), then the joint’s influence just extends forward from the center of the joint.After binding skin, you can use the Paint Skin Weights Tool to edit the influence of joints in an intuitive manner. For more information, see Painting smooth skin point weights.
- Falloff
-

Available only for Geodesic Voxel binding (when Bind Method is set to Geodesic Voxel).
Controls how rigid the bind is applied to the geometry. A value of 1 creates a more rigid bind, while 0 produces a smoother bind. (The default value is 0.2)
- Resolution
-

Available only when Bind Method is set to Geodesic Voxel.
Increases the precision of the voxelization. Maya calculates the weighting based on the voxelized volume. Depending on the resolution sections of the mesh may become connected in voxel space, which can result in binding artifacts (similar to those that occur with the Closest Distance or Closest in Hierarchy methods).
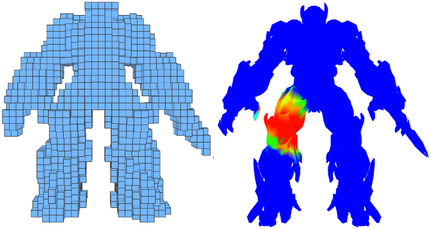
The following images show a mesh voxelized at two different resolutions. In the first image, since a coarse resolution is selected, knee and hand voxels become connected. This results in deformation of knee geometry when the arm moves, and so on.

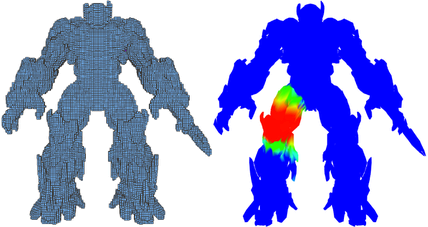
At a finer resolution (see below), the hand and leg stay independent, yielding a higher quality bind.
 Tip: Choosing the right resolution is a trade-off between bind time and quality. It is a good idea to start with a coarse (low) voxelization resolution and increase it as needed.
 - Validate voxel state
-

Available only when Bind Method is set to Geodesic Voxel.
When on, performs a post-validation on the voxels. Activated by default, you can disable it as it is not required and causes additional processing time. However this can be a useful diagnostic tool for more complex geometry. See also Degenerate geometry.