Creates a gradation through a series of colors. Use this texture:
- to create different types of effects, such as stripes, geometric patterns, or mottled surfaces
- as a 2D background
- as the source file for an environmental sphere texture to simulate a sky and horizon
- as the source file for a projection texture to simulate wood grain, marble, or rock
Find this texture in the Create bar. To apply this texture as a texture map, see Map a 2D or 3D texture.
Very complex ramp textures may experience aliasing during an animation. If this occurs, convert the ramp texture into an image file (see Convert a texture or shading network to a File Texture for details).
- Type
-
The direction of the color ramp. The default is V Ramp. The following shows what happens when you select the Circular Type and adjust the colors of the Ramp swatch in the Attribute Editor (see also Ramp).

- Interpolation
-
Controls the way colors blend in the ramp. The default setting is Linear. In the above example, because the surface is spherical, a Smooth Interpolation type works well.
- Ramp
-

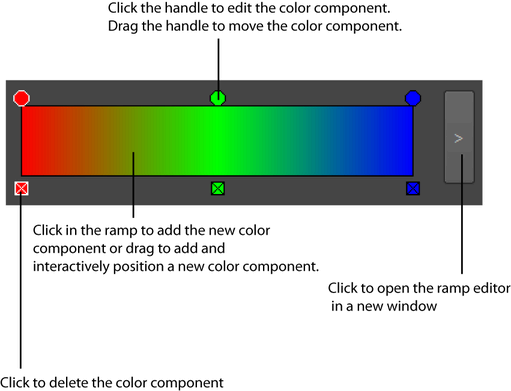
By default, the Ramp is set to black and white (from black to white).

You can switch over to a rainbow ramp by selecting Presets > Rainbow. To revert back to the default, select Presets > BlackToWhite. Another available option is Presets > WhiteToBlack.
Each color component in the ramp has a circular color handle on the top, and a square color icon on the bottom. The active color has a white border around its color handle and icon. In addition, you can click the arrow on the right side of the ramp to open the ramp editor in a larger, resizable window.
Note: Alternatively, you can expand the ramp editor by expanding the Attribute Editor.
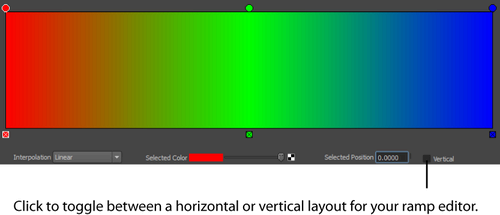
In the large ramp editor window, you can edit the interpolation method, the selected color, and the color entries. In addition, you can check and uncheck the Vertical box to toggle between a vertical or horizontal layout for your ramp editor.

Checking the Vertical box alters the size of your Ramp Editor. Once you check the Vertical box, the Ramp Editor automatically adjusts to a suitable size.
When you save your scene, Maya also saves the layout that you have chosen for your Ramp Editor and the corresponding window size.
Note: Only changes in Type, Interpolation, Selected Position, and Selected Color are displayed in the ramp. Changes in all attributes are displayed in the Hypershade swatch. - Selected Color
-
The active color component. This attribute applies to the active color only.
- Selected Position
-
Position of the active color component in the ramp. This attribute applies to the active color only. The range is 0 (bottom of ramp) to 1 (top of ramp).
- U Wave, V Wave
-
Controls the amplitude of a sine wave offset of the texture in the U and V directions. Increasing the U Wave or V Wave increases the display of the texture’s waviness. The range is 0 (no wave) to 1. The default is 0.
Tip:To increase the number of waves in the texture, increase the Repeat UV values in the 2D texture placement node.
- Noise
-
Offset amount in the U and V directions by 2D noise. If the texture repeats (Repeat UV values are greater than 1), the noise does not repeat (each instance of the texture is unique). The range is 0 (no noise) to 1. The default is 0.
- Noise Freq
-
Controls the noise granularity (if the Noise value, above, is non-zero). The range is 0 to 1. The default is 0.5.
HSV Color Noise
Randomize a Ramp texture’s color using three separate 2D noises which affect the color’s Hue, Saturation, and Value.
- Hue Noise
-
Offsets the color hue. Use to mark the color with specks of different colors. The range is 0 to 1. The default is 0.
- Sat Noise
-
Offsets the color saturation (or whiteness). Use to create a weathered look. The range is 0 to 1. The default is 0.
- Val Noise
-
Offsets the color value (or blackness). The range is 0 to 1. The default is 0.
- Hue Noise Freq, Sat Noise Freq, Val Noise Freq
-
Controls the granularity for hue, saturation, and value noise. The range is 0 to 1. The default is 0.5. (For each non-zero Freq value, additional calculations may slow down rendering.)