Add fields to the Data Standard dialog by modifying the .xaml files for the Vault Client, Vault Office Client, AutoCAD, and Inventor.
See Anatomy of a .xaml File for more information about modifying the .xaml files for Data Standard.
Configure the Data Standard Dialog
- Make sure you have added any new property definitions to the .cfg files for AutoCAD and Inventor if you intend to map to them from the Data Standard dialog. You do not need to modify a .cfg for the Vault client or Vault Office client. Note: All the fields that will be accessible in the Data Standard dialog as a property must be defined in the .cfg file. The name of the property is also the name of the file or title-block property. If the property name matches an existing file property, such as title , then this file property is used. Otherwise a custom property is created. The only exception to this rule is AutoCAD. When AutoCAD synchronizes properties, it does so from Data Standard to the title-block attributes, not to the file attributes.
See Modify the CAD Configuration File for Data Standard for more information about property definitions.
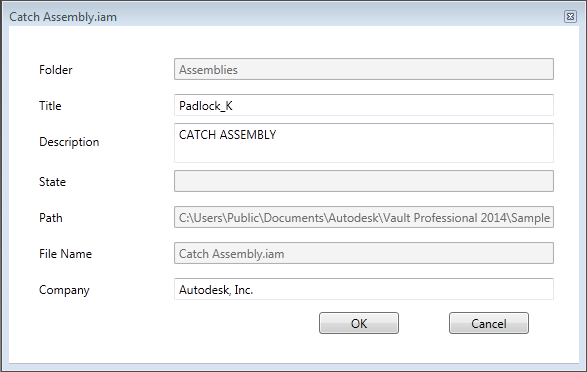
For example, if you want to add a field with the Company name to the Inventor Data Standard dialog and you want it mapped to your file property company, you must create a new entry for that property in the 1 file first.

- Locate the .xaml for the Data Standard Dialog that you want to modify. For example, if you want to change the Data Standard dialog layout for Inventor, you must make changes to the Inventor.xaml. Refer to the following list for the .xaml file locations:
- Vault Client C:\ProgramData\Autodesk\Vault <release>\Extensions\DataStandard\Vault\Configuration\File.xaml
- Vault Office Client (Vault 2015 R2 Only) C:\ProgramData\Autodesk\Vault 2015 R2\Extensions\DataStandard\Vault\Configuration
- Inventor C:\ProgramData\Autodesk\Vault <release year>\Extensions\DataStandard\CAD\Configuration\Inventor.xaml
- Inventor-Tube and Pipe C:\ProgramData\Autodesk\Vault <release>\Extensions\DataStandard\CAD\Configuration\TubeAndPipe.xaml
- Inventor-Cable and Harness C:\ProgramData\Autodesk\Vault <release>\Extensions\DataStandard\CAD\Configuration\CableAndHarness.xaml
- Inventor-DesignAccelerator C:\ProgramData\Autodesk\Vault <release>\Extensions\DataStandard\CAD\Configuration\DesignAccelerator.xaml
- Inventor-Frame Generator C:\ProgramData\Autodesk\Vault <release>\Extensions\DataStandard\CAD\Configuration\FrameGeneratorFrame.xaml
- AutoCAD C:\ProgramData\Autodesk\Vault <release>\Extensions\DataStandard\CAD\Configuration\AutoCAD.xaml
- Open the .xaml file with any text editor (e.g., XML Notepad 2007).
- Create any labels or text boxes that you want to add to the Data Standard dialog under the Grid Folder. Each label and text box requires its own content definition as well as a value for how it should be ordered (Grid.Row and/or Grid.Column) on the dialog. Note: Rows and columns begin with the index 0 and not 1. If you need new rows or columns, just copy and paste them and insert them in the proper definition part. If you are not sure about the height of rows and width of columns, just use the value "auto" or "*".
Text boxes also need to be enabled (IsEnabled).
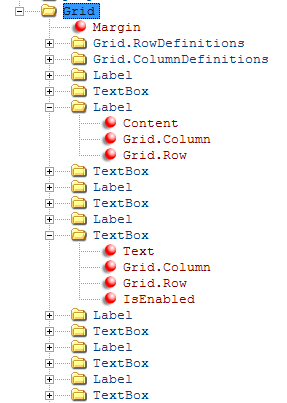 Tip: Duplicate an existing Label and Text box and modify the values for quicker changes to the .xaml file.
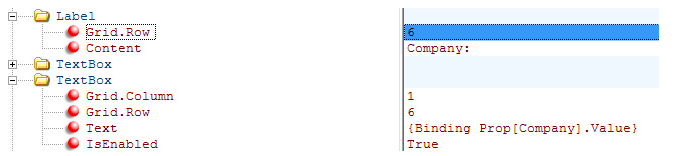
For example, if you want to add a new Company label, navigate to the Grid folder and insert a new Label and provide a Content definition for it. Then modify the Grid.Row value for that label to indicate in which order on the dialog the label should appear.
- Save the file and close it.
- Launch the dialog to see the new labels and text boxes and make sure that everything displays correctly.