You define filters in the Filter definition dialog. Access the dialog by clicking ![]() , in the Object inspector dialog. The following dialog displays:
, in the Object inspector dialog. The following dialog displays:
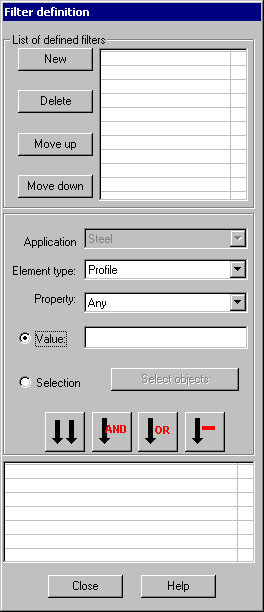
Filter definition are based on types of model elements and their properties. A defined filter is identified by a name displayed on the filter selection list located in the Object Inspector dialog.
The Filter definition dialog allows you to define a new filter or modify an existing filter (except for the two default filters). User-defined filters are deleted from the list by clicking the Delete button.
The top part of the dialog contains the list of all the filters defined by the user in a project. A selected (highlighted) filter is an active filter (i.e. a filter selected when the dialog was opened).
The bottom part of the dialog includes the field for defining the selected filter. The steps taken while defining and modifying a filter are similar.
To define a new filter:
- Click the New button in the top part of the dialog. The New filter name dialog displays.
- Enter a name for the filter in the edit field.
Note: If the Inherit definition option is on, then a new filter will inherit a definition from the recently-selected filter (which means that the expression of the recently-selected filter will be entered on the list located in the bottom part of the Filter definition dialog); if the Inherit definition option is off, then a new filter will be created without any definition of expression (the list located in the bottom part of the Filter definition dialog box will be empty).
- Close the New filter name dialog, the defined filter displays on the list contained in the Filter definition dialog box.
After providing a filter name, the user may determine the expression defining a filter.
From the Type drop-down list, select a type of element that is to be included in the defined filter. The contents of the Properties list (see also List of available elements, properties and values) will change depending on the element type selected.
Select a filtering criterion from the Properties list. Criterion depends on the selected element type.
Depending on the selected type of property, determine the list of selected property values in the Value edit field. This field allows entering values that appear in the expression defining a filter.
If the Properties and Value field are left blank, all the elements of the selected type (all values) will be included in the filter defined.
For some of the properties (e.g. length), define a range of values in the Value field; the following syntax is applied:
- Single values separated with a semicolon e.g. 1; 2; 3; 10; - only the elements listed will be included in a filter.
- Range of values defined as follows: 1-100.
- Values greater than and less than: -100; 10-; (respectively).
Apart from definition of values, it is also possible to define graphically the elements that are included in a filter; once the Selection option is selected. Once the Select objects button becomes accessible; clicking this button closes the dialog, whereas the cursor is in the selection mode. Right-click the structure elements (or click the ENTER key) to display the elements in the dialog.
To include an expression or selection in a filter, it is necessary to use one of the buttons shown below:
 - Clicking this button replaces all the expressions defined by the expression currently determined.
  - Clicking this button adds the current expression to expressions already defined in a filter (the AND operator is added in front of the current expression).
  - Clicking this button adds the current expression to expressions already defined in a filter (the OR operator is added in front of the current expression).
  - Clicking this button adds the current expression to expressions already defined in a filter (the AND NOT operator is added in front of the current expression).
All expressions added to a defined/modified filter are displayed in the bottom part of the dialog with appropriate operators. Each expression is entered into a separate line; lines are separated with logical operators referring to expressions below.
You cannot modify the contents of a single expression in a filter; however, it is possible to delete lines from definitions of expressions in a filter. Delete lines by right-clicking on one of the following commands within the bottom part of the Filter definition dialog.
- Delete line - once this command is selected, a highlighted line is deleted.
- Delete all - once this command is selected, a whole filter definition is deleted.
Each of the filters can be modified at any moment while working in a project. The list of filters defined can be seen in the top part of the Filter definition dialog. A filter defined in the project is deleted from the list of available filters by highlighting a line with a filter name and clicking Delete. The order of filters defined in a project can be changed on the filter list by applying the buttons: Move up or Move down. The highlighted filter is moved one position up or down on the list of defined filters.