Now, just as we did for the large-notch coupon, we'll examine SDV1 to evaluate the damage in the cruciform. We'll also be able to see how the elements are removed from our model as failure propagates.
Recall that SDV1 will range from 1.0 to 3.0 for woven materials, but the discrete values between 1.0 and 3.0 represent a different damage state. For additional information, refer to Appendix C.
- After the job has completed, click from the main toolbar and open Tutorial_6_PW_Abaqus.odb This will open the output database file and switch to the visualization module.
- Select SDV1 from the drop list of variables in the Field Output dialog.

- Adjust the Deformation Scale Factor () and enter a value of 1 in the Deformation Scale Factor field. Click OK.
- The default contour type is set to Banded, but the Quilt type is more useful for viewing SDV1. To switch from Banded to Quilt, select from the main toolbar and select Quilt as the Contour Type. The plot should look similar to that shown below. Minor differences are usually the result of mesh variations.
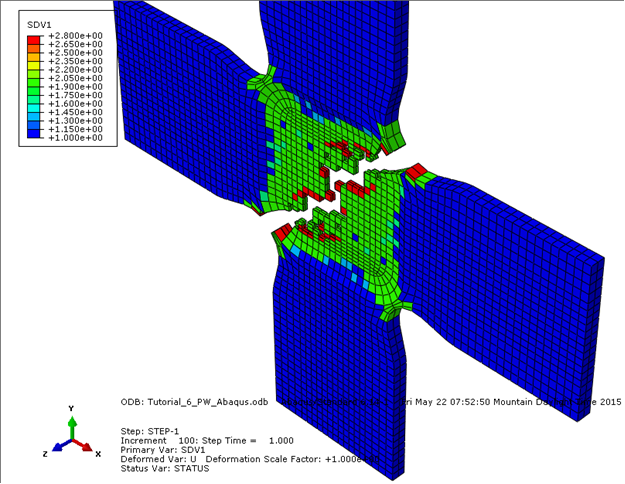
Visually, we can clearly see the effect the element deletion has on this model. The removal of elements makes it very easy to identify failure.
If we were to plot a load-displacement curve for this cruciform specimen, we would see that the cases with and without element deletion have very similar responses. Since much of the failure in the cruciform occurs within a few increments, this should not surprise us.
When we have a model in which the damage propagates gradually over several increments we will see a larger discrepancy between the responses with and without the use of element deletion. In such a case, the results should appear to be more physically reasonable with element deletion activated. This is especially true for woven materials where it is harder to degrade the material to a very low stiffness. Recall, that until an element has been deleted, it will continue to contribute to the strain energy of the model, and as a result, influence the propagation of damage. This can lead to a larger post-failure stiffness than expected.