How to set up, modify, and use a Transformer Rig with rigid targets, predefined modifiers, and clamp points to modify shapes.
Set up a Transformer Rig
- Click the Transformer Rig icon to open the Transformer Rig toolbox.
First, the Transformer Rig expects you to specify the initial set of target geometry.
- Pick all the geometry that should be modified, and ensure that geometry that shouldn’t change is not included.
When you're satisfied with your selection, click Accept Targets.
Remember: you can always add to or remove from the target geometry set later.
- Next, you are prompted to add modifiers. In a Transformer Rig, there must be at least one modifier geometry.
- Click the modifier icon (either Add Free Modifiers or Add Predefined Modifiers) that suits your needs; for more information about the tools in the Transformer Rig toolbox, see Object Edit > Dynamic Shape Modeling > Transformer Rig
 .
. - Select the geometry that will serve as a modifier.
- Click Accept Modifiers when you are satisfied with your selection of modifier geometry.
- Next, add geometry that will constrain the changes to the model. Click the Add Constraints icon.
At this point, you may want to edit the pick mask before selecting curves to use as constraints.
Instead of using the Marking Menu, click on the Show Pick Mask icon to open the Transformer Rig Pick Mask: Add Target Mode window to modify the pick mask.
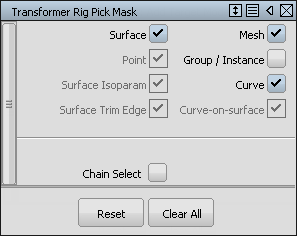
You may want to turn off options for entity types that you don’t want to accidentally pick.
- Close the window.
- Click or click-drag to select the constraint geometry.
- Click Accept Constraints when you are satisfied with your selection.
- To finish, click Go.
Use a Transformer Rig to modify shapes
To use the Transformer Rig, you leave the Transformer Rig toolbox and change the shape of the model by manipulating the rig with the standard Alias transform tools.
- Leave the Transformer Rig toolbox by choosing Pick > Object.
The color highlights disappear when you leave the tool. Also notice that the geometry selected as targets now has history.
- Pick the modifier geometry.
- Use one of the Transform tools (Move, Scale, Rotate, Non-p scale) on the modifier geometry to achieve the desired shape.
Through Transformer Rig history, the target geometry updates automatically when you change the modifier geometry. You can also change modifier control vertices, and attributes such as degree and number of spans.
Change Transformer Rigs
Modify a Transformer Rig by using Query edit on any one of the target geometries.
After you have created a Transformer Rig and exited the Transformer Rig toolbox, you can still return to the toolbox and make modifications.
- Click Object Edit > Query Edit
 .
. - Use the
 to click on any one of the target geometries.
 The Transformer Rig toolbox plus all the color highlights reappear to show that you have returned to the Transformer Rig toolbox.
- To remove a target surface from the rig, place the cursor over the yellow-green highlight, and click with the
 , or choose the Remove from Rig tool.
 - A contextual menu appears at the cursor. Choose Remove from the menu.
The corresponding yellow-green highlight is removed, and the surface returns to its pre-transformer rig shape.
- To add new target geometry, click either the Add Flexible Targets (if the target is permitted to have its shape modified) or Add Rigid Targets (if its shape should not change, even though its placement might) icon.
- Use the to select the surface to be assigned as a target.
- Click Accept to add the new target surface to the rig.
The shape of the surface will follow the modifier surface, and yellow-green highlights appear on the surface.
Use rigid targets with Transformer Rigs
Rigid targets are free to translate and/or rotate according to the modifications you have made. However, they are not to change shape at all: hence the name "rigid".
- Click the Transformer Rig icon to open the toolbox.
- Click the Transformer Rig tool. You are prompted to select geometry.
- Pick the surfaces to be modified.
- Click Accept Targets. The selected surfaces become flexible targets.
- You are prompted to add modifiers.
- Choose the tool (either Free or Predefined) and select the geometry to serve as modifiers, then click Accept Modifiers.
You are prompted to add Flexible or Rigid targets.
- Click the Add Rigid Targets icon.
- Pick the surfaces that should change position or orientation, but not change shape.
- Click Accept Targets after selecting appropriate surfaces.
- The rigid targets are now highlighted green, with the word Rigid on top of them. You can modify the attributes of the target by clicking it with the to open this menu:
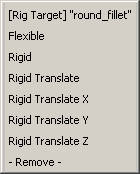
This menu enables you to switch a target from rigid to flexible, and vice-versa. You can also prevent rotation of the target by choosing Rigid Translate, or constrain it further by choosing one translation axis.
- Now add Constraints if they are required. Click the AddConstraints icon.
- Pick the appropriate geometry.
- Click Accept Constraints to add the geometry as constraints.
- Click Go to finish
- Choose Pick > Object
 to leave the Transformer Rig toolbox, and select the modifier surfaces.
 - Choose Transform > Move
 to reposition the modifier surfaces.
 Notice the rest of the surfaces are modified accordingly. Specifically, notice that the rigid target surfaces retain their shape.
Use predefined modifiers with Transformer Rigs
Predefined modifiers are pairs of geometry. The first one indicates where the target geometry was, and the second indicates where the target geometry is supposed to go.
- Click the Transformer Rig icon to open the toolbox.
- Select the target geometry.
- Click Accept.
Now click Add Predefined Modifiers to start adding before-and-after pairs of modifiers.
- First click on the geometry that is in the “Before” or “From”position, location, or shape.
- Click Accept to continue.
- Select the corresponding geometry that is in the “After” or “To” position, location, or shape.
- Click Accept to finish.
- To add more pairs of modifiers, click Add Pre-Defined Modifiers again and follow steps 4 through 7.
Add a clamp to surfaces in Transformer Rigs
The Transformer Rig provides visual feedback about what is outside the region of modification. Red dots show regions that are clamped (will not change), while pale yellow dots show regions that are free to move.
The Transformer Rig uses the modifiers and constraints to make an educated guess at what is outside the region of modification, but sometimes it needs help to determine this correctly.
To provide the Transformer Rig with a hint that a particular part of the surface is to be held fast, add a clamp point. Clamp points can only be added if there are targets and constraints already applied to the Rig.
- Choose the Add Clampers tool to start.
- Click on the edge of the surface that should not be modified by the Transformer Rig.
A pink indicator appears where you click to show that a clamp point has been established.
If you are clamping an area that has inadvertently moved, you will see that it snaps back to its original, and proper, position.
The visualization also updates to show that the Transformer Rig has understood to hold fast the selected area of surface.
- Add more clamp points, if required, by repeating the process.