To overwrite a clip to the timeline using the Overwrite button:
- Move the timeline positioner to the frame that you want to use as the beginning of the overwrite.
- From the workspace, select the clip that you want to overwrite.
- Add In and Out points, if needed.
- Click the Overwrite button.
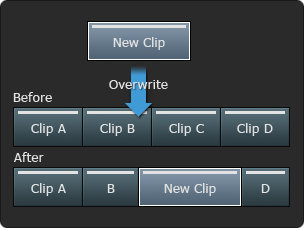
 Depending where the positioner is placed, existing material is overwritten, and the overall length of the timeline sequence does not change. In the following illustration, New Clip is edited into the sequence at a frame in Clip B. Frames after the insertion point are overwritten by New Clip. All of Clip C and some of Clip B and D are overwritten.
 Note: You can also perform three-point or four-point overwrite edits with In and Out points on the source and timeline clips. In the case of a four-point edit, a Timewarp may be applied if the number of frames differs between the source and timeline clips. You can enable of disable Auto Timewarp in the Timeline section of the Preferences menu.
To overwrite a clip to the timeline gesturally:
- Disable Ripple.
- From the Workspace Media panel or Viewing panel, select the clip that you want to overwrite.
- Add In and Out points, if needed.
- Drag the clip to the timeline.
As you hover over the timeline with your clip, you see a phantom visual guide as to the space on the track or tracks your clip will take when dropped.
- Release the clip on the timeline.
Tip: You can also drag and drop a clip to the timeline from the source tab of the Player.