Trim (or roll) a clip to add frames to, or remove frames from, a clip's head or tail.
To trim (or roll) a clip or transition on the timeline:
- From the Editorial Mode box, select Trim.
- Position the cursor near the head or tail of a clip or transition on the timeline.
The cursor turns to a trim cursor (a yellow arrow and line if ripple is enabled, or a red arrow and line if ripple is disabled). If you want to trim a cut, position the cursor over the cut, and notice that the trim cursor becomes a double arrow with a line.
- Drag left or right to remove the number of frames that you need.
You can see the head or tail number on the clip change as you trim.
Tip: Enable Focus On Trim in the Timeline Options menu to snap the timeline positioner to the transition while trimming, allowing you to view the frames you are trimming in the Player, or switch to Trim View to see your incoming and outgoing frames.
To trim (or roll) a clip or transition using Trim View:
- Double-click a cut between two clips on the timeline, or select Trim View from the View Mode box.
Trim View appears in the Viewing panel, displaying the last (outgoing) and first (incoming) frame from the two clips you are trimming.
- Use any of the following techniques to trim your clips to the desired frames:
- Click and drag directly in the left or right Trim View window. You can see the trim icon as you drag. The icon is displayed in yellow or red, depending on the state of the Ripple button.
- Click and drag toward the middle of the two Trim View windows. Notice that the trim icon appears as a double-sided arrow, indicating that you are trimming the cut between the two clips.
- Click any of the timecode or duration fields at the top of Trim View windows to enter specific values. If a timecode or duration field is not enabled, click the corresponding Trim View window or offset field to enable it.
- Click and drag the outgoing or incoming Trim Offset field to specify the number of frames offset in the clip. You can also click the minus or plus buttons to offset by those amounts.
- You can also trim on the timeline, and use the Trim View as a viewing aid.
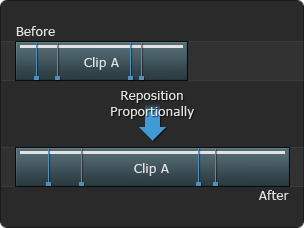
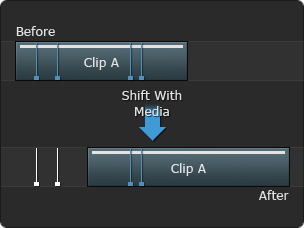
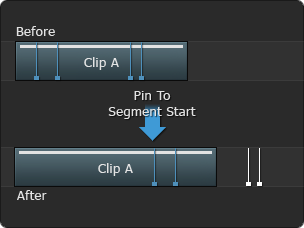
Trimming Keyframes
| Select: | To: | Example |
|---|---|---|
| Reposition Proportionally | Resize the channel as you trim. The animation channel is scaled to fit into the timeline element. This option has no effect when you slip or slide. |
 |
| Shift With Media | Link the keyframes to their original frame numbers. The animation channel moves to follow the original frames as you trim. |
 |
| Pin To Segment Start | Unlink the keyframes from their original frame number. The animation channel remains with the timeline element as you trim. |
 |
In the Editorial Mode box, you can also select Slide Keyframes mode, which allows you to slide all of the keyframes of a specific timeline effect on a clip. For example, you can slide all of the Axis keyframes on a clip.