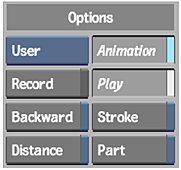
After recording brush strokes, you can apply them to the front clip using the Play option, which is activated automatically when you finish recording the paint strokes.
To play recorded strokes:
- Enable Play.
The Play options appear.

- Define the brush characteristics using the Brush Attribute fields.
- Define the duration of the stroke sequence using the second timebar. Drag the indicator to modify the duration.

(a) Indicator
The number of strokes is divided by the length of the stroke, defined by the second timebar.
The indicator in the second timebar is identical to a track in the Channel Editor.
- Enable the Play options.
Enable: To: Part Play only a part of the recorded strokes. AutoPaint applies the strokes to a frame, erases those strokes, and moves to the next frame. This has the effect of creating streaks on your rendered clip. Backward Play the paint strokes backward. Distance Play paint strokes based on distance. AutoPaint divides the length of paint strokes by the number of frames to determine what to render in each frame. Stroke Play the paint strokes simultaneously. - Enable Animation.
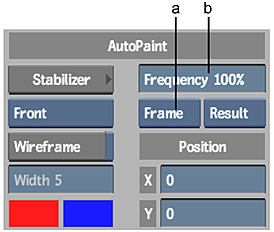
The Animation menu appears.

(a) Animation Type box (b) Frequency field
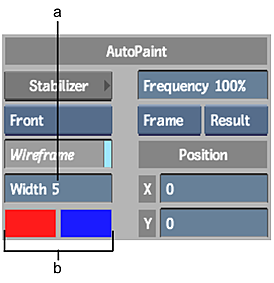
- Enable Wireframe to preview the path(s) of the painted strokes.

(a) Width field (b) Wireframe colour pots
The wireframe preview shows the complete path(s) of the painted strokes. It also shows what will be painted in each frame as set using the second timebar.
You can set the width of the wireframe using the Width field. You can also change the colour of the path and progression wireframes using the colour pots beneath the Width field.
For Path animation, you define how often AutoPaint reads the Channel Editor values when rendering the points or stamps that make up a given stroke. At a frequency of 100%, AutoPaint reads the Channel Editor values the most frequently.
For example, assume you set your AutoPaint sequence of 100 stamps to run over 10 frames using Path animation. If you set the Frequency field to 100%, AutoPaint reads the Channel Editor values 10 times every frame. If you set the Frequency field to 50%, AutoPaint reads the Channel Editor values 5 times every frame.
Tip: Use the Frequency field to lower the processing time for your AutoPaint sequence. Use a low frequency to render a quick preview of the result. - Swipe the bar at the bottom of the menu to display the Channel Editor.
You can animate the following parameters:
- Sampling amount
- X and Y values
- Brush size, rate, pressure, jitter, direction, roll, opacity, and colour
- Tracker translation
Note: The Channel Editor only appears if Animation is enabled. Also, animation data in the Channel Editor is not erased when you record new strokes. - To apply the paint strokes, click Render. Note: If you are zoomed in on the image and are in the Raster zoom mode, only the visible portion of the image will be processed. This is much faster than using Tiled mode, but will not apply your modifications to the entire frame. For more information on zoom modes, see Painting on Full-Resolution Film Images.