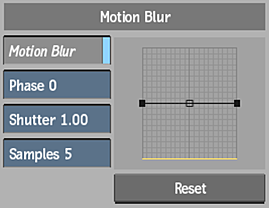
Use motion blur on a garbage mask to compensate for the movement of an object in a clip. Motion blur is created according to the animated movement of a mask's vertices. The amount of blurring is affected by the speed of the mask's movement.
Motion blur can account for the natural blurring of an object as it moves or rotates in space. For example, assume you are drawing a garbage mask around a car as it turns a corner. Because you are using an overhead shot, the edges of the car where motion blur occurs change as the car accelerates and rounds the corner. By applying motion blur to the mask, which has animated position and rotation values to match the car's movement, appropriate blurring of the car's edges into the background clip occurs.
To apply motion blur to a garbage mask:
- Access the Garbage Mask Setup menu.

- Set the motion blur as follows.
- Motion Blur button
- Enable to apply motion blur to garbage masks.
- Phase field
- Specifies whether the motion blur is based on the movement before or after the current frame. A value of -100 places the motion blur before the frame, while a value of 100 places the motion blur after the frame. A value of 0 is centred, which evenly distributes the motion blur. The default value is 0.
- Shutter field
- Controls the duration of the motion blur at each frame, which affects the size of the motion blur. Increasing Shutter value does not increase the processing time.
- Samples field
- Determines the quality of the motion blur produced by the number of samples taken at each frame. Increasing the Samples value causes the processing time to increase linearly.
Note: You can animate the Motion blur button, as well as the Phase, Shutter, and Samples fields. They can be found in the Channel Editor under the motion_blur folder.- Motion Blur curve
- Determines the transparency of the samples that create the blurring effect. The left side of the curve controls the samples of the incoming movement of the subject in the frame. The right side of the curve controls the samples of the outgoing movement of the subject in the frame.
For example, to add blur to the left edge of the mask as it travels from left to right in the clip, adjust the motion blur curve so it slopes down. If you want to add a bit of blur on each side of the mask, adjust the motion blur curve so it peaks in the middle.
Select one of the three vertices on the curve to move it. When you select a vertex, its tangent handle is displayed. You use the tangent handle to adjust the slope of the curve.
Note: The garbage mask motion blur settings are similar to those in the Axis menu in Action.Motion blur occurs on the mask according to the settings you select and the speed its vertices traverse the clip.
- Enable Motion Blur. This makes the motion blur available for application on any garbage mask or axis in the setup.Note: Motion blur settings are applied uniformly to all garbage masks in the setup.
- To reset all motion blur settings back to their default settings, click Reset and then click Confirm.
- To apply motion blur to a garbage mask, access the Garbage Mask Shape controls, select the garbage mask, and then enable MBlur.
The settings specified in the Garbage Mask Setup menu will be used to create the motion blur effect on the garbage mask. You can select one garbage mask at a time.
- To apply motion blur to an axis, select the axis, and then enable MBlur.
The settings specified in the Garbage Mask Setup menu will be used to create the motion blur effect on the axis. You can select one axis at a time.