Once you define a basic LUT type in the LUT Editor, you can modify:
- The reference white and reference black values
- The highlights and shadows
- The gamma of the conversion curve
- The gamma of the incoming film negative
- The degree to which the shoulder at the upper end of the conversion curve is softened
When you modify these values, the basic LUT curves are updated to reflect the changes. For all procedures, you can monitor the R, G, and B channels independently while modifying the LUT.
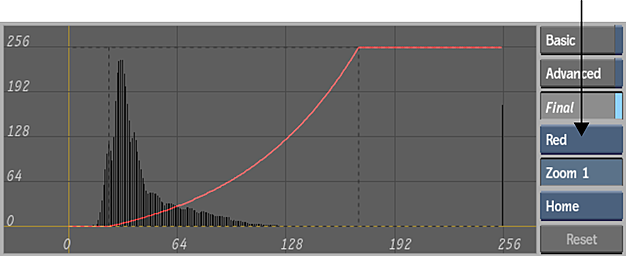
To monitor the R, G, and B channels independently:
- From the Edit Curve box, select Red, Green, or Blue to monitor the red, green, or blue channels independently.
Modifying Reference White and Reference Black Values
The reference white and reference black values define the intensity levels at which incoming pixels are considered white or black respectively. For example, selecting a logarithmic-to-linear basic conversion LUT curve sets the reference white to 685 and the reference black to 95. (These have been shown to be good values for Kodak™ film stock.) As a result, source pixels with values from 685 and 1023 will produce white pixels, while those from 0 and 95 will be set to black.
Reference white and black are affected by the values assigned to highlights and shadows. White pixels are mapped to the value set for highlights, while black pixels are mapped to the value set for shadows. See GUID-693C7FD7-6765-4DFC-8237-A5846CFACCDA.htm#WSCBA3EE2B36D8CB6F6DC202441162BE3FA98-7FE2.
To modify reference white or black values using the Ref White and Ref Black fields:
- Do one of the following:
- To set proportional R, G, and B values, enable Prop and then enter the value in one of the (left-to-right) R, G, and B Ref White and Ref Black fields.
- To set independent R, G, or B values, disable Prop and then enter the value in the corresponding (left-to-right) R, G, or B Ref White and Ref Black fields.
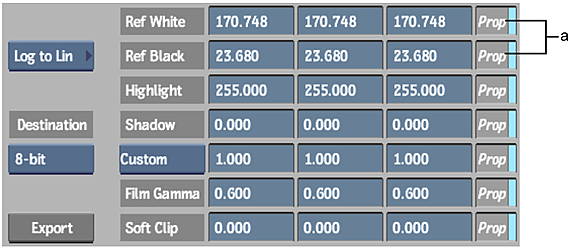
(a) Ref White/Black fields and Prop (Proportional) buttons
To modify reference white or black values using the LUT Editor graph:
- Do one of the following:
- To set proportional R, G, and B values, select All from the Edit Curve box, and then drag the vertical reference white or reference black line left or right.
- To set independent R, G, or B values, select Red, Green, or Blue from the Edit Curve box, and then drag the vertical reference white or reference black line left or right.

(a) Highlight line (b) Reference White line (c) Edit Curve box
Tip: If you already entered independent values and want to modify the R, G, and B values proportionally, you must drag the reference white or reference black line that corresponds to the corresponding channel. To view the selected R, G, or B luma values as a greyscale luma image in the Import Image menu, enable the Exclusive button.
Modifying Highlights and Shadows
Highlight and shadow values define the maximum and minimum values permitted for each channel. All values above the highlight are clamped down to it. Similarly, all values below the shadow are clamped up.
To modify highlight and shadow values using the Highlights and Shadows fields:
- Do one of the following:
- To set proportional R, G, and B values, enable Prop and enter a value in one of the (left-to-right) R, G, and B Highlights and Shadows fields.
- To set independent R, G, or B values, disable Prop and enter the value in the corresponding (left-to-right) R, G, or B Highlights and Shadows fields.
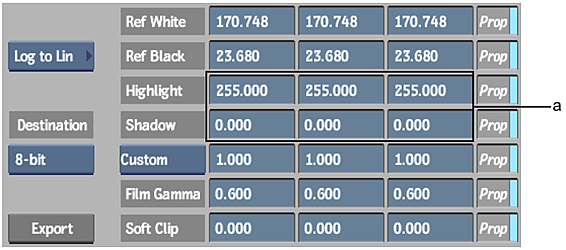
(a) Highlight/Shadow fields
To modify highlight or shadow values using the LUT Editor graph:
- Do one of the following:
- To set proportional R, G, and B values, select All from the Edit Curve box, and then drag the horizontal highlight or shadow line up or down.
- To set independent R, G, or B values, select Red, Green, or Blue from the Edit Curve box, and then drag the horizontal highlight or shadow line up or down.
Modifying the Gamma of the Conversion Curve
Set the gamma correction value to correspond to the display gamma you set your system to use. You can select a preset from the Gamma Correction box or enter a custom value.
To modify the gamma correction curve using the Gamma Correction fields:
- Select an option from the Gamma Correction box.
(a) Gamma Correction fields (b) Gamma Correction box
Select: To: Video Display Set video gamma correction presets. Custom Enter custom gamma values. - If you selected Custom, do one of the following:
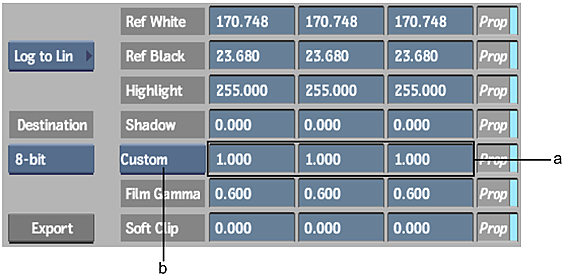
- To set proportional custom R, G, and B gamma correction values, enable Prop, and then enter the value in one of the (left-to-right) R, G, and B Gamma Correction fields.
- To set independent custom R, G, or B gamma correction values, disable Prop, and then enter the value in the corresponding (left-to-right) R, G, or B Gamma Correction field.
To modify the gamma correction curve using the LUT Editor graph:
- Do one of the following:
- To modify the combined R, G, and B gamma correction curves proportionally, select All from the Edit Curve box, and then drag the gamma correction curve left or right.
- To set independent R, G, or B values, select Red, Green, or Blue from the Edit Curve box, and then drag the gamma correction curve left or right.
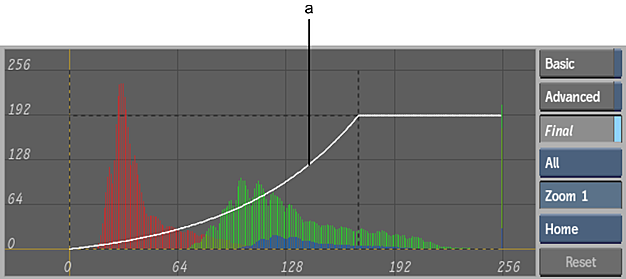
(a) Gamma correction curve
Modifying the Gamma of the Incoming Film Negative
The values in the Film Gamma fields affect the gamma correction curve inversely to the Gamma Correction fields. This is because the gamma correction performed using these controls is based on the gamma of the original film negative. Typically, the gamma of a film negative is 0.6. Only adjust this value if your film negative is of a non-standard gamma. You should not have to modify this value by very much.
To modify the gamma correction curve using the Film Gamma fields:
- Do one of the following:
- To set proportional custom R, G, and B gamma correction values, enable Prop and then enter the value in one of the (left-to-right) R, G, and B Film Gamma fields.
- To set independent custom R, G, or B gamma correction values, disable Prop and then enter the value in the corresponding (left-to-right) R, G, or B Film Gamma field.
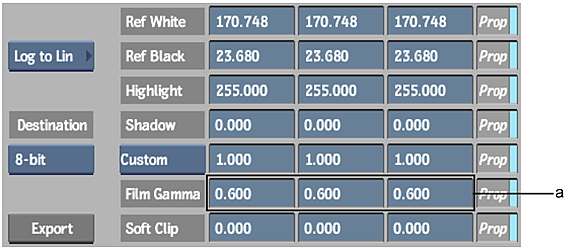
(a) Film Gamma fields
Adjusting the Softclip Values
You can soften the shoulder of the gamma correction curve by adjusting the Softclip values. When you soften the shoulder of the conversion curve, you soften the transition of colours toward the reference white value. This results in less harsh highlights in your clip.
To soften the shoulder of the gamma correction curve using the Softclip fields:
- Do one of the following:
- To set proportional custom R, G, and B gamma correction values, enable Prop, and then enter the value in one of the (left-to-right) R, G, and B Softclip fields.
- To set independent custom R, G, or B gamma correction values, disable Prop, and then enter the value in the corresponding (left-to-right) R, G, or B Softclip field.
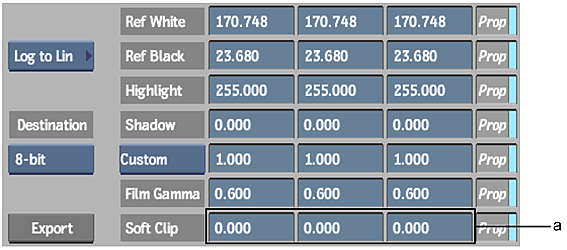
(a) Soft Clip fields
To soften the shoulder of the gamma correction curve using the LUT Editor graph:
- Do one of the following:
- To soften the shoulder of the combined R, G, and B gamma correction curves proportionally, select All from the Edit Curve box, and then Shift-drag the gamma correction curve left or right.
- To soften the shoulder of the R, G, or B curves separately, select Red, Green, or Blue from the Edit Curve box, and then Shift-drag the gamma correction curve left or right.
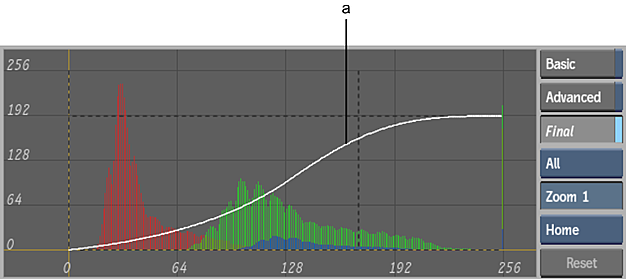
(a) Softened shoulder