Use Batch or Batch FX to assemble a series of creative finishing tasks using nodes. Each node represents a specific Flame Premium function. Connect clips with nodes and use the result of one node as the source for the next. The assembled result Batch or Batch FX in the schematic builds a process tree from left to right, processing as many output clips as needed.
A process tree begins with a clip, contains at least one node, and ends with a Render, Write File, or BFX Output node (a BFX tree invariably ends with a BFX Output node).
While working in Batch or Batch FX, the Timeline tab can be accessed to edit the clip and add Timeline FX.
Adding additional clips and nodes to achieve the desired result. As the schematic pipelines become larger, group nodes or add notes to nodes to manage any clutter.
About Nodes
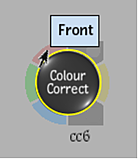
Nodes have one or more colour-coded input and output points (also called tabs) used for connecting to clips and to other nodes. All nodes have an output tab. For example, a Colour Correct node can accept a Front, Matte, and Back connection, whereas an Auto Matte node accepts a Front input.
When adding nodes, connect them to the process tree by linking the result from one node and using it as a source (front, matte, or back) for the next node in the process tree. Nodes can also be connected by linking backward from the source of one node to the output of another (to reuse a node’s output).
To connect nodes, use the coloured tabs on the node's left side known as source tabs. The colours of the source tabs represent different input types. The yellow tab on the right side of the node is called the Result tab (for some nodes, a blue tab is also present on the right side, this is the OutMatte tab). Use the Result tab of a node to connect its result to the input tab of another node.
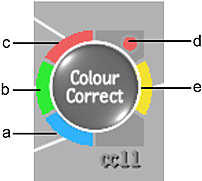
This is a typical node tab configuration. Some nodes have specific tabs related to their function (such as the forward vector tab on the Pixel Spread node).

(a) Matte tab (b) Back tab (c) Front tab (d) Warning tab (e) Result tab

| Colour | Tab | Description |
|---|---|---|
| Red | Front | Connects a front clip to a node. |
| Green | Back | Connects a back clip to a node. |
| Blue | Matte | Connects a matte clip to a node. |
| Light Blue | Misc | Miscellaneous tab specific to certain nodes, such as a Z-Depth or Forward Vector input. |
| Turquoise | Audio | Connects a clip with audio to a Render node. |
| Yellow | Result | Connects the result of a node to other nodes. |
| Blue | Output Matte | Connects the output matte of a node to other nodes. |
| Red circle | Warning | Warns that clip input to this node is unconnected or is missing media, or clips parented to this node do not share the same resolution or a compatible bit-depth. See Adding Clips to the Process Tree. |
The available source tabs depend on the node. If the node accepts a front, back, and matte clip, all coloured source tabs are available. If the node only accepts a front clip, the red source tab is available and the other source tabs are grey. When a source tab or Result tab is not connected to a clip or to another node, the coloured tabs are dimmed.
Blend Nodes
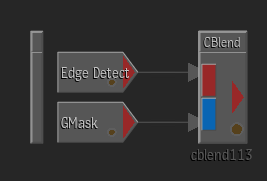
Colour Blend (CBlend) and Matte Blend (MBlend) nodes look and behave differently from other Batch or Batch FX nodes.

Blend nodes are used extensively in the Modular Keyer. See Using Blend Nodes for more information.