Once you have added softness, check to see if there are any grey areas in the key resulting from the setting. If so, there are several techniques to remove the grey areas:
- Perform negative sampling on the areas.
- Use patches.
- Use garbage masks.
- Manipulate the softness element in the RGB viewer.
- Use the Softness fields.
In this section, two methods are shown: using Negative Sampling to refine the softness range, and using the Patch tool to create “selective keys” in the white areas of the matte. To learn other ways to remove unwanted grey areas, see Techniques for Adjusting Softness.
Negative Sampling
This is probably the simplest method of removing greys from the matte. You sample in the unwanted grey area to subtract those colour values from the softness range.
Try this method first to see if it solves the problem. However, if the colour values in the foreground subject are too similar to those at the edges, you may remove too much of the softness.
To perform negative sampling:
- From the View box, select the current result view (displayed as <Currently Selected Node> Result, in the View box). Identify the unwanted grey areas in the matte.
- Select Sample Softness from the Sampling box.
- Press Alt and click a grey area. Gently drag the cursor over the area.
If the negative sampling removed too much of the desired softness or brought back graininess, click Undo and try another method.
Adding a Patch
Patches are another type of sample you can take in the image window. Unlike tolerance and softness, you can specify the colour that a patch sample renders on the matte. Patch samples can be rendered as white, black, or any shade of grey on the matte. You can also set the opacity of a patch.
One use for patches is to remove unwanted grey areas from the matte. Use a patch to isolate a range of colours from those that have been included in the softness range, then set the colour you want the pixels to have on the matte. Sampling a patch to remove grey areas in the key is similar to creating a garbage mask by keying instead of drawing.
You can use up to three different patches in a key.
To sample a patch:
- From the View box, select the current result view (displayed as <Currently Selected Node> Result, in the View box).
- Identify the unwanted grey areas in the matte.
- In the Sampling box, set the sample type to Patch1.

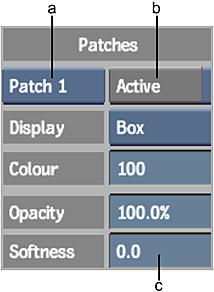
- In the Patches box, select Patch 1.

(a) Patches box (b) Active button (c) Patches Softness field
- Enable Active.
- Specify the colour in which you want to render the patch. In this example, make the patch white by setting the P1(Patch 1) Colour to 100 (this is the default value). To render the sampled values as black, enter a value of 0. Use a value between 0 and 100 for any shade of grey.
- Sample the unwanted grey area by dragging the cursor over it.
The grey areas of the matte corresponding to the colour values sampled are changed to white.
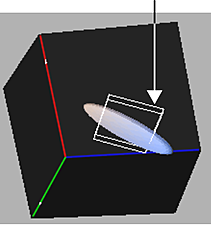
All the colour values sampled are included in the patch. Notice the patch in the RGB viewer, represented by a white wireframe box. All colour values in the box will be rendered white on the matte.

- If necessary, sample again to add to the patch. Watch the edges to make sure they are not affected by the sample. Tip: To remove colour values from the sample, press Alt as you sample. To undo a sample, click Undo.
- If needed, soften the edges of the patch by dragging the cursor to the right or left in the Patches Softness field.
A negative softness value softens the edges of the patch inwards from the edge. A positive value softens the edges outwards beyond the edge, adding softened pixel values to the patch.
Tip: You can view softness as a red wireframe box when the patch is displayed in Box mode. See GUID-3A776674-0171-4EF4-8763-018901CFD322.htm#WSCBA3EE2B36D8CB6F7AF539341162BE3A0C5-7FE7. - If needed, adjust the opacity of the patch using the P1 Opacity field A value of 100% renders the patch as fully opaque. A value of 0% renders the patch as fully transparent.
The RGB viewer now contains three key elements:
- The tolerance sample (as an ellipsoid)
- The softness sample (as an ellipsoid)
- The patch (as a white wireframe box)
For instructions on completing the key using the basic keying technique, see the sections referred to in 3D Keying Workflow.