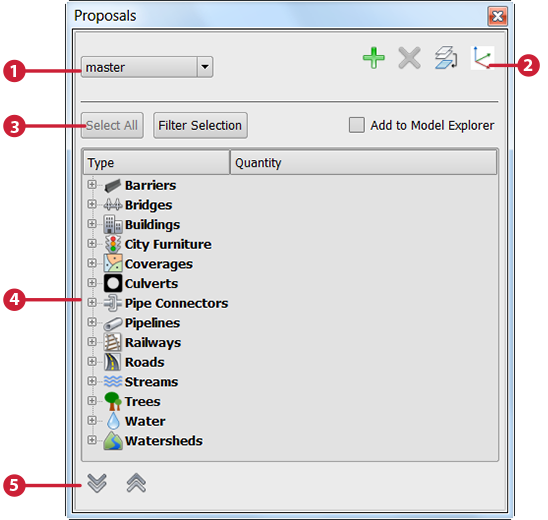
Use the Proposals Manager to view information about all proposals, including your original model.

The elements in the Proposals Manager panel are:
- Proposals List — Select the proposal on which you want to work. The master (original) model, as well as all proposals you've created in that model, are listed.
- Tool Strip — These options affect individual proposals.
Icon Name Description 
Add New Proposal Add a proposal to the master. The new proposal is based on the previous one: it initially contains all the same features as the proposal that was active when you added it. All proposals are stored with the master—think of them as different views of the same data.

Remove Current Proposal Delete the current proposal. Any features you created in that proposal are also deleted.

Merge Proposals Merge two proposals, combining their changes. If any of the features conflict, the conflicts are outlined in red. To delete the conflicts, select the relevant objects and press Delete.
Once you decide on a final proposal, you can merge it with the master. See To merge proposals.

Toggle 2D/3D Sketch Display Switch between viewing in two or three dimensions.
- Selection Buttons — Highlight features in the model, and add them to the Model Explorer, if desired.

To select all features that you added to the current proposal (either by sketching or by importing), click Select All. If you have a current selection set that includes proposed features as well as master features, click Filter Selection to show only the members of that selection set that you added to the current proposal. 
By default, proposed features appear in the Proposals Manager, but not in Model Explorer. To add proposed features to Model Explorer, highlight them and select Add To Model Explorer. Note: Once features are added to the Model Explorer, you cannot remove them from the Model Explorer. Removing them in the Model Explorer removes them from the model altogether. - Features List — Once you sketch new features, they appear in the list under their feature type. For each feature, basic information (such as the number of items you added and removed and their total area or length) is listed. To see more information for roads, railways, and buildings, expand the Details entry. To see the details for a particular road, railway, or building, click its ID value (under Details).
- Data Source List — Use the
 (Expand All) and
  (Collapse All) arrows to display each data source or collapse the list to show only feature type titles. Once you collapse the list, you can expand individual feature types.
 Right-click any data source to see relevant options.