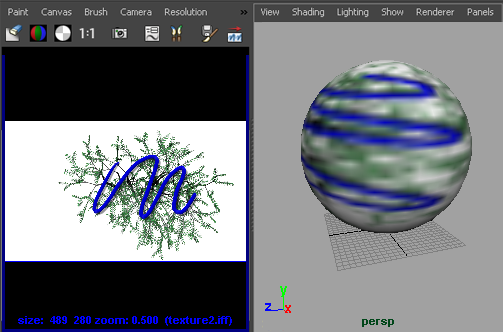
Although you can use the 3D Paint Tool to modify a texture by painting directly on the surfaces the texture is applied to, you can also modify the texture in the canvas and immediately see the effects on the surfaces.

To modify a texture applied to a surface
- Apply the file texture to the surface. For details, see Map and position textures.
- Open Hypershade, if it is not already open ().
- Using the middle mouse button, drag the applied file texture onto the canvas.
Tip:
To paint on Maya textures (for example, checker or fractal), select the surface the texture is on and in Hypershade, Shift-select the texture. Still in Hypershade, select . Now drag the converted file texture onto the canvas.
- Select and turn off Save Alpha.
- Set Paint Effects to save the canvas after each stroke ( or click the folder icon on the toolbar).
- Change your layout to display both the canvas and a view of your scene (for example, ).
- In the scene view, turn on
Hardware Texturing ().
Tip:
To improve the display quality of the texture, open the Attribute Editor for the shader, expand Hardware Texturing, and change the Texture resolution to the desired setting. On Windows, you may need to set the quality to something other than Default to see the texture update.
- Paint on the canvas (see
Paint on the canvas). The texture updates on the surfaces it is applied to each time you release the mouse button.
Tip:You can paint attributes that you can’t see through Hardware Texturing (for example, bump, incandescence, transparency) and see the effect on the surface it’s applied to using IPR.
- Assign a texture to the required attribute of the shader and apply the shader to the surface. For details, see Assign materials to surfaces.
- In Hypershade, use the middle mouse button to drag the texture node onto the canvas.
- Set Paint Effects to save the canvas after every stroke.
- Do an IPR render of the surface and select the area you want to view. For details, see About Interactive Photorealistic Rendering (IPR).
- Paint on the canvas.