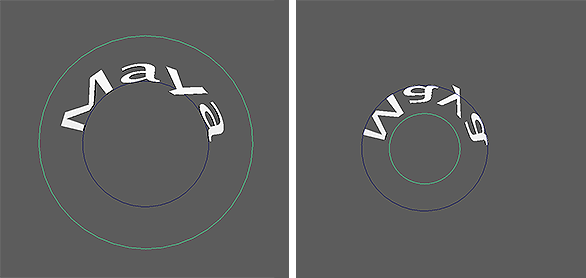
The Curve Warp deformer allows you to stretch or animate an object along a curve. You can access it from a number of different places:
- In the Modeling and Rigging menu sets:
- In the Animation menu set:
Curve Warp
- Curve
-
Displays the curve being used as input. You can middle-drag a curve into this field or right-click to connect the selected curve. If a curve is already connected, you can also right-click to remove or show it in the Outliner.
- Aim Curve
-
Displays the curve that the geometry is being pointed towards when Aim is set to Aim Curve. You can middle-drag a curve into this field or right-click to connect the selected curve. If a curve is already connected, you can also right-click to remove or show it in the Outliner.

- Aim
-
Specifies the orientation of the object being deformed. Options include:
- Auto Normals: Automatically determines how to orient the mesh based on its normals.
- Curve Normals: Orients the mesh along the curve's normals at each control point.
- Aim Curve: Orients the mesh towards a specified curve.
- Aim Curve Mode
-
Specifies what aspect of the aim curve is used to orient the geometry when Aim is set to Aim Curve. Options include:
- U Value: Samples the corresponding U values of both the input and aim curves, then uses the line between them as the geometry's up vector. This is the fastest method of evaluation.
- Closest Point: When sampling each U value of the input curve, this uses the corresponding closest CV on the aim curve to determine the geometry's up vector. This method is easier to work with but slower than U Value.
- Alignment
-
Specifies the axis on which the mesh is aligned relative to the curve it is being deformed along.
- Flip Axis
-
Inverts the Alignment axis.
- Envelope
-
Controls falloff from the meshes original shape to its deformed shape on the curve. Use this attribute to blend between them.
- Offset
-
Determines how far along the curve to offset the mesh. Increasing this value moves the mesh along the curve. You can also set this value below 0 or above 1 to have the mesh carry on beyond the start/end of the curve.
- Keep Length
-
Keeps the length of the input mesh. If you disable this, the mesh will always stretch to fill the entire length of the curve.
Mesh Scaling
- Length Scale
-
Scales the mesh based on a percentage of the curve's length.
- Max Scale
-
Scales the mesh along its non-length axes.
Scale Curve
This graph allows you to customize the shape of the Max Scale.
Curve Rotation
- Rotation
-
Determines the overall rotation of the mesh around the curve's length.
- Twist Rotation
-
Determines the amount of additional twist to apply to the mesh round the curve's length.
Twist Curve
This graph allows you to customize the shape of the twist applied by the Twist Rotation.