Use these options to set what happens when you select the .
Brush
- Size
-
Sets the radius of the tool.
Hotkeys: B + drag or MMB-drag left/right to adjust the brush size. B + MMB-drag left/right or Ctrl + MMB-drag left/right to adjust the brush size from 0.
Tip: Click the pin icon to save the
Brush Size setting for the selected tool. All the other tools' unpinned
Brush Size settings share the same value.
- Size Units
- Lets you set the size of sculpting tool using screen space or world space units. By default, size is measured in world space units (for example, a default Size of 100 = a radius of 100 centimeters). When Screen Pixels is selected, size is measured in screen space based pixels.
- Strength
-
Determines how much the tool affects the surface. Depending on the tool, this value represents either a percentage of the maximum power available or a height expressed in world space units.
Hotkeys: M + drag or MMB-drag up/down to adjust the brush strength. M + MMB-drag up/down or Ctrl + MMB-drag up/down to adjust the brush strength from 0.
- Lock Shell Border
- Mirror
-
Reflects a stroke from one side of a model to the other, along the specified axis. See Sculpt using symmetry.
Note: The Mirror setting persists when you reopen your scenes.
- Off
-
Strokes are not reflected.
- Object X
-
Reflects strokes across the local space X-axis.
- Object Y
-
Reflects strokes across the local space Y-axis.
- Object Z
-
Reflects strokes across the local space Z-axis.
- World X
-
Reflects strokes across the world space X-axis.
- World Y
-
Reflects strokes across the world space Y-axis.
- World Z
-
Reflects strokes across the world space Z-axis.
- Spacing
-
Controls the stamp frequency/continuity on a stroke. Depending on the Size and Falloff settings for a tool, the Spacing can be set to a higher value to refine the tool behavior and improve the appearance of the stroke. The default setting is 6.25 and ranges between 0 and 100. The higher the setting, the more gaps appear on the stroke, depending on the tool settings.
- Steady Stroke
-
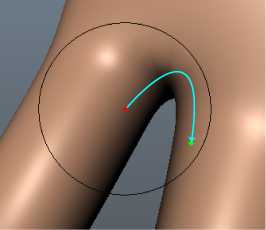
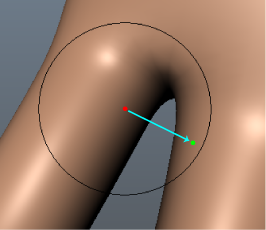
Helps to produce a smoother stroke by filtering mouse/stylus movement. When on, a vector displays on the tool cursor and no stroke appears until you drag a distance equal to the length of the vector. The length of the vector is set by the Distance setting. See Produce smooth tool strokes.
- Distance
-
Sets the length of the Steady Stroke vector on the tool cursor.
Falloff
Lets you specify how the tool effect diminishes (or not) from its center point to its outer edge. The falloff is represented as a curve that can be edited. See also Adjust sculpting tool falloff.
- Type
- Falloff controls how the sculpting tool's strength diminishes from the center of the brush towards its outer edge. The sculpting tool assigns a falloff value to each vertex within the brush's radius depending on its distance from the center point. The farther a vertex is from the center point, the more falloff is applied. The following falloff types use different methods to measure this distance, and produce unique results.
- Surface/Volume
- (Default) Surface/Volume is a combination of the other two falloff types. To determine which vertices to affect, the brush walks along the surface until it reaches the end of the surface or the edge of its radius, whichever comes first. To determine the falloff values of each vertex, the brush draws a straight line from the center of the brush to each vertex.
- Surface
- The brush measures distance by starting at its center point and walking along the surface to find vertices. It searches for vertices until it reaches the end of the surface or the edge of the brush's radius, whichever comes first. Vertices are assigned a falloff value depending on how far away they are from the center point. Surface falloff is useful when you want the sculpting tool to conform to a surface. For example, you can separate the upper lip from the bottom lip on a character's face using this falloff type.
 Note: Sculpting with Surface falloff may result in a slower performance than sculpting with the other falloff types.
 - Volume
-
The brush measures distance by drawing a straight line from the center of the brush to each vertex within the brush radius. Vertices are assigned a falloff value depending on how far away they are from the center point. Volume falloff affects all the meshes that are within the brush radius, even if there is no bridge between separate meshes.

- Falloff curve
- Controls the profile (cross-section) of sculpting tools. The falloff curve determines how the tool strength diminishes from the center towards its outer edge. Depending on how you set the falloff, your sculpt strokes can feather off gently, blending smoothly with the surrounding surface, or appear with a sharp edge. See Adjust sculpting tool falloff.
- Snap to Grid
-
Constrains points to the Falloff curve grid.
- Reset Curve
- Resets the falloff curve to its default shape.
- Save Custom Curve
- Saves the current falloff curve to the Custom Curve presets in the Tool Settings.
- Preset Curve
- Lets you quickly set the Falloff curve by selecting from frequently used shapes.
- Custom Curve
- Lets you quickly set the
Falloff curve by selecting from custom shapes.
Ctrl-click a custom curve image to delete it.
Stylus
- Min Brush Size
-
Specifies how small the tool is when the lightest pressure is applied to the pen, expressed as a percentage of the tool’s Size setting. For example, a Min Brush Size % of 100 indicates there is no size variance, regardless of the pressure applied.
- Min Brush Strength
-
Specifies how weak the tool strength is when the lightest pressure is applied to the pen, expressed as a percentage of the tool's Strength value. For example, a Min Brush Strength % of 100 indicates there is no strength variance, regardless of the pressure applied.
Display
- Orient brush to surface
-
Orients the tool cursor display (in the 3D View) along the normal of the face under the center of the tool's radius. This setting Influences cursor display only, and does not influence the effect of the brush on the surface.
- Show wireframe
- When on, the model's wireframe is displayed while you sculpt.
- Show frozen
- When on (default), displays areas of the mesh that are frozen. See
Freeze regions on a model.
Note: Per-face shader assignments and per-vertex colors are not visible when Show Frozen is on.