The orientation and location of the point cloud's origin can affect navigation and editing in several ways. The most common reason for changing the origin is for working in large-scale point clouds such as aerial views in which the scans are miles apart.
***Note*** You can also reset the Z axis in the Preferences dialog box, General tab.
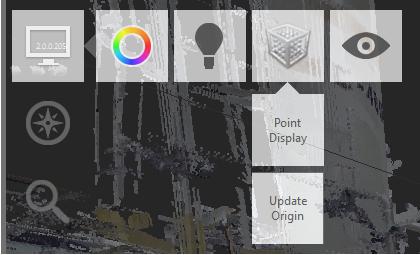
On the Project screen, hover over Display Settings > Points > Update Origin.
In the point cloud, click the new origin point and press the Tab key. A blue disk graphic indicates the plane that is perpendicular to the current Z axis (which indicates the "up" direction).

Axes Direction
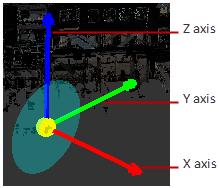
You can reorient the "up" direction and ground plane rotation at the same time you change the origin.
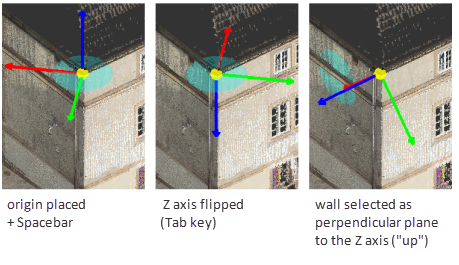
- · Click a planar area in the point cloud to serve as the ground plane. The Z axis will extend orthogonally from this plane.
- · Press the Alt key to flip the Z axis in the opposite direction.
To change the orientation of the X axis, use one of the following methods and press Enter:
- · Click a planar area in the point cloud. The X axis will extend orthogonally from this plane.
- · Press the Alt key to flip the X axis in the opposite direction.
Set the Direction of the Positive Z Axis (Preferences)
You can modify the orientation of the point cloud, including its grid, by specifying a new axis to represent Z, or "up." Changing the setting reorients the grid display.
On the Project tile menu, hover over Home and click Preferences.
In the Preferences dialog box, under Up Direction, select an axis and direction that you want to represent the "up" direction.
For example, if you specify -z, the point cloud flips upside-down from its current orientation.
Limit the Angle of Rotation
You can control the angle of rotation to prevent the scene from turning upside-down as you orbit.
On the Project tile menu, hover over Home and click Preferences.
In the Preferences dialog box, under Up Direction, select Keep Scene Upright.