Walkthrough: Hello World
Use the Revit Platform API and C# to create a Hello World program using the directions provided. For information about how to create an add-in application using VB.NET, refer to Hello World for VB.NET .
The Hello World walkthrough covers the following topics:
- Create a new project.
- Add references.
- Change the class name.
- Write the code
- Debug the add-in.
All operations and code in this section were created using Visual Studio 2012.
Create a New Project
The first step in writing a C# program with Visual Studio is to choose a project type and create a new Class Library.
- From the File menu, select New
 Project….
 - In the Installed Templates frame, click Visual C#.
- In the right-hand frame, click Class Library (see Figure 1: Add New Project below). This walkthrough assumes that the project location is: D:\Sample.
- In the Name field, type HelloWorld as the project name.
- Click OK.
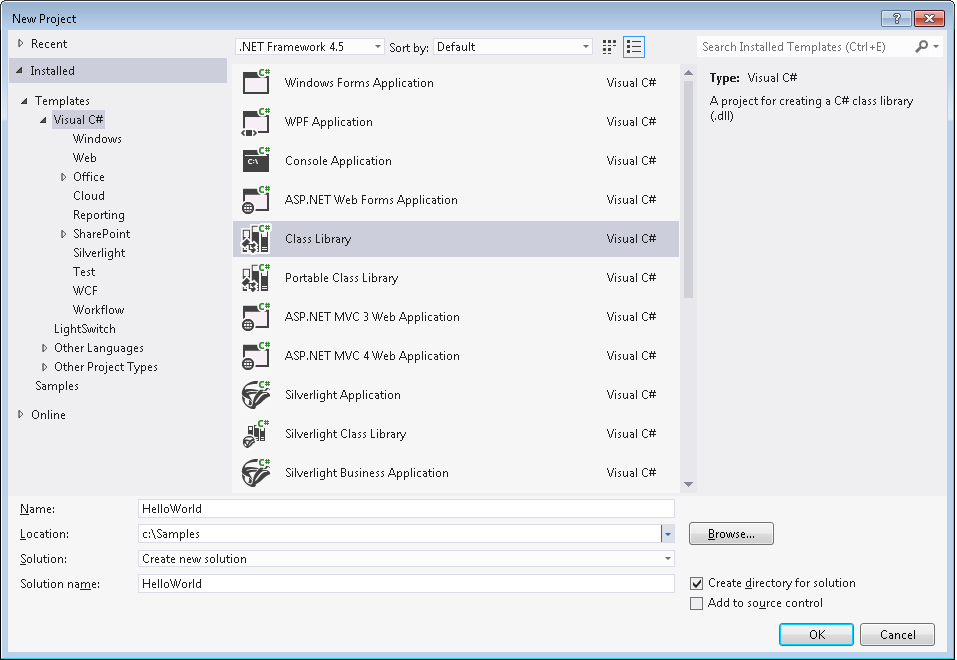
Figure 1: Add New Project
Add References
- To add the RevitAPI reference:
- From the View menu select Solution Explorer if the Solution Explorer window is not open.
- In the Solution Explorer, right-click References to display a context menu.
- From the context menu, click Add Reference. The Add Reference dialog box appears.
- In the Add Reference dialog box, click the Browse tab. Locate the folder where Revit is installed and click the RevitAPI.dll. For example, the installed folder location is usually C:\Program Files\Autodesk\Revit 2016\RevitAPI.dll.
-
Click OK to select the .dll and close the dialog box. RevitAPI appears in the Solution Explorer reference tree.
- Note: You should always set the Copy Local property of RevitAPI.dll to false for new projects. This saves disk space, and prevents the Visual Studio debugger from getting confused about which copy of the DLL to use. Right-click the RevitAPI.dll, select Properties, and change the Copy Local setting from true (the default) to false.
-
Repeat the steps above for the RevitAPIUI.dll.
Add Code
Add the following code to create the add-in:
|
Code Region 2-1: Getting Started |
using System;
using Autodesk.Revit.UI;
using Autodesk.Revit.DB;

namespace HelloWorld
{
   [Autodesk.Revit.Attributes.Transaction(Autodesk.Revit.Attributes.TransactionMode.Manual)]
   public class Class1 : IExternalCommand
   {
      public Autodesk.Revit.UI.Result Execute(ExternalCommandData revit,
         ref string message, ElementSet elements)
      {
         TaskDialog.Show("Revit", "Hello World");
         return Autodesk.Revit.UI.Result.Succeeded;
      }
   }
}
|

Figure 2: Using Intellisense to Implement Interface
Every Revit add-in application must have an entry point class that implements the IExternalCommand interface, and you must implement the Execute() method. The Execute() method is the entry point for the add-in application similar to the Main() method in other programs. The add-in entry point class definition is contained in an assembly. For more details, refer to Add-in Integration.
Build the Program
After completing the code, you must build the file. From the Build menu, click Build Solution. Output from the build appears in the Output window indicating that the project compiled without errors.
Create a .addin manifest file
The HelloWorld.dll file appears in the project output directory. If you want to invoke the application in Revit, create a manifest file to register it into Revit.
- To create a manifest file, create a new text file in Notepad.
- Add the following text:
Code Region 2-2: Creating a .addin manifest file for an external command
<?xml version="1.0" encoding="utf-8" standalone="no"?> <RevitAddIns> <AddIn Type="Command"> <Assembly>D:\Sample\HelloWorld\bin\Debug\HelloWorld.dll</Assembly> <AddInId>239BD853-36E4-461f-9171-C5ACEDA4E721</AddInId> <FullClassName>HelloWorld.Class1</FullClassName> <Text>HelloWorld</Text> <VendorId>NAME</VendorId> <VendorDescription>Your Company Information</VendorDescription> </AddIn> </RevitAddIns> - Save the file as HelloWorld.addin and put it in the following location:
- C:\ProgramData\Autodesk\Revit\Addins\2016\
- If your application assembly dll is on a network share instead of your local hard drive, you must modify Revit.exe.config to allow .NET assemblies outside your local machine to be loaded. In the "runtime" node in Revit.exe.config, add the element <loadFromRemoteSources enabled="true"/> " as shown below.
<runtime>
        <generatePublisherEvidence enabled="false" />
        <loadFromRemoteSources enabled="true"/>
</runtime>
Refer to Add-in Integration for more details using manifest files.
Debug the Add-in
Running a program in Debug mode uses breakpoints to pause the program so that you can examine the state of variables and objects. If there is an error, you can check the variables as the program runs to deduce why the value is not what you might expect.
- In the Solution Explorer window, right-click the HelloWorld project to display a context menu.
- From the context menu, click Properties. The Properties window appears.
- Click the Debug tab.
- Under the Start Action section, click Start external program and browse to the Revit.exe file. By default, the file is located at the following path, C:\Program Files\Autodesk\Revit 2016\Revit.exe.
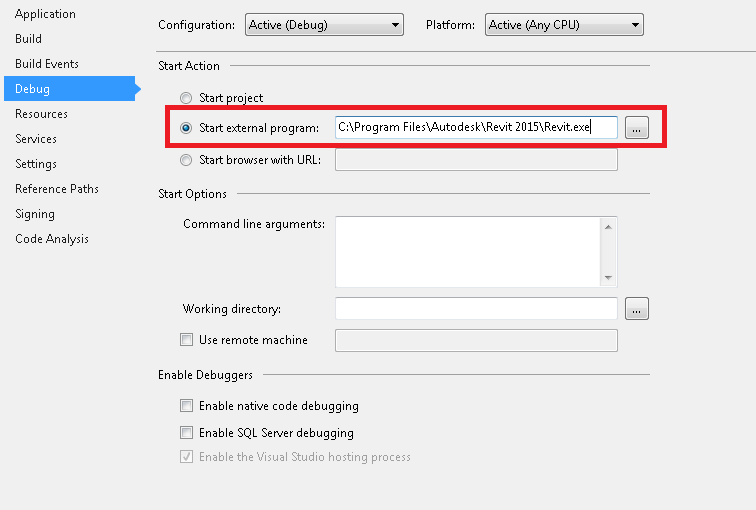
Figure 3: Set debug environment
- From the Debug menu, select Toggle Breakpoint (or press F9) to set a breakpoint on the following line.
TaskDialog.Show("Revit", "Hello World"); - Press F5 to start the debug procedure.
Test debugging:
- On the Add-Ins tab, HelloWorld appears in the External Tools menu-button.

Figure 4: HelloWorld External Tools command
- Click HelloWorld to execute the program, activating the breakpoint.
- Press F5 to continue executing the program. The following system message appears.
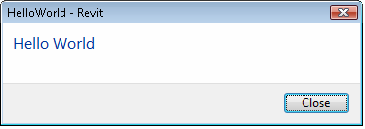
Figure 5: TaskDialog message
Troubleshooting
Q: My add-in application will not compile.
A: If an error appears when you compile the sample code, the problem may be with the version of the RevitAPI used to compile the add-in. Delete the old RevitAPI reference and load a new one. For more details, refer to Add Reference.
Q: Why is there no Add-Ins tab or why isn't my add-in application displayed under External Tools?
A: In many cases, if an add-in application fails to load, Revit will display an error dialog on startup with information about the failure. For example, if the add-in DLL cannot be found in the location specified in the manifest file, a message similar to the following appears.
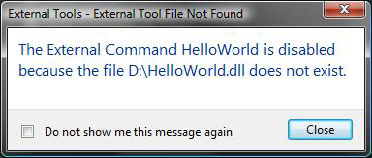
Figure 6: External Tools Error Message
Error messages will also be displayed if the class name specified in FullClassName is not found or does not inherit from IExternalCommand.
However, in some cases, an add-in application may fail to load without any message. Possible causes include:
- The add-in application is compiled with a different RevitAPI version
- The manifest file is not found
- There is a formatting error in the .addin manifest file
Q: Why does my add-in application not work?
A: Even though your add-in application is available under External Tools, it may not work. This is most often caused by an exception in the code.
Revit will display an error dialog with information about the exception when the command fails.
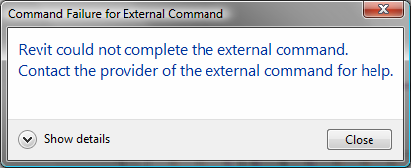
Figure 7: Unhandled exception in External Command
This is intended as an aid to debugging your command; commands deployed to users should use try..catch..finally in the example entry method to prevent the exception from being caught by Revit. Here's an example:
|
Code Region 2-4: Using try catch in execute: |
public IExternalCommand.Result Execute(ExternalCommandData commandData, ref string message, ElementSet elements)
{
        ExternalCommandData cdata = commandData;
        Autodesk.Revit.ApplicationServices.Application app = cdata.Application;

        try
        {
                // Your code here
        }

        catch (Exception ex)
        {
                message = ex.Message;
                return Autodesk.Revit.UI.Result.Failed;
        }
                return Autodesk.Revit.UI.Result.Succeeded;
}
|