Perform an energy analysis based on the conceptual masses in the model.
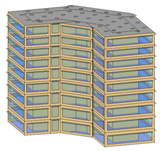
- Create a mass model.
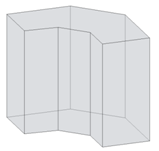
You can load a mass family into a project for simulation or create an in-place mass directly in a project.
Note: Overlapping masses cannot be analyzed. If the analysis tool detects the presence of overlapping masses, the software displays an ignorable error, and the masses are joined to allow you to analyze the mass model. - Create mass floors.
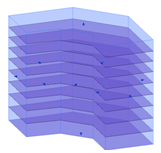
- Decide how you will perform thermal zoning in the mass model.
- Automatic zones include basic perimeter zones and a core zone. In Step 5, you will use the Perimeter Zone Depth and Perimeter Zone Division parameters to create automatic zones.
- Custom zones allow you to refine the energy simulation to more closely reflect the design intent. To create a custom zone, modify the mass model, create a form to describe the desired zone, and use the Cut Geometry tool to incorporate that form into the mass model. Then continue with Step 4.
- Automatic zones include basic perimeter zones and a core zone. In Step 5, you will use the Perimeter Zone Depth and Perimeter Zone Division parameters to create automatic zones.
- Modify energy settings.
- Click Analyze tab
 Energy Analysis panel
 (Energy Settings).
- For Location, specify the geographic location of the model and select a weather station.
- For Mode, select Use Conceptual Masses.
- Optional: Specify values for Ground Plane and Project Phase.
- If you are using automatic zones (see Step 3):
- For Perimeter Zone Depth, specify a linear dimension to create a building core, or specify 0 (zero) if no core is desired.
- Select Perimeter Zone Division to divide each mass floor into 4 equal, quadrant-based zones.
- Click OK.
- Click Analyze tab
- Create the energy model: Click Analyze tabEnergy Analysis panel
 (Create Energy Model).
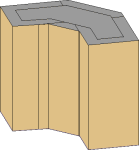
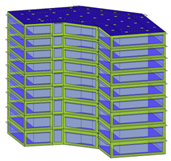
The software detects the mass floors in the model and uses them to create zones and assign mass subcategories, which use conceptual types for thermal properties.
 Note: If you change the Revit model, delete and re-create the energy model to reflect the changes.
 - (Optional) Modify the instance properties for automatically applied glazing.
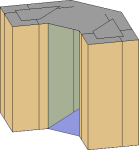
For example, to reduce the amount of glazing on the south or west face of the building:
- Click Massing & Site tabConceptual Mass panel
 (Show Mass Surface Types).
- In the drawing area, place the cursor at the edge of the Mass Exterior Wall surface to modify, press Tab until the surface is highlighted, and click the surface to select it.
- On the Properties palette, under Energy Model, for Values, select <By Surface>.
- For Target Percentage Glazing, specify a lower percentage to reduce the glazing, or enter 0 (zero) to eliminate it.
- Click Massing & Site tab
- Sign in to
Autodesk® A360.
Click Sign in
Sign in to
Autodesk® A360. Enter your Autodesk ID and password.
- Display a 3D view of the model, and click Analyze tabEnergy Analysis panel
 (Run Energy Simulation).
- In the Run Energy Simulation dialog, do the following:
- For run name, specify a name for the analysis.
- Under
Green Building Studio Project, do the following:
- If you are running the energy simulation for the first time or if you changed any energy settings (including the location) for the
Revit model, select
Create New.
This option ensures that the latest Revit settings are used for the energy simulation.
- If you did not change any energy settings since the last energy simulation for this model or if you created a GBS project with pre-defined settings to use for this simulation, select
Use Existing and specify the GBS project to use.
Settings in the existing GBS project override any changes made to energy settings in the Revit model.
For more information, see Specify the GBS Project for Energy Analysis.
- Click Continue to run the simulation.
- If you are running the energy simulation for the first time or if you changed any energy settings (including the location) for the
Revit model, select
Create New.
The current view displays mass zones and mass shades, and it temporarily dims elements that are not included in the analysis.
The software checks to ensure that the model contains at least one mass floor, has a known geographic location, and that an energy model has been created. If these conditions are not met, a dialog notifies you of the conditions and automatically fixes them to allow the simulation to proceed. If the dialog displays, click Yes.
If there are no error conditions, a gbXML file is created and sent for simulation. The server returns the simulation results to Revit, where they are displayed in the Results and Compare dialog.
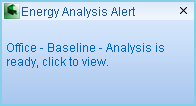
- When the simulation is complete, an alert displays. Click the analysis name in the alert to view the analysis results.
Or, in the Energy Analysis panel, click
 Results & Compare, and select the analysis from the project tree.
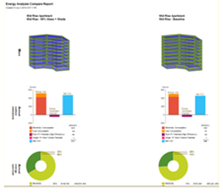
- View the analysis results in the Results & Compare pane.
- (Optional) To refine the energy analytical model, modify the mass model and energy settings as needed, and then repeat steps 5–10 to run an analysis on the modified model.
To compare results, select multiple analysis results and click Compare on the toolbar.
- (Optional) Open results in Green Building Studio, or export results for use in another application.