Perform an energy analysis based on the building elements that comprise the model.
If the model includes conceptual masses, they are used as shading objects in the energy analysis.
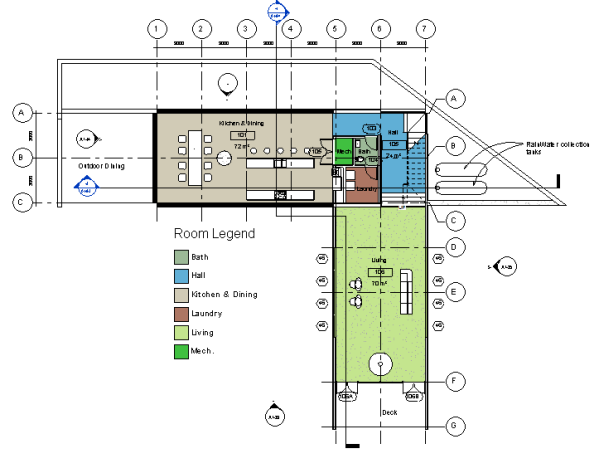
- Create the
Revit building model.
- Click Analyze tab
 Energy Analysis panel
 (Energy Settings).
- In the Energy Settings dialog, do the following:
- For Location, specify the geographic location of the model and select a weather station.
- For Mode, select Use Building Elements.
- Optional: Specify values for
Ground Plane and
Project Phase.
You can also change values for the remaining parameters, but it is not necessary. The default values are designed to provide the best results in most cases.
- Click OK.
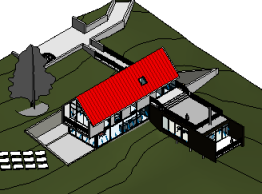
- (Optional) To create and view the energy model before submitting the energy simulation, click Analyze tabEnergy Analysis panel
 (Create Energy Model).
- When created, the energy model opens in the 3D Energy Model view. You can also examine the Analytical Spaces and Analytical Surfaces schedules to understand the geometry of the analytical mode. See About Viewing an Energy Model Based on Building Elements.
- Review Energy Analysis using Building Elements - Model Validation for tips on how to improve the energy model for analysis.
Note: If you change the Revit model, delete and re-create the energy model to reflect the changes. - Sign in to
Autodesk® A360.
Click Sign in
Sign in to
Autodesk® A360. Enter your Autodesk ID and password.
- Click Analyze tabEnergy Analysis panel
 (Run Energy Simulation).
- If needed, in the dialog, select Create the Energy Analytical Model and continue to run the simulation.
The software detects the energy analytical model geometry. Depending on the size and complexity of the model, this may take considerable time.
The software checks to ensure that at a minimum the model consists of a reasonably closed shell that contains at least one floor, walls, a roof, and has a known geographic location. There are additional model requirements to consider to ensure a successful energy analysis. -
You are informed when the energy analytical model has been generated. Click OK to proceed with the energy simulation.
- In the Run Energy Simulation dialog, for Run Name, specify a name for the analysis.
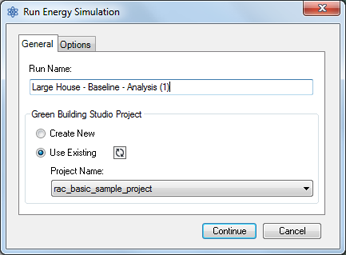
- Under
Green Building Studio Project, do the following:
- If you are running the energy simulation for the first time or if you changed any energy settings (including the location) for the
Revit model, select
Create New.
This option ensures that the latest Revit settings are used for the energy simulation.
- If you did not change any energy settings since the last energy simulation for this model or if you created a GBS project with pre-defined settings to use for this simulation, select
Use Existing and specify the GBS project to use.
Settings in the existing GBS project override any changes made to energy settings in the Revit model.
For more information, see Specify the GBS Project for Energy Analysis.
- If you are running the energy simulation for the first time or if you changed any energy settings (including the location) for the
Revit model, select
Create New.
- (Optional) Click the Options tab to specify utility billing data and weather period data sets, which can be added using
Green Building Studio.
For more information, see Adding Utility Billing Data.
-
Click Continue to run the simulation.
If there are no error conditions, a gbXML file is created and sent for simulation. The server returns the simulation results to Revit, where they are displayed in the Results and Compare dialog.
- When the simulation is complete, an alert displays. Click the analysis name in the alert to view the results.

Or, in the Energy Analysis panel, click
 (Results & Compare), and select the analysis from the project tree.
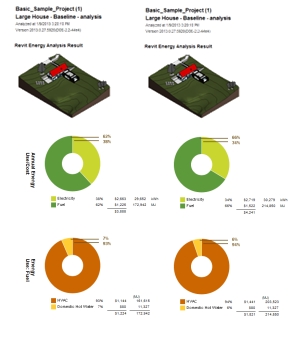
- View the analysis results in the Results & Compare pane.
- (Optional) To refine the energy analytical model, modify the building model and energy settings as needed, delete and create the energy model, and run an analysis on the modified model.
To compare results, select multiple analysis results and click Compare on the toolbar.
- (Optional) Open results in Green Building Studio, or export results for use in another application.