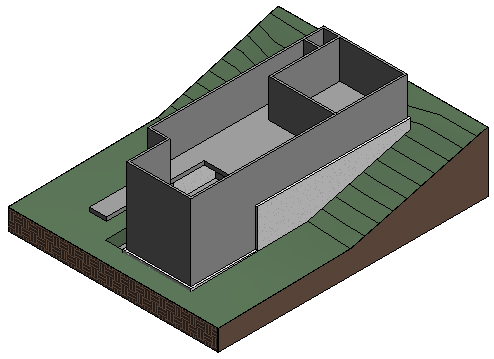
In this exercise, you create a floor on the lower level using the footprint of the exterior walls.
|
Next, you copy the floor to the entry level and modify the floor boundary for this level. In the final steps, you attach the walls from the lower level to the entry level floor.
Objectives
- Add a floor by picking walls to create the boundary.
- Copy and paste the floor to another level.
- Edit the floor boundary and use the Align and Trim tools to create a closed loop sketch.
- Modify the roof slope.
- Attach interior walls to the floor.
Create a Floor on the Lower Level
- Open project GS_04_add_floor.rvt.
- In the Project Browser, under Floor Plans, double-click 01 - Lower Level.
- Click Architecture tab
 Build panel
 (Floor).
 - Click Modify | Create Floor Boundary tabDraw panel
 (Pick Walls).
 - Position the cursor over a wall, press Tab, and click to select the chain of walls to form the boundary.
- On the Mode panel, click
 (Finish Edit Mode).
 - Click No at the prompt. "Would you like walls that go up to this floor's level to attach to its bottom?"
- Click No at the prompt, "The floor/roof overlaps the highlighted wall(s). Would you like to join geometry and cut the overlapping volume out of the wall(s)?"
- Click
 (Modify).
Copy the Floor to the Entry Level
- Click the edge of the floor to select the element, and on the Clipboard panel, click
 (Copy to Clipboard). Tip: To make it easier to select the floor, click the drop-down arrow for the Select panel on the ribbon, and make sure "Select elements by face" is checked. Then, place the cursor over the floor, and click to select it. Alternatively, place the cursor near the floor edge, and press Tab until the status bar indicates the floor, and click to select it.
 - On the Quick Access Toolbar, click
 (3D View).
 - Click Modify tabClipboard panelPaste drop-down
 (Aligned to Selected Levels).
 - In the Select Levels dialog, click 02 - Entry Level, and click OK.
A new floor is added to the Entry Level.
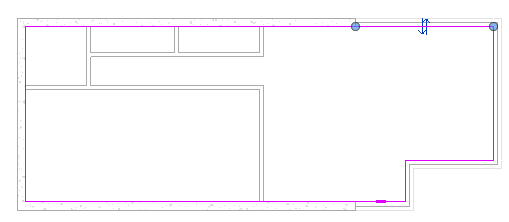
Edit the Floor
- In the Project Browser, under Floor Plans, double-click 02 - Entry Level.
- With the floor selected, on the Mode panel, click
 (Edit Boundary).
 - Select the short horizontal line in the upper-right, as shown below, and press Delete.
- Select the vertical sketch lines individually on the right, and drag them to create a boundary similar to the one shown below. (Drag the upper vertical line to the left, and the lower, shorter vertical line to the right.)

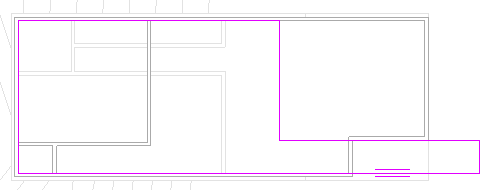
- On the Modify panel, click
 (Align).
 - Click the outside face of the exterior wall and the top sketch line for the narrow part of the floor to align them, as shown.

- On the Modify panel, click
 (Trim/Extend to Corner).
 - Click the sketch lines in the upper right corner to trim the corner boundary.
- On the Mode panel, click (Finish Edit Mode).
- Click No at the 2 prompts.
Attach the Walls to the Floor
- Click to select the interior walls that display in the underlay for 01 - Lower Level.
Press and hold Ctrl as you click to select multiple elements.
- On the Modify|Walls panel, click
 (Attach Top/Base).
 - Click the new floor to attach the top of the walls on the lower level to the entry level floor.
- On the Quick Access Toolbar, click (Default 3D View).