The Simulation Job Manager contains the following elements:
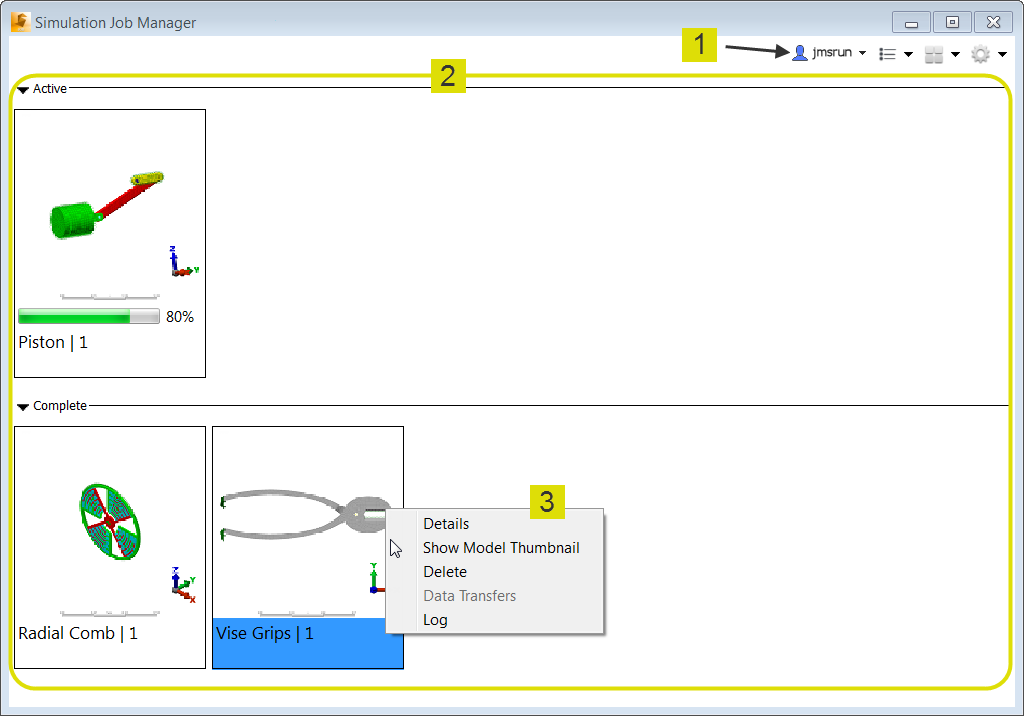
Figure 1: Simulation Job Manager (Medium Icon View Mode)
- Toolbar: The toolbar contains the following items:

- The Sync Monitor indicates when network activity occurs between your local machine and an Autodesk 360 server. To view the number of files being uploaded or downloaded, hover your mouse on the Sync Monitor icon, and a tooltip displays the current network activity.
- This is the User name or email address used to log into the Autodesk cloud services. If you are not logged in, "Sign In" is displayed in this location.
- Job Filter: Use the settings in this tool to control the visibility of successfully completed or canceled jobs. You can also control the sort order of the displayed jobs. Sort in ascending or descending order according to the following criteria:
- Name
- Status
- % Progress
- Time
- Source Computer Note: For Simulation Mechanical Flex, the Source Computer column display the computer name of your local workstation for each job you have submitted. This column also lists the computer name of other workstations that have submitted jobs to the cloud using the same cloud-credit account.
- Sizes: Use this menu to specify the thumbnail size (Small, Medium, or Large Icons, as shown in Figure 1) or to choose the List view option. The List view mode, shown in the following image, provides extra details.

Figure 2: Simulation Job Manager (List View Mode)
- Preferences: Set Preferences to customize how the Simulation Job Manager behaves. Additionally, you can access Help and open the About information box to check the version number and the active port number.
- Job View: The Job View area is divided into the following two two portions, whether viewing thumbnails (Figure 1) or using the List view mode (Figure 2):
- The Active list (top portion) monitors currently running jobs. A progress bar on each item provides an indication of how much of the simulation process has been completed.
- The Complete list (bottom portion) shows the previously finished or canceled jobs. A yellow triangle icon with an exclamation point (
 ) appears on canceled jobs.
- Context Menu (Right-Click): Whether viewing thumbnails or the List view, the context menu for each job contains several tools for gaining more insight into the progress of your simulation. The options displayed in the menu depend upon the item you right-click. In other words, not all menu choices are available in every situation:
- Details: Opens a detail view of the selected job. The detail view lists the status; job type; priority; scheduled, started, and completed time; source computer; and the thumbnail image of the model. While running, a progress bar indicates the progress of the simulation. Click OK to close the detail view. An example of the Detail view is shown in the following image:
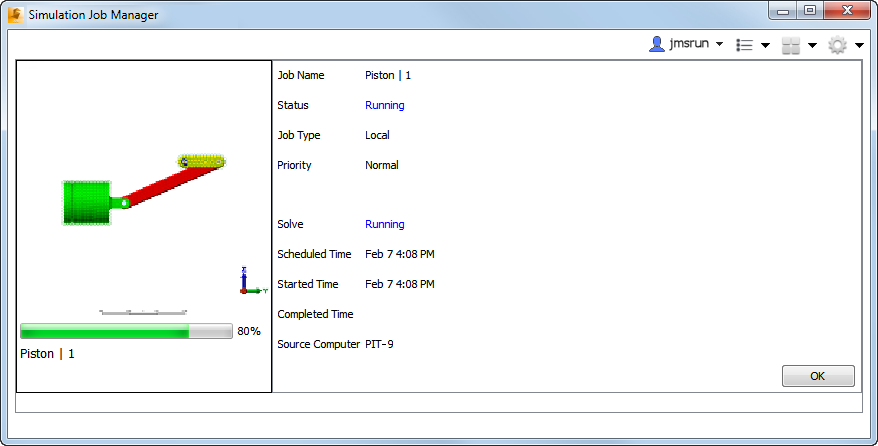
Figure 3: Simulation Job Manager (Detail View)
- Open: Open the model in Simulation Mechanical Flex.
- Show Model Thumbnail: Opens the model thumbnail image in your default application for *.png files. The Windows file association settings for this file type determine which application opens the thumbnail image.
- Cancel (only available while job is running): Immediately stops the running job. No further results are written to your hard drive. Note: When a nonlinear analysis is stopped in this manner, a subsequent attempt to resume the analysis may fail. For example, assume that a mechanical event simulation (MES) job is canceled while temporary files are being written. Attempting to resume the analysis will likely fail due to incomplete or corrupted temporary files. In such cases, you would have to restart the solution from the beginning.
- Delete (only available for completed jobs): This command removes the job from the Complete list in the Simulation Job Manager but does not delete the model files or results from the local computer.
- Data Transfers: Opens a summary of the data uploaded and downloaded to and from the cloud.
- Log: If an error occurs, the log file can be helpful in troubleshooting the problem. A technical support engineer may request it from you in the event of a problem.
- Priority (while running): Set the priority of jobs run with the Local Solve option. By default, local jobs are Normal priority. This means that they run in the order in which they are submitted. If, however, it is necessary to run a local job sooner than in the submitted order, increase its priority to High. This causes the job to run next, after the current job is finished, regardless of how many jobs were submitted before it. Likewise, to cause a job to run later than in the submitted order, change its priority to Low. (This option is available only for Local jobs.)
Context menu behavior when two or more jobs are selected:
To select multiple jobs, hold the keyboard Ctrl key, and click on each desired job. You can also use the Ctrl key to deselect a currently selected job. To select a range of jobs, click the first job and then hold the Shift key while clicking the last job.
When multiple jobs are selected, the items listed in the context menu depend on whether you have selected active or finished jobs, or a combination of the two, as follows:
- If you select only active jobs, Cancel is include in the context menu and Delete is not.
- If you select only completed jobs, Delete is include in the context menu and Cancel is not.
- If you select a combination of active and completed jobs, clicking Cancel only affects the active jobs. Likewise, clicking Delete only affects the completed jobs. Note: You can only select a mixture of active and completed jobs when using the List view mode. The Icons view modes do not permit the concurrent selection of both active and completed jobs.
- Details: Opens a detail view of the selected job. The detail view lists the status; job type; priority; scheduled, started, and completed time; source computer; and the thumbnail image of the model. While running, a progress bar indicates the progress of the simulation. Click OK to close the detail view. An example of the Detail view is shown in the following image: