mr Proxies are useful when you want to fill a scene with instances of objects that have a high polygon count, such as 3D trees. Proxy objects save you time and free up memory because they do not need to be converted to mental ray format and their source objects do not need to be present during render time.
In this lesson, you convert trees to .mib format so they can be used as mr Proxy objects.
Set up the lesson:
- Click
 (Open File), navigate to the \scenes\rendering\mr_proxies folder, and open
trees.max.
Note: If a dialog asks whether you want to use the scene’s Gamma And LUT settings, accept the scene Gamma settings, and click OK. If a dialog asks whether to use the scene’s units, accept the scene units, and click OK.
(Open File), navigate to the \scenes\rendering\mr_proxies folder, and open
trees.max.
Note: If a dialog asks whether you want to use the scene’s Gamma And LUT settings, accept the scene Gamma settings, and click OK. If a dialog asks whether to use the scene’s units, accept the scene units, and click OK.
Render the scene:
-
 Zoom and
  pan so the tree objects fill the viewport.
 -
 Render the scene.
The eight trees in the scene show foliage from four different seasons: winter, spring, summer, and fall. The trees in the front row are oaks, and the trees in the back row are elms.
These trees were created and textured using the methods described in the lesson Creating Billboard Tree Maps. The only difference is that there was no need to center each tree in a viewport and render it: The mr Proxy method works with referenced geometry instead of with rendered bitmaps.
-
 Close the Rendered Frame Window.
Save the materials to a library:
-
 Open the Slate Material Editor.
 - On the Material/Map Browser panel at the left, scroll down so you can see the Scene Materials group. (It helps to drag the edge of the Browser panel to make the Browser wider, too.)

The four Tree materials are the ones you want to save.
- In the Scene Materials group, right-click the Tree-Fall material entry. On the pop-up menu, choose Copy To
 New Material Library.
In the file dialog, name the library mytrees.mat.
3ds Max displays an entry for the new library at the top of the Material/Map Browser.

The asterisk before the name of the library indicates that it has not yet been saved.
- In the Scene Materials group, right-click the Tree-Spring material entry. On the pop-up menu, choose Copy To mytrees.mat.

- Copy Tree-Summer and Tree-Winter to mytrees.mat as well.
- Scroll to the top of the Material/Map Browser so you can see the mytrees.mat library. Right-click the mytrees.mat label, and on the pop-up menu, choose the first entry, C:\Users\...\mytrees.mat Save.

- Close the Slate Material Editor.
Now you have a library of materials to use for the proxy objects. The next task is to create those proxies.
The tree materials that you saw in the rendering will need to be reused for the mr Proxy objects. The best way to do this is to save the materials in a library, so you can access them for use in various scenes and situations.
Save source objects in mr Proxy file format:
- On the
 Create panel, activate
  (Geometry), then open the Objects drop-down list and choose “mental ray.”
- On the Object Type rollout, click “mr Proxy” to activate it.

- Drag in the viewport to create an mr Proxy object.

- Go to the
 Modify panel. On the Parameters rollout, in the Source Object group, click the Source Object button (initially labeled “None”).
In the viewport, click the Elm-Winter tree object.

- In the Parameters rollout Source Object group, click Write Object To File.

3ds Max opens a file dialog. If you need to, navigate to the \sceneassets\renderassets folder. Name the file My_Elm_Winter (it has a filename extension of MIB), and then click Save.
3ds Max opens an “mr Proxy Creation” dialog. On this dialog, click OK to accept the default values.
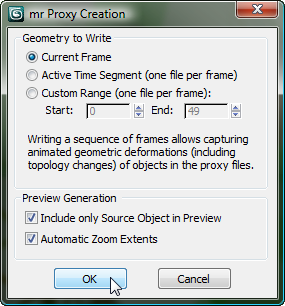 Note: If your tree object were animated, you would use the “mr Proxy Creation” dialog to save the object as a sequence of frames, with one .mib file created per frame. You specify the time segment to save in the Geometry To Write group.
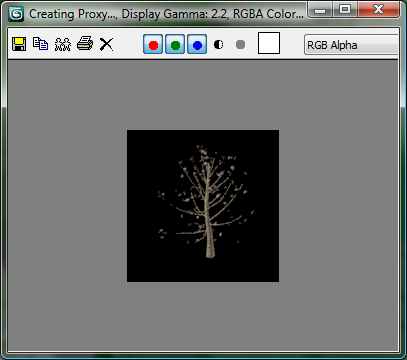
3ds Max briefly displays a small Rendered Frame Window while it renders the proxy geometry.
In the viewport, 3ds Max displays the mr Proxy object as a point cloud.

- In the Parameters rollout Display group, change the Viewport Verts value from 128 to 512, and press Enter.

The object outline becomes more apparent as more points are displayed, but a denser point cloud can affect viewport performance.

- Change the Viewport Verts value back to 128, then turn on Show Bounding Box to display the extents of the tree proxy.

3ds Max displays the proxy surrounded by a complete bounding box.

- With the proxy object selected, repeat steps 4 through 7 for the Elm-Spring tree object.
When you’re done, you should have an .mib file for Elm-Spring.
If you were working from scratch, you would repeat the steps for every tree in the scene, but to speed things up a little, we have created .mib files for all the tree types. These are saved in the \sceneassets\renderassets folder. You will use these proxies in the next lesson.
- Do not save the current scene file.
The work you needed to save is contained in the MIB files and their associated bitmaps.