Filters are simply operations that can be performed to different biped body parts. They are similar to fixers, but they operate over an interval of time rather than on the results of the last analysis. Thus, you can use a filter without analyzing.
Certain filters share parameter types and functionality as fixers, though the values are not shared and are distinct for each filter. Use a filter whenever you want to perform a general operation over a body parts motion, like smooth out or boost up some noise."
Procedures
To filter a track:
- Choose the parts you want to filter: either just a particular curve, or an entire selection.
- Choose the time range you want to filter: either the entire biped animation, the active time segment, or a custom range.
- Choose the filter you want to apply. Adjust its individual parameter as required.
- Click Filter at the bottom of the panel.
- Observe the effect on the graph in the Curve view.
-
 Play the animation and observe the difference, if any.
 Click
 Undo if the results are unexpected or incorrect.
Interface

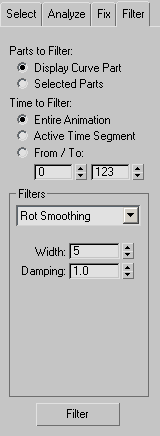
- Parts to Filter
- Sets the filter to act on either the display object or the entire selection of objects.
- Display Curve Part Sets the filter to act on the displayed object curves.
- Selected Parts Sets the filter to act on the active selection. Especially useful when working on the whole biped.
- Time to Filter
- Sets the range to be filtered to either the entire biped animation, the active time segment, or a custom range of frames.
- Entire Animation Sets the time to filter to be the complete biped animation (disregarding the active time segment).
- Active Time Segment Sets the time to filter to be the scene active time segment. You set the active time segment in the 3ds Max Time Configuration dialog.
- From / To: Sets the time to filter to a custom range of frames.
Filters group
- [filters list]
- Choose the filter to use from this drop-down list.
The available filter types include smoothing, blurring, boosting, key reduction, and subanims.
- Rot filters work in quaternion rotation space, and modify the quaternions of the specified animation tracks.
- Pos filters work in the specified positional coordinate system, and modify the positions of the animation tracks.
- Blurring Uses basic Gaussian filters that take a weighted average over the width. Blurring filters are good for smoothing out noise, but can also over-smooth areas that aren't noisy.
See Blurring, Smoothing, and Boosting parameters, below.
- Smoothing filters, on the other hand, are much better than blurring filters for keeping the general shape of the track or curve. They affect only areas that have big changes. The drawback of the smoothing filters is that they don't change the curve as dramatically as the blurring filters do, so sometimes you'll need to run the smoothing filter multiple times to smooth out a particularly noisy area.
- Adv Rot Smoothing works even better than the normal angular smoothing filter when it comes to modifying only large changes and not small ones.
See Blurring, Smoothing, and Boosting parameters.
(There is no comparable “advanced position” fixer or filter.)
- Boosting Boosting filters are the opposite of blurring filters. They increase, rather than decrease, changes in the track. Boosting filters are helpful if you want to make a track have more exaggeration or a little more jerkiness.
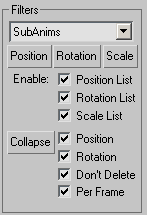
- Sub Anims The Sub Anims filter manages sub-animation of biped objects. Clicking a button that corresponds to a transform (Position, Rotation, or Scale) displays a dialog that lets you assign a controller to that transform. Assigning a controller in this way assigns it only to the selected biped parts. This is very handy for adding controllers to multiple biped parts all at once. Also includes the ability to enable or disable the three list controllers selectively, and avoids creating SubAnims, where they already exist. See Sub Anim parameters.
- Key Reducer Creates tracks with fewer keys, by removing certain keys based on tolerance and key spacing parameters. This works similarly to how key reduction works during motion-capture import.
- Knee Wobble Corrects knees that wobble or shake when a foot is planted. If the knee is determined to wobble by the filter, the center of mass object is adjusted to eliminate the wobble.
- Knee Extension Corrects knees that overextend when a foot is planted. If the knee extension is identified by the filter, the center of mass object is adjusted to eliminate the extension.
- Blurring, Smoothing, and Boosting parameters
-
Width Width is the size of the filter kernel width in frames. It tells you how much of the animation is taken into effect when filtering a specified keyframe.
Damping The Damping value changes how effective the filter should be. A higher value, the more dramatic the change. A damping value of 1.0 is normal filter behavior.
- Sub Anim parameters
-

Enable Turns Position, Rotation, and Scale subanims on and off for the selected biped parts.
Collapse Adds the subanim animation of the selected biped part to that part’s Transform controller.
Note: When you choose the Sub Anims filter, the Filter button at the bottom of the panel disappears. That's because the operations of this filter are immediate.- Don’t Delete Maintains the subanim in the list as it’s collapsed onto the biped.
- Per Frame Sets keys at every frame of the collapsed controller.
The Sub Anims filter tools are also available from the Motion panel. You can assign controllers to a biped subanim, and then collapse it by right-clicking and choosing Properties. The difference between using this in the Motion panel and in the Workbench is that you can apply subanims to multiple biped objects in one step when using the Workbench filter.
- Key Reducer parameters
-
Create Key Per Frame When on, the filter creates a key per frame for every selected track. Default=off.
Tolerance Sets the maximum angular or positional deviation for a track (other than a COM track). Default=3.0.
Values are in units of translation for position tracks, and in degrees for rotation tracks.
Key Spacing Sets the minimum number of frames between keys (other than COM keys).
Tolerance is computed first, then Minimum Key Spacing computes further key reduction.
COM Parameters These Tolerance and Key Spacing settings affect key reduction only on specified center-of-mass (COM) tracks (horizontal, vertical, or rotational).
- Filter
- Click to apply the active filter to the selected tracks.