This topic shows how to design a graph to produce a basic modifier in Max Creation Graph. You'll use as the processing core a PushRandom compound included with Max Creation Graph that lets you apply a spiky appearance to mesh objects.
As with geometry, creating a modifier with Max Creation Graph requires, at least, some input, a processing node, and an output. You'll start with the output node.
- Start 3ds Max, open the Scripting menu, and choose Max Creation Graph Editor.
- Make sure there's an "Untitled" tab, then click in the right side of the graph window attached to the tab and type x on the keyboard.
This opens the Search list.
- Make sure there's an "Untitled" tab, then click in the right side of the graph window attached to the tab and type x on the keyboard.
- You're looking for an output node, so type ou on the keyboard.
This narrows the list to output nodes only.
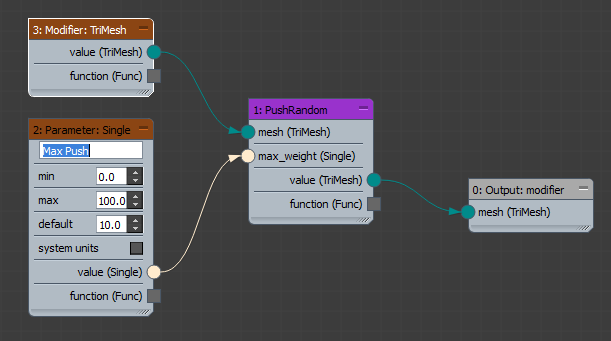
- Click the Output: modifier node to add it to the graph.
- In the Operator Nodes list, find the Geometry - Deformers category and expand it.
This category contains only compound nodes, as indicated by the purple text.
- Find the PushRandom compound and double-click it to add it to the graph.
- Wire the value (TriMesh) output connector of the PushRandom node to the mesh (TriMesh) input connector of the output node.
Take a look at the input connectors of the PushRandom node. It needs two inputs: an object to modify (the mesh (TriMesh input) and a numeric value called "max_weight." This is, as you might guess, the amount to push.
- Select the PushRandom node, then right-click it and choose Generate Parameters.
This adds a Parameter: Single node to the graph and wires it to the max_weight input connector of the PushRandom node.
- Edit the text field in the Parameter: Single node to read Max Push and set the Default value to 10.0.
There remains a single node to add: the modifier input.
- Drag from the teal input connector of the PushRandom node to an empty area of the graph editor. When the search list opens, type m on the keyboard, then click the Modifier: TriMesh entry.
This node simply lets you use a mesh object as the input for the modifier.
- And you're done! Open the Build menu and choose Evaluate.
As you haven't saved the graph yet, you're prompted to do so.
- Click Yes, then when the Save As file dialog opens, enter the name PushRandom and click Save.
The Message Log window shows the usual success messages.
Because the graph uses the Output: modifier node, its output automatically appears in the Modifier List, as you'll see in a moment.
- Add a standard Sphere primitive to the scene, and make sure it's selected.
- Go to the Modify panel, open the Modifier List, and choose the PushRandom modifier.
The sphere's surface becomes spiky, because the modifier pushes its vertices outward by random distances between 0 and 10 units.
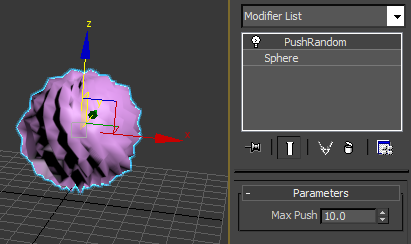
- Try changing the Max Push value in the modifier to see how it affects the sphere's appearance.
- Notice that despite the "Random" in the node's name, the appearance is fairly regular, so the effect isn't truly random. For extra credit, try modifying the compound's effect.
- In the graph window, right-click the PushRandom compound and choose Open Compound In New Tab.
A second tab named PushRandom.maxcompound opens showing the graph contained within the compound. Note that the compound contains another compound named ArrayOfRandomFloatsInRange. You can nest compounds to any extent.
- Open the second compound in another window. Examine the two compounds and see what different effects you might achieve. If you change a compound and save it, be sure to save it in the Compounds folder so it remains available to you in future sessions.