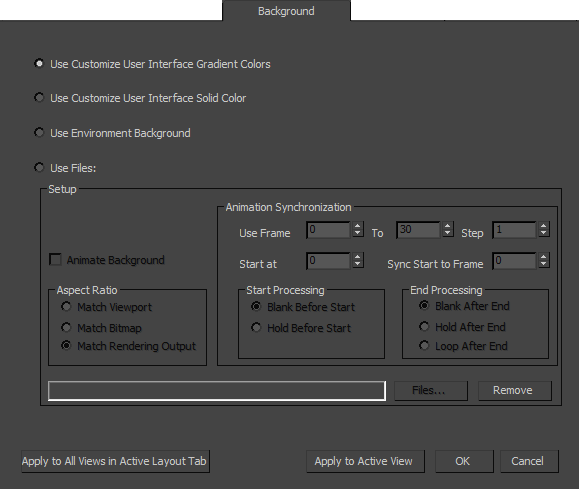
Provides options for viewport background display.
Procedures
To assign an image to one or all viewports:
- Activate the viewport that is to display the background image.
- Open the Viewport Configuration dialog to the Background panel (keyboard shortcut: Alt+B).
- Choose Use Files.
- In the Setup group, click the Files button.
This opens the Select Background Image dialog.
- Use the dialog to open the image or animation to use.
- To display the image in a single viewport, click Apply to Active View. To display the image in all viewports, click Apply to All Views in Active Layout Tab.
- Click OK.
The image is displayed in a single viewport or all viewports.
To display the environment map in a viewport:
- Use the Environment dialog to assign an environment map. (See the procedure “To choose an environment map.”)
- In the Environment dialog
 Background group, be sure Use Map is turned on (the default).
- Activate the viewport where you want the map displayed.
- Open the Viewport Configuration dialog to the Background panel (keyboard shortcut: Alt+B).
- Choose Use Environment Background.
- Click OK.
The map is displayed in the viewport.
To assign a viewport background by dragging and dropping:
- Browse images in the Asset Browser, in Windows Explorer, or in another graphics-browsing application.
- Select a thumbnail of the bitmap with your mouse and drag it onto an empty area of a viewport.
Do not drop the map onto an object: This creates a material instead of assigning a background.
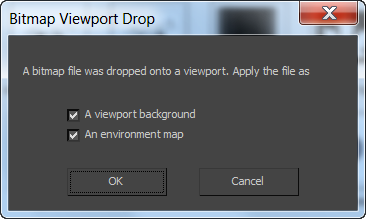
3ds Max opens the Bitmap Viewport Drop dialog:

- A viewport background
- When on, puts the bitmap into the viewport as a background.
- An environment map
- When on, includes the bitmap when you render the viewport.
- Click OK.
To display an animated background:
- Choose Use Files and assign an animation file (AVI, MOV, or IFL file) as the viewport background.
- Turn on Animate Background.
- Choose Customize
 Preferences. On the Viewports panel, turn on Update Background While Playing.
Now the background plays when you click Play, or when you drag the time slider.
Tip: If you follow these steps and the background still doesn't appear to animate, open the Time Configuration dialog and in the Playback group, turn off Real Time.
To use the environment map with animation controls:
- On the Viewport Configuration dialog
 Background panel, choose Use Files.
- As the image file, choose the same map you’re using as the environment map.
- Set parameters in the Animation Synchronization group.
- Click OK.
The environment map appears in the viewport. The image is renderable.
This procedure is useful if you’ve assigned an animated environment map and want access to the animation controls on the Background panel.
To match the viewport background with the rendered background:
- Activate the viewport to render.
- Open the
Point-Of-View (POV) Viewport label menu and choose Show Safe Frames.
This turns on Safe Frames in the viewport.
Note: You can also use Views menu Configure
  Safe Frames tab. In the Application group, turn on Show Safe Frames In Active View.
- In the Material Editor, create a material that contains the bitmap for your rendered background.
- At the bitmap level of the Material Editor, on the Coordinates rollout, choose Environ.
The Mapping control is automatically set to Screen. This is the only mapping type that works for this purpose.
- On the main menu, choose Rendering
 Environment.
- Drag the map from the Material Editor
 Maps rollout to the Environment Map button on the Environment dialog. Click OK on the Instance (Copy) Map dialog.
- In the Viewport Configuration dialog
 Background panel, choose Use Files and then click Files to assign the same bitmap.
- In the Aspect Ratio group, choose either Match Viewport or Match Rendering Output. Click OK.
- Render the viewport.
The background displayed in the rendered scene should exactly match the background displayed in the Live area of the safe frames.
Note: When you use the Match Bitmap option, the bitmap reverts to its original aspect ratio and does not match the rendered scene, unless you're rendering to the same aspect ratio.
To remove a background image:
- Activate the viewport in which the background image is visible.
- Open the Viewport Configuration dialog to the Background panel.
- In the Setup group, click Remove.
- Click OK to close the Viewport Configuration dialog.
Interface

- Use Customize User Interface Gradient Colors (The default for
Perspective viewports.) Displays the background as a gradient.
To customize the gradient colors, use the Customize User Interface dialog
 Colors panel
  Viewport Background Gradient Bottom and Viewport Background Gradient Top options.
- Use Customize User Interface Solid Color (The default for
axonometric viewports.) Displays the background as a solid color.
To customize the solid background color, use the Customize User Interface dialog
 Colors panel
  Viewport Background option.
- Use Environment Background Displays the background specified on the Environment panel.
- Use Files Displays an image used for viewports only.
You can display an image in one or all viewports. You might use images for modeling, for example, by placing front, top or side view sketches in the corresponding viewports. Or use a viewport background image to match 3D elements with digitized camera footage, or for rotoscoping.
You select the image or animation to display in the active viewport, set the frame synchronization between the animated image file and the current scene, and turn the assigned image on and off. These changes do not affect the rendered scene.
To place an image in the background of the rendered scene, use the Environment And Effects dialog
 Environment panel, accessed from the Rendering menu.
Note: When a viewport shows safe frames and the Aspect Ratio option is set to either Match Viewport or Match Rendering Output, the assigned viewport background image is confined to the Live area of the safe frames and correctly matches the rendered background bitmap.
Environment panel, accessed from the Rendering menu.
Note: When a viewport shows safe frames and the Aspect Ratio option is set to either Match Viewport or Match Rendering Output, the assigned viewport background image is confined to the Live area of the safe frames and correctly matches the rendered background bitmap.Setup group
- Animate Background
- Turn on to use an animated background. See
To display an animated background. Default=off.
Note: As of 3ds Max 2014, the Lock Zoom/Pan checkbox used in previous releases has been replaced by 2D Pan Zoom mode, which is available for perspective, camera, and spotlight viewports.
Aspect Ratio group
Controls the proportions of the viewport background by matching it to the bitmap, rendering output, or to the viewport itself.
-
Match Viewport
Changes the aspect ratio of the image to match the aspect ratio of the viewport.
-
Match Bitmap
Locks the aspect ratio of the image to the native aspect ratio of the bitmap.
-
Match Rendering Output
(The default.) Changes the aspect ratio of the image to match the aspect ratio of the currently chosen rendering output device.
Note: When the Match Bitmap or Match Rendering Output option is chosen, 3ds Max centers the image and if necessary, clears the edges of the viewport to the default background color.Animation Synchronization group
Controls how sequences of images (for example, from IFL, AVI, or MOV files) are synchronized to the viewport for rotoscoping.
- Use Frame
-
The first field sets the first frame of the incoming sequence that you want to use, and the second field sets the last one.
- Step
-
Sets the interval between the frames you want to use. For example, if this spinner is set to 7, 3ds Max uses every seventh frame.
- Start At
-
Specifies the frame number at which you want the first input frame to appear. What happens in the viewport before the start frame depends on the option you choose for "Start Processing," below.
- Sync Start To Frame
-
Determines which frame from your incoming sequence is displayed at the Start At frame. For example, you could have a 30-frame IFL sequence that starts in your scene at frame 10, but you could use the 5th frame from the IFL on frame 10 by setting Sync Start to 5.
- Start Processing
- Determines what happens in the viewport background before the start frame.
- Blank Before Start Makes the viewport background blank before the start frame.
- Hold Before Start Specifies that the viewport background will contain the start frame.
- End Processing
- Determines what happens in the viewport background after the last input frame.
- Blank After End Makes the viewport background blank after the last input frame.
- Hold After End Specifies that the viewport background will contain the last input frame until the last frame in the animation.
- Loop After End Specifies that the viewport background will loop from the end frame back to the start frame, ad infinitum.
- [file name field]
- Displays the path and file name of the bitmap you have chosen.
- Files
-
Click to open a Select Background Image dialog, which lets you select a file or sequence of files for your background.
- Remove
- Click to remove the currently chosen background image.