Add a new Thickness/Angle template to the material database.
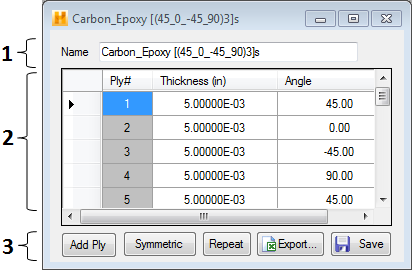
Helius Composite comes with 18 predefined Thickness/Angle Templates (9 templates for a carbon/epoxy system and 9 templates for a glass/epoxy system. Selecting New Thickness/Angle Template opens the Edit Thickness/Angle Template window as shown below. Each data item that entered in the Edit Thickness/Angle Template window is discussed below.

- Template Name - The name of the new thickness/angle template must be specified.
- Layup Window - This window displays each ply you have added to the thickness/angle template. The image above shows four plies that have been added to the thickness/angle template. The numbering of the plies increases in the direction of the positive global Z axis (see the diagram in the Create a New Laminate section). Thus the first ply in the list is always the ply located at the algebraically smallest global Z coordinate. Likewise, the last ply in the list is always the ply located at the algebraically largest global Z coordinate. For each ply, the layup window lists the thickness of the ply and the fiber angle of the ply relative to the global coordinate system.
Note: All fiber orientation angles are expressed in degrees and must be between -90° and 90°. Ply orientation angles are measured as rotations about the global Z axis (right-hand rule positive). A fiber orientation angle of 0° corresponds to the positive global X direction. A fiber orientation angle of +45° corresponds to a direction half-way between the positive global X direction and the positive global Y direction. A fiber orientation angle of +90° corresponds to the positive global Y direction.
- Template Build Options - The template build options allow you to perform a number of common laminate building tasks. This includes adding a new ply, doubling the current number of plies to make the laminate symmetric, repeating the current number and sequence of plies, or saving the thickness/angle template.
- Add Ply
- Add individual plies to the layup. Pressing the add button places a new ply at the bottom of the layup. After the new ply appears in the layup window, you must define the thickness and fiber orientation angle of the new ply. To define the thickness of the new ply, click in the space provided and key in the thickness value and press Enter. The fiber orientation angle is defined similarly.
- Symmetric
- Create a mirror image of a selected group of plies and add them to the bottom of the laminate. To use this option, select (or highlight) a group of plies from the layup window by left-dragging the cursor over gray boxes to the left of each ply in the group. After the desired group of plies is highlighted, click the Symmetric button. A mirror image group of plies is added to the bottom of the laminate.
- Repeat
- Replicate a selected group of plies and add them to the bottom of the laminate. To use this option, select (or highlight) a group of plies from the layup window by left-dragging the cursor over gray boxes to the left of each ply in the group. After the desired group of plies is highlighted, click the Repeat button. A new group of plies (exactly like the highlighted group) is added to the bottom of the laminate.
- Export
- After a thickness/angle template has been created, click Export to write the thickness/angle template to a *.csv file compatible with Microsoft Excel.
- Save
- This command saves the thickness/angle template. The saved template is visible in the file tree under Thickness/Angle Templates.