For each item in the Render Layers List, you can refine the parameters using the Outputs tab.
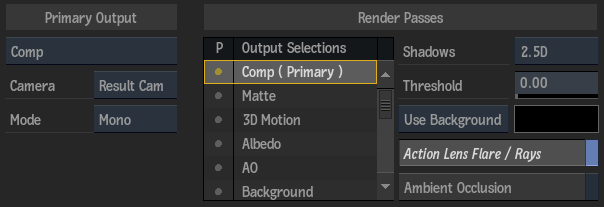
Primary Output Section
- Primary Output box
- Select a primary output type. Render Passes options change based on the primary output type.
Note: If you accessed Action from the timeline (or when using the GMask Tracer), a single Render Layer is available with Comp and Matte enabled.
- Camera box
- Select which camera or stereo rig to assign to the render layer.
- Mode box
- Select a render mode. Selecting the Stereo mode and a stereo camera results in left and right clips when processed. Selecting Stereo mode and any monoscopic camera results in two identical clips. Selecting Left, Right, or Mono results in a single output, regardless of the camera selected.
Render Passes Section
In the Output Selections List, the primary output is indicated, such as Matte (Primary). You can add as many other render passes to an output as you want. Simply click the dot to the left of the pass name (a coloured dot indicates that a render pass is enabled for the selected render layer).
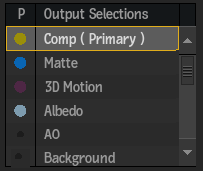
Tip: To see the result of a render pass without enabling it for the selected render layer, click the name of the render pass in the Output Selections List.
The following render passes are available in Action. Some settings may be different depending on the selected render pass:
- Comp
- Renders selected objects in the scene with their parameters.
- Matte
- Renders the matte of the selected objects in the scene.
- 3D Motion
- Renders 3D absolute motion vectors in world space.
- Albedo
- Renders the diffuse colour of selected objects in the scene.
- AO (Ambient Occlusion)
- Renders a grayscale output that is dark in areas that light cannot reach and bright in areas where it can. Specific AO settings can be found in the Ambient Occlusion tab.
- Background
- Renders the Action background from the Media list.
- Emissive
- Renders the colours of selected objects in the scene.
- GMask
- Renders the GMask transparency. Equivalent to selecting GMask Only in the Use GMask box of a Matte render pass.
- Lens Flare (also includes Rays)
- Renders just the lens flares and rays in the Action scene. There is also an option to include lens flares and rays in a Comp render pass.
- Media Matte
- Available as a primary output type, but not as a render pass. Renders the matte of the media specified in the Media field.
- Motion Vectors
- Renders 2D motion vector information.
- Normals
- Renders the normals of selected objects in the scene.
- Occluder
- Renders a GMask occluder when attached to a post-processing effect, such as a lens flare.
- Position
- Renders world absolute pixel coordinates of a scene or a selection of objects.
- Reflection
- Renders the reflection map settings of selected objects in the scene.
- Roughness
- Renders the roughness in a physically-based rendering (PBR) shader.
- Shadow
- Renders a white image with greyscale regions that represent the shadow cast coverage.
- Specular
- Renders the specular map settings of selected objects in the scene.
- UV
- Renders the UV map settings of selected objects in the scene.
- Z-Depth
- Renders the Z-depth of selected objects in the scene.
- Z-Depth HQ
- to be used with Matchbox shaders. Renders a 32-bit Z-depth output encoded into a 16-bit buffer.
Outputs Settings
Depending on the output selection, some of the following settings may appear:
- Shadow Output Type box
- Select the type of shadow cast to output for a Comp or Shadows render pass.
Note: When set, this becomes the default Shadow Type for any new Shadow Cast nodes.
- Threshold field
- Displays the value at which the alpha is included in the depth of the output.
- Comp box
- Select whether to render the scene over a background or over a colour you choose using the colour picker.
- Comp colour pot
- Displays the colour that the comp is rendered over. Editable.
- Action Lens Flares / Rays button
- Enable to include lens flares and rays in a Comp render pass.
- Ambient Occlusion button
- Enable to process a Comp output with the ambient occlusion (AO) effect. Other AO settings appear in the Ambient Occlusion tab.
- Matte Background box
- Select whether the object's matte is rendered on top of a black (default) or white background. When using the GMask Tracer node, you also have Input as an option. Select Input to set the Media Front and Matte as the Background for both the Comp and Matte outputs respectively.
- Use Gmask box
- Select whether to use the garbage mask transparency or render the GMask colour. Available for Matte render passes.
- Blending box
- Select whether to use a master blend option (Override) or to use the blend set in the Blending Mode box (Keep Blend). Available for Matte render passes.
- Blend Mode box
- Select an option to determine the blending mode of the mask when it overlaps with another mask. Available for Matte render passes when Override is selected in the Blending box.
- Bit Depth field
- This locked field displays that this output type is locked to a 16-bit floating point output. Non-editable.
- Motion box
- Select an option to determine the direction of the motion. Select Average to produce a mix between previous and next frame. Available for 3D Motion and Motion Vector render passes.
- Backward button
- Enable to set the direction of the vectors to backwards. Available for 3D Motion and Motion Vector render passes.
- Motion Vector Range box
- Select whether the vector data is absolute or normalized. Available for Motion Vector render passes.
- Camera GMask Only button
- Enable to display GMasks connected to the current camera. In this case, GMasks do not interact with the scene, and are only used in the post-processing pipeline. Available for GMask render passes.
- Light box
- Select which light to include in a shadow render pass.
- Filtering field
- Displays the amount of smoothing in a shadow render pass. Editable.
- Maximum Z Difference field
- Displays the maximum amount of Z depth information to take into account for smoothing a shadow render pass. Editable.
- Media field
- Displays the number that corresponds to the media in the Media list for a Media Matte output. Editable.