How To ... Develop a Scene Browser using TreeView ActiveX Control - Part One
| How To > Use ActiveX Controls > Develop a Scene Browser - Part One |
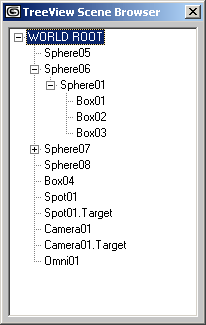
This tutorial demonstrates how to create a Scene Browser showing the object hierarchy in a TreeView ActiveX Control.
 ActiveX Controls have been deprecated by Microsoft in the latest versions of the
Windows operating system in favor of the DotNet framework and its controls.
While MAXScript still supports ActiveX controls, these have to be installed and registered on the system to be accessible to MAXScript.
As a replacement of ActiveX controls, MAXScript supports DotNet controls in 3ds Max 9 and higher.
Please see the topic Converting ActiveX TreeView Control to DotNet TreeView Control
ActiveX Controls in MAXScript Rollouts

Step-By-Step
We start by defining a simple MacroScript with the name SceneTreeView which will appear in the category "HowTo". Simple (old-style) macroScripts do not have on execute do or on isEnabled event handlers. The code inside the MacroScript definition is executed immediately when the ActionItem (button, menu item or keyboard shortcut) representing the MacroScript is activated.
This is the rollout to be created when the MacroScript is executed. It will display the title "TreeView Scene Browser". The variable treeview_rollout will be local to the macroScript and will be used later on to create a dialog out of the rollout definition.
This is the function which will perform the initialization of the TreeView ActiveX control we will create. The control itself will be passed as argument to the function.
The .indentation property expects a value in Twips and defines the amount of twips to indent children relatively to their parent. Since a pixel is roughly 15 twips, this line tells the hierarchy to use 28 pixels indentation.
TheLineStyle propery controls the appearance of the lines connecting the nodes in the hierarchy. We want the root to have its own plus/minus box and be connected to the scene nodes.
This function will be called recursively to create children of the node passed as argument using theChildren argument containing an array of 3ds Max scene nodes. The argument tv will contain the TreeView to add to.
For each 3ds Max scene node in theChildren array...
...we add a new child to the supplied node. We pass a couple of parameters to the add() method - the index of the parent, the relationship flag (4), the key (empty string), the text of the new child (the name of the scene node), and the index of the image to be displayed as icon (0 for no image)
Once the child is created, the function calls itself recursively, passing the newly created node and the array of children of the current scene object as parameter. This way, the complete scene hierarchy will be recreated by the TreeView!
The recursive function ends here.
This function will define the content of the TreeView.
We add a single new node to represent the Root.
We set its label to "WORLD ROOT"
Then we collect all objects in the scene that have no parent. These are the top-level nodes that will be the "children of the world".
Finally, we call the recursive function, passing the TreeView, the Root node and the array of top-level scene objects as arguments.
Now we can create a TreeView ActiveX control in the rollout.
This spinner will allow us to test interactively the .indentation property of the TreeView. Simply changing the spinner's value will dynamically update the indentation of the complete hierarchy!
If the user clicked a node, we will try to convert its name back to a 3ds Max scene node and select it in the scene. This demonstrates the usage of TreeView event handlers...
If the user changed the spinner, we want the .indentation to be set to the respective amount of Twips.
When the rollout is opening (this is when the CreateDialog function is called)...
...the initialization function and the data collecting function will be called to define the style and populate the TreeView control with the names of the 3ds Max scene objects.
The rollout open event ends here.
Before creating a new dialog, we want to make sure any previously opened dialog with the same name is closed...
Finally, we create a new Dialog using the rollout definition.
What's Next?
This is a very basic version of the script. To see how it can be further improved and customized, see Part Two of the tutorial - How To ... Develop a Scene Browser using TreeView ActiveX Control - Part Two
