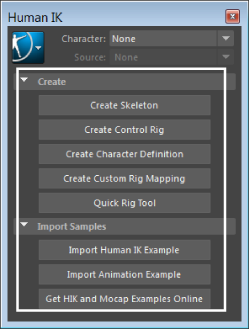
The Start pane has buttons that can guide you through your character setup workflows. The buttons in the Create and Define sections open a new tab in the HumanIK window. Each tab contains a HumanIK tool that is used during the character setup process. The buttons in the Import section open a webpage where you can download free samples.
As you setup your character, different tabs appear in the HumanIK window. Once a tab is displayed, it remains in the window and you may access it at any time. Toggling between tabs does not affect the current character state. Some of the buttons in the Start pane also appear as menu items in the HumanIK menu button. These options can be used in combination with one another.
You can return to this pane at any time during the setup process by selecting None from the Character menu.
Create
- Create Skeleton
-
Creates a skeleton with a valid skeleton definition in your scene and opens the Skeleton, Definition, and Control Rig tabs in the HumanIK window. This operation sets the Source state to None.Note: The Skeleton tab is only available if you create a skeleton in Maya using the HumanIK window.
- Create Control Rig
-
Opens the Create Control Rig dialog box. Select the Create button to create a HumanIK skeleton and valid skeleton definition. Select Define if you have an existing skeleton that needs to be defined.Tip: After you have a skeleton with a valid definition, select Control Rig from the Source menu to create a Control rig.
See Controls tab and Create a Control Rig.
- Create Character Definition
- Opens the Definition tab where you can map the structure of an existing skeleton. See Define an existing skeleton for HumanIK.
- Create Custom Rig Mapping
- Lets you map the structure of an existing rig. The character must have a Custom rig and a valid skeleton definition before you can define your Custom rig. If your skeleton does not have a skeleton definition, selecting this option opens the Custom Rig dialog box. Click Define to open the Definition tab or Cancel to return to the Start pane. See Custom Rig tab and Create a Custom rig mapping.
- Quick Rig Tool
- Opens the Quick Rig Tool, which lets you quickly rig a character mesh for animation. See Create an automatic character rig for a mesh.
Import Samples
- Import Human IK Example and Import Animation Example
- Click to load example scenes directly. Example characters load with a valid character definition, and are ready to be rigged.
- Get HIK and Mocap Examples Online
- Click to download a .zip file containing additional HIK and Mocap example files.