
You can view these attributes under the Smooth Mesh section on the polyShape node for the mesh.
- Smooth Mesh Preview
-
Controls how Maya displays a polygon mesh in the scene. The mesh can be displayed either un-smoothed, fully smoothed, or in both modes simultaneously. The default setting is off. See Preview a smoothed mesh.
Note: Smooth Mesh Preview affects only the display of the polygon mesh in the scene view. If you render the mesh while Smooth Mesh Preview is turned on the mesh will appear in its original un-smoothed state in the final image.If you want the mesh to appear smoothed in a rendering, you can convert the smooth preview to a smoothed polygon mesh using Modify > Convert > Smooth Mesh Preview to Polygons or to a subdiv proxy using . See also Subdiv Proxy Options.
- Display
-
Determines the display mode for Smooth Mesh Preview. Two display modes are possible:
- Cage + Smooth Mesh
-
Press the 2 key to display the selected polygonal mesh in this mode. The original un-smoothed version of the mesh is displayed in wireframe (cage) as well as a smoothed shaded preview version of the mesh simultaneously.
The Edit options specify which version of the mesh you can select components on in the Legacy Viewport only (Viewport 2.0 always allows you to select both).
- Smooth Mesh
-
Press the 3 key to display the selected polygonal mesh in this mode. Only the smoothed preview version of the mesh is displayed in this mode. You select and edit components on the smoothed preview when working in this mode.
Note: When editing components on the mesh in either preview mode, the transform manipulator always appears in the location of the component as it appears on the original version of the mesh.
- Subdivision Method
-
Lets you select the algorithm that is used to smooth a mesh in Smooth Mesh Preview mode. Different options display depending on the Subdivision Method you select.
- Use Global
-
When enabled, Maya uses the Subdivision Method that is set in the Polygon Preferences (also displayed in parenthesis to the right). See Subdivision Method. Disable this option to set the Subdivision Method on a per-object basis.
- Maya Catmull-Clark
-
Smooths the faces of a mesh using Maya's implementation of the Catmull-Clark algorithm.
For more information see Maya Catmull-Clark Controls.
Note: In Maya 2014 and earlier versions, Maya Catmull-Clark was the default subdivision method. - OpenSubdiv Catmull-Clark
- (Default) Applies a uniform refinement scheme to the faces of a mesh, subdividing the entire mesh by the same amount. See
OpenSubdiv overview.
For more information on the OpenSubdiv Catmull-Clark options, see OpenSubdiv Controls.
- OpenSubdiv Catmull-Clark Adaptive
-
Applies a progressive refinement scheme to irregular parts of your mesh. Adaptive subdivision only refines the mesh topology where additional detail is needed. It uses the GPU to generate a high resolution mesh that can be rendered at a high frame rate, without affecting your scene's performance. Adaptive subdivision supports high levels of tessellation and adjusts tessellation based on camera position, providing you with a smooth mesh whether your model is close to the camera or far away.Note: OpenSubdiv Catmull-Clark Adaptive is only supported by OpenGL 4 and DirectX11 compatible graphics cards.
- Displacement Preview
-
Toggles the display of displacement maps in the scene. Displacement Preview is off by default. When turned on, the following Smooth Mesh attributes get set:

- Smooth Mesh Preview is turned on.
Global (OpenSubdiv Catmull-Clark) is turned off.
Subdivision Method is set to OpenSubdiv Catmull-Clark Adaptive.
Note that turning Displacement Preview off does not return these attributes to their previous settings.
Hotkey: Alt + 3 toggles Displacement Preview on and off for the selected polygon objects.
Note: The Displacement Preview option is only supported by OpenGL 4 or DirectX 11 compatible graphics cards. - Smooth Mesh Preview is turned on.
Subdivision Levels
- Display Subdivisions
-
Controls whether the subdivided components in the smoothed preview are displayed on the smoothed preview version of the mesh. Subdivided components will be displayed when a check mark appears.
- Preview Division Levels
-
Controls the number of times the original version of the mesh is subdivided (Default hotkeys: Page Up, Page Down). The slider range is between 0 and 4. The default setting is 2. A value of 0 indicates no smoothing while a value of 4 is the highest smoothing within the range of the slider. You can input values higher than 4 in the text field.
Note: Whenever a polygon mesh has an associated subdiv proxy object and the Smooth Mesh Preview option is turned on, the Page Up and Page Down hotkeys will only control the smooth level on the subdiv proxy. - Use Preview Level for Rendering / Render Division Levels
-
See Use Preview Level for Rendering / Render Division Levels for more information regarding these attributes.
OpenSubdiv Controls
- Vertex Boundary
- Controls how boundary edges and corner vertices are interpolated.
Important: When working with the OpenSubdiv Catmull-Clark subdivision method, a corner is an area of your mesh where two edges meet.
- Sharp edges and corners
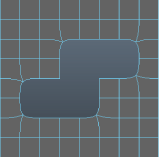
- (Default) Edges and corners remain sharp after smoothing.
In the following example, edges and two-edge corners are sharp.
- Sharp edges
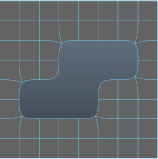
- Edges remain sharp after smoothing. Corners are smoothed.
In the following example, edges are sharp, but two-edge corners are smoothed.
- UV Boundary Smoothing
- Controls how smoothing is applied to boundary UVs.
Important: When working with the OpenSubdiv Catmull-Clark subdivision method, a corner is an area of your mesh where two edges meet.
- None
- UVs are not smoothed.
- Preserve edges and corners
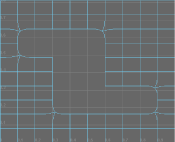
- UVs are smoothed. Edges and corners remain sharp after smoothing.
In the following example, boundary edges and two-edge corners are sharp.
- Preserve edges
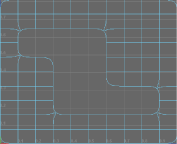
- UVs and corners are smoothed. Edges remain sharp after smoothing.
In the following example, boundary edges are sharp, but two-edge corners are smoothed.
- Maya Catmull-Clark
- (Default) When on, smooths face-varying data (UVs and colors sets) near vertices that are not on a discontinuous boundary. Vertices on a discontinuous boundary are subdivided with a sharp rule (interpolated through).
 Note: Maya Catmull-Clark UV Boundary Smoothing produces the same results as the Smooth Internal option in the Maya Catmull-Clark controls.
- Propagate UV Corners
- When on, face-varying data (UVs and color sets) from the original mesh is applied to the corners of the Smooth Mesh preview.
- Smooth Triangles
- When on, applies a subdivision rule to your mesh that makes triangles subdivide more smoothly. Smooth Triangles is off by default.
- Crease Method
- Controls how creases are smoothed during subdivision.
- Normal
- (Default) No smoothing is applied to creases.
- Chaikin
- Interpolates the sharpness of incident edges, producing semi-sharp creases. After subdividing a crease edge, the sharpness of the resulting edges is determined using Chaikin's algorithm. This method improves the appearance of multi-edge creases with different edge weights.
- OpenCL Acceleration
-
When on, OpenCL, an API that uses the GPU to perform computations, performs the subdivision.
- Adaptive Tessellation Level
-
Lets you control the level of refinement that is applied to your adaptively tessellated geometry. Increasing the Adaptive Tessellation Level improves the refinement of the tessellation, smoothing your mesh without affecting your scene's performance. Adaptive Tessellation Level is only available when OpenSubdiv Catmull-Clark Adaptive is turned on. To visualize tessellation, turn on Display Subdivisions and then adjust the Adaptive Tessellation Level.Note: Visualizing tessellation is only supported in the Legacy Default Viewport.
- UV Tiles
-
When on, displacement maps that contain tiled textures are loaded and displayed in your scene. See Loading multi-tiled UV textures through a single texture node.
Viewport 2.0 supports UV tile textures by default, so toggling this attribute has no effect. You can reload UV tile textures by clicking Generate Preview in the File Attributes group of the file texture node.
Note: OpenSubdiv does not support Explicit Tiles. - Displacement Type
-
Lets you select the displacement type that is displayed:
Note: This attribute has no effect in Viewport 2.0 . In this case, the displacement shader controls how displacement is displayed.
- Scalar
- (Default) When selected, bump maps are displayed.
- Vector (global space)
- When selected, vector displacement maps are displayed.
Note: Vector displacement maps are only supported in global space, not tangent space.
Maya Catmull-Clark Controls
- Boundary rules
- Lets you set how you want creasing applied to boundary edges and vertices as you smooth the mesh.
- Legacy
- Applies no creasing to boundary edges and vertices.
- Crease all
- (Default) Applies full creasing to all boundary edges and all vertices that have only two incident edges before being converted to a smooth mesh.
- Crease edges
- Applies full creasing to edges only.
- Continuity
-
Specifies the degree of smoothness.
- Smooth UVs
-
Applies the same smoothing operation to the UVs as to the vertices. Smooth UVs is on by default, providing better results for UVs.
Turn off Smooth UVs if you want to maintain compatibility with scenes created in older versions of Maya, or if the UVs do not need to be smoothed and you want to improve performance.
- Propagate Edge Hardness
-
Copies the edge hardness values from any hardened edges on the original mesh to the associated new edges on the smooth mesh. The default setting is off.
- Map borders
-
Controls how borders are smoothed when Smooth UVs is on.
- Do not smooth
-
Borders are not smoothed.
- Smooth internal
-
(Default) Internal borders are smoothed. This is the default setting.
- Smooth all
-
All UV borders are smoothed.
- Preserve
-
Specifies what components will remain unaffected during the Smooth.
- Geometry borders
-
When turned on (the default), this option preserves the properties of the border edges of the mesh.
- Hard edges
-
Preserves the properties of any existing manually hardened or softened edges. If you have changed the hardness or softness of edges ( or ), turn this option on to maintain those settings.
Notes on Smooth Mesh Preview
- When the Edit option for Cage + Smooth is set to Both you may want to change the active and inactive display colors for the Smooth Mesh Preview to more easily differentiate between the cage and the smoothed versions of the mesh. Select and then choose either the Active or Inactive tabs to set the related active and inactive color settings found in the Smooth Mesh Preview section of Colors preferences window.
- If you turn on Smooth Mesh Preview for one or more meshes that contain 15,000 polygons each or more you are prompted with the following message:
"The selected mesh
<object name> contains a large number of faces and may take a while to smooth or run out of memory. Do you want to continue with smooth mesh preview?". This message indicates that the interactive performance may be affected if you proceed with using the
Smooth Mesh Preview on these high polygon count objects. There are a few ways you can modify the triggers for this warning.
If you want to set the default face limit to another value, for example: 20,000 polygons, you can type the following in the command line:
optionVar -intValue smpSizeOfMeshForWarning 20000;
Alternatively you can disable the warning altogether by typing the following in the command line:
optionVar -intValue smpSizeWarningDisabledForAllPolys 1;
To re-enable the message, input the same command with a value of 0.