This menu is always available from the main menu bar, regardless of which menu set you choose.
Transform
- Transformation Tools
- Options in this submenu help you set the actions related to the transformation of scene objects.
- Select
Modify > Transformation Tools > (tool type) >
 to set the
Transformation Tools Options.
to set the
Transformation Tools Options.
- Reset Transformation
- Sets the transformations on the selected objects back to zero. This undoes any transformations since the object was created or the last “freeze”.
- Use the options to control which types of transformations (Translate, Rotate, or Scale) are reset.
- Freeze Transformations
- Adjusts the current transformations on the selected object(s) to be at the object(s)’ zero position.
Tip: Perform a freeze transform before executing operations such as stitch, align, attach, sculpt, wire, and wrinkle; or delete history before doing a freeze.
- Select
Modify > Freeze Transformations >
to set the
Freeze Transformations Options.
- Match Transformations
- Allows you to set the transform values of any selected (target) objects to match those of the last selected (source) object. You can choose to match Translate, Rotate, or Scale independently or all together. See Matching object attribute values.
Pivot
- Center Pivot
- Moves the pivot to the center of the object or component selection (based on its bounding box).
- Center Pivot supports shapes and components. For example, if components are selected, the pivot centers on the bounding box of the selected components. If an object with children is selected, the pivot centers on the entire hierarchy. If you want to center the pivot on a single shape's geometry in a hierarchy, you must select the shape node first. See Center the pivot point.
- Bake Pivot
- Applies the current tool's custom axis orientation to the selected object's transform. For example, you can edit your pivot using custom pivot editing mode and then bake your edited pivot to the selected object. You can choose to bake only the Position, Orientation, or both. See Activate custom pivot editing mode.
-
Note: This option is specific to object selections and cannot be used with component selections.
Align
- Snap Align Objects
- Options in this submenu help to snap objects together, align objects in space, and repositions a selection of objects evenly along a curve. Select
Modify > Snap Align Objects > (alignment type) >
to set the
Snap Align Objects Options.
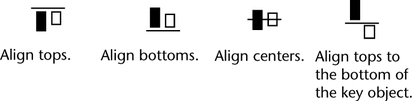
- Align Tool
- Lets you align objects visually by clicking icons representing the planes and positions you want to align.
- Select the objects you want to align. The other objects align to the last selected (green) object.

- Click an icon to align the objects. The icons show how the bounding boxes align. For example:
- Use Edit > Undo or press z to reverse an align.
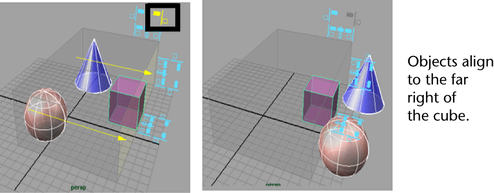
In the following example, the objects align to the far right of the cube outside the transparent box.
See also Align objects.
- Click an icon to align the objects. The icons show how the bounding boxes align. For example:
- Snap Together Tool
- Lets you visually pick the points on two objects to snap together.
- Click a point on one object, then click a point on the second object. You can drag the selected points to edit them. Then press Enter to snap the points together. See also
Snap one object to another.
- Move and rotate object(s) — As the tool snaps the points together, it rotates the moving object so the objects snap together along normals. This can help prevent the objects from intersecting.
- Move object(s) only — The tool snaps the points together without rotating the moving object. The objects retain their orientation after the snap.
- Snap to Polygon Face — Constrains the snap points to the centers of polygon faces.
Options in the Snap Together Tool are:
Nodes
- Evaluate Nodes
- The items in this submenu let you turn off evaluation of various animation and modeling nodes to improve performance. The effects of the nodes do not appear in the view panels until you turn them on again.
Naming
- Prefix Hierarchy Names
- Adds a prefix to the name of the selected parent object and all its children.
- Select the parent.
- Select Modify > Prefix Hierarchy Names.
- Type a prefix and click OK.
- See also Change the name of one or more objects.
- Search and Replace Names
- Searches node names for the string specified in Search For and replaces the named string with the string specified in Replace With.
- You can choose to search a hierarchy, selected nodes, or all nodes. See also Change the name of one or more objects.
Attributes
- Add Attribute
- Custom attributes are attributes you optionally add and define from the Add Attribute window. Although custom attributes are dynamically added to an object, we refer to them as custom to distinguish them from the built-in dynamic attributes.
- Custom attributes have no direct effect on any characteristic of an object in Maya. You can use them to control a combination of other attributes. You might also use a custom attribute as a variable—a place to store a value temporarily to be read by other attributes.
- When you add a custom attribute to an object, it appears in the Extra Attributes section of the Attribute Editor (and in the Channel Box, if you make the attribute keyable).
- Select Modify > Add Attribute to set the Add Attribute Options.
- See Create, edit, or delete custom attributes.
- Edit Attribute
- You can edit custom (or dynamic) attributes from either the Modify menu or from the Attribute Editor (Attributes > Edit Attributes).
- Select Modify > Edit Attribute to set the Edit Attribute Options.
- See Create, edit, or delete custom attributes.
- Delete Attribute
- You can delete custom attributes from the Modify menu or from the Attribute Editor (Attributes > Delete Attributes). You cannot delete built-in attributes.
- See also Create, edit, or delete custom attributes.
Objects
- Make Live
- Makes the selected surface live, letting you snap other objects and tools to its surface.
Your live surface can be a polygon mesh, NURBS surface, or construction plane.
Make Live also supports hidden surfaces. See
Set a live surface
and
Snap to a live surface.
Tip: When Make Live is used with the Quad Draw Tool, you can create new topology that is snapped to a live surface. See Create polygons interactively with Quad Draw.
- Replace Objects
- Replaces one or more objects in the scene with a specified source object. Select the objects you want to replace as well as the object you want to use as the source object. The source object must be the last object in the selection.
- Select
Modify > Replace Objects >
to set the
Replace Objects Options.
- Convert
-
Converts NURBS, Polygons, Curves, Polygons, Objects, and so on. For more information this submenu options, see Convert submenu.
Paint Tool
- Paint Scripts Tool
- Lets you use the Paint Scripts Tool to paint MEL scripts.
- For more information about painting scripts, see Overview of MEL script painting and Script paint.
- Select
Modify > Paint Scripts Tool >
to set the
Paint Scripts Tool Options.
- Paint Attributes Tool
- Lets you use the Paint Attributes Tool to paint MEL scripts. For more information, see Paint attributes. See also How Artisan brush tools work.