Autodesk Vault provides an engineering data management solution that ensures the integrity of design relationships and supports revision control, while SharePoint provides a simplified and familiar interface for other users within a design organization . This integration is achieved with Microsoft Business Data Connectivity Services (BDC) by using Autodesk Vault with Microsoft SharePoint.
SharePoint users can search, list, link, and download visualization files from Autodesk Vault using the SharePoint interface.
Deploy and Configure Vault for Sharepoint 2013
Product Requirements
- Autodesk Vault Professional 2017.
- Microsoft SharePoint 2013 Standard or higher.
– Business Data Connectivity Service
– Search Service Application
- Microsoft WSE 3 (Web Service Extensions 3 is downloadable from Microsoft.com).
Note: Hosted SharePoint environments are not supported.
Follow these steps to deploy the Microsoft Sharepoint Vault Integration and configure it for use.
Deployment
- Install the BCS model which is required for communication with Autodesk Vault.
- Create two administrative web pages.
Administrative Web Pages
- The Vault Settings page which applies to the farm. This page should be configured by a site collection administrator. The Default location is: http://<Server>/_layouts/Autodesk.Vault.BCSConnect/VaultSettings.aspx
- The Add List page which is used by site owners to create new SharePoint lists of Vault data. New lists are created on the site from which this page is accessed. The Default location on the selected site is: http://<Server>/_layouts/Autodesk.Vault.BCSConnect/addVaultlist.aspx.
Batch Files
-
deployAll.bat
- Deploys the Vault integration to the default collection.
- When using the deployAll.bat file, deployFarm.bat and deploySite.bat files are not necessary.
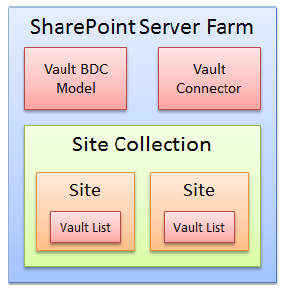
- The deployAll.bat can be used when the default site collection is the only collection or when there are multiple site collections.
- Each of the deploy batch files has an equivalent retract batch file for removal of the solution.

-
deployFarm.bat
- ThedeployFarm.bat file deploys the SharePoint solution and the BCS model.
- The deploySite.bat file deploys the Add List and Vault Settings pages at the site collection.
- You must modify the path within the batch file to use deploySite.bat. The instructions for modifying the path are detailed in the next section.
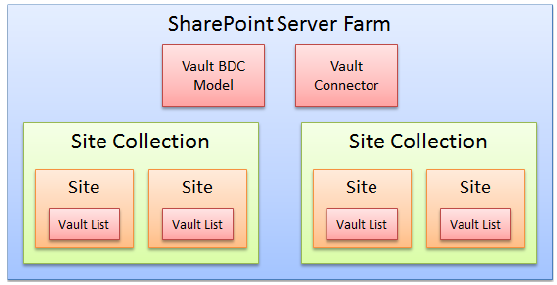
- It is permissible to deploy to multiple site collections, as demonstrated by this image.

Example of Deploying Vault for Sharepoint to a Default Site
- Default deployment creates the Add List page: http://<Server>/_layouts/Autodesk.Vault.BCSConnect/addVaultlist.aspx
- A new Vault list is desired on the site ‘Electrical’ under the site collection ‘Engineering‘: http://<Server>/sites/Engineering/Electrical/SitePages/Home.aspx
- Copy the path, starting with ‘_layouts’ from the default site. Append to the path of the selected site: http://<Server>/sites/Engineering/Electrical/_layouts/Autodesk.Vault.BCSConnect/addVaultlist.aspx
Following is an example of the steps taken when deploying to the default site, and then accessing the Add List web page from a sub-site of another site collection.
Using this virtual path to access the Add List page will create a new vault list that is exclusive to the site from which it was created.
Modify the path in the deploySite.bat file
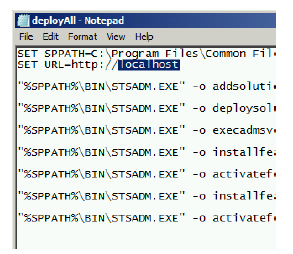
- Open the batch file with Notepad and replace ‘localhost’ with the server name.
Set URL=http://<Server>

- If deploying the Vault integration to a specific site collection, modify the
deploySite.bat file with the path to that site collection.
For Example, if your server was ServerABC and the site collection was Engineering, you would enter: Set URL=http://ServerABC/Sites/Engineering
- If updating an existing deployment of Vault connector, run retractAll.bat to prepare the existing deployment for an update.
Set Access Permissions
- Start SharePoint Central Administration.
- Click Manage service applications under Application Management.
- Click Business Data Connectivity Service.
- In the Vie section, select External Content Types in the drop-down menu.
- Check the box next to AdskVaultChangeOrder and click the Set Object Permissions button.
- Add All Users(windows) and click the Add button.
- Check each permission box and click the OK button.
- Repeat steps 5-7 for AdskVaultFile and AdskVaultItem.
You must configure access permissions for Vault files, Items, and Change Orders.
Configure Vault for Sharepoint
- Configure Vault Login Credentials
- Configure the Profile Page in SharePoint
- Configure Vault Search for SharePoint
- Create and Manage Vault Lists in SharePoint
- Manage Thumbnails in SharePoint
When you have finished installing the Vault for SharePoint integration, you must configure SharePoint to work with Vault by following the steps in the following sections.