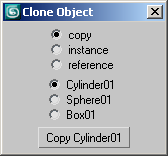
Radiobuttons UI コントロール
radiobuttons コントロールは、一連のラジオ ボタンをロールアウトに配置するのに使用します。一度に 1 つしかチェックできません。ユーザはセット内のさまざまなボタンをクリックして状態を変えることができます。
構文は次のようになります。
radiobuttons <name> [<caption>]	labels:<array_of_strings> \
[tooltip:{<string>|<array_of_strings>}] \
[default:<number>] [columns:<number>] [offsets:<array_of_point2s>]
radiobuttons 項目の既定の位置合わせは、 #center です。
| 例:
|
--Create some scene objects. Select them, then run the script:
(
local obj_array = selection as array
local obj_name_array = for o in obj_array collect o.name
rollout CloneObject "Clone Object" (
radiobuttons copy_type labels:#("copy", "instance", "reference")
radiobuttons which_obj labels:obj_name_array -- computed label array
button do_it "Copy Object"
fn updateButton = (
do_it.text = case copy_type.state of (
1: "Copy "
2: "Instance "
3: "Reference ")
do_it.text += obj_name_array [which_obj.state]
)--end fn
on copy_type changed state do updateButton()
on which_obj changed state do updateButton()
on CloneObject open do updateButton()
on do_it pressed do (
copyfn = case copy_type.state of (
1: copy
2: instance
3: reference)
if which_obj.state > 0 do copyfn obj_array[which_obj.state]
)--end on pressed
)--end rollout
if obj_array.count > 0 do createDialog CloneObject
)--end script
|
|
|
パラメータ
labels:<array_of_strings>
ラジオ ボタンの数と各ラジオ ボタンのテキスト ラベルを指定する文字列配列です。
最初に選択されているラジオ ボタンの番号です。既定値は 1 です。
0 に設定すると、ラジオ ボタンはまったく選択されません。
ボタンを配置する列の数です。既定では、MAXScript はすべてのラジオ ボタンを 1 行に並べてレイアウトしようとします。1 行に入りきらない場合には、1 列下げます。このパラメータを使用すると、複数の列にボタンを配列するレイアウトにするように強制できます。各列には同じ幅が与えらます。この幅はすべての列の最大ラベルの幅であり、列内のラジオ
ボタンは左揃えになります。
| 例:
|
--create radio buttons with two columns:
rollout testRollout "Test Size"
(
radiobuttons rad_buttons "Size:" labels:#("Big", "Bigger", "Biggest", "Huge") columns:2
)
createDialog testRollout
|
tooltip:{<string>|<array_of_strings>}ラジオ ボタンのオプションのツールチップを表示します。
文字列を指定すると、その文字列がすべてのラジオ ボタンのツールチップとして使用されます。
文字列の配列を指定する場合、配列のサイズはラベルの配列サイズと同じにする必要があり、対応する配列要素が各ラジオ ボタンに使用されます。
3ds Max 2012 以降で使用できます。
スクリプト例:
| 例:
|
rollout MyRollout "Untitled" width:162 height:300
(
radioButtons rdo1 "RadioButtons" tooltip:"Test Tooltip 1" labels:#("Button1", "Button2")
radioButtons rdo2 "RadioButtons" tooltip:#("Test Tooltip 2","Test Tooltip 3") labels:#("Button1", "Button2")
radioButtons rdo3 "RadioButtons" labels:#("Button1", "Button2")
-- radioButtons rdo4 "RadioButtons" tooltip:#("Test Tooltip 4") labels:#("Button1", "Button2")
button btn1 "Button" tooltip:"Test Tooltip 5"
)
createdialog MyRollout

--Enabling the remarked rdo4 will cause
--an error because the number of tooltip items
--does not match the number of labels items
|
offsets:<array_of_point2s>
オプションのラジオ ボタン オフセットを指定して、コントロール内のラベル レイアウトを調整します。
配列のサイズはラベルの配列サイズと同じにする必要があり、対応する配列要素が各ラジオ ボタンに使用されます。
オフセットは作成時に一度設定され、後で修正することはできません。
3ds Max 2013 以降で使用可能です。
サンプル スクリプト:
| 例:
|
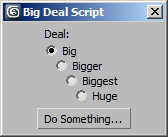
rollout testRollout "Big Deal Script"
(
 radiobuttons rad_buttons "Deal:" columns:1 \
   labels:#("Big", "Bigger", "Biggest", "Huge") \
   offsets:#([0,0], [10,0], [20,0], [30,0])
 button btn_dosomething "Do Something..."
)
createDialog testRollout
|
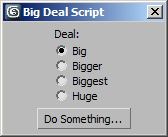
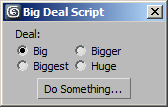
| 左のスクリーンショットは、offsets: パラメータなしの同じダイアログ ボックスを示しています。既定の #center 位置合わせでは、コントロールの境界ボックスの新しい幅を考慮します。オフセットは、ラジオ
ボタン項目の元の位置に対して相対的です。
|
|
| 例:
|
rollout testRollout "Big Deal Script"
(
 radiobuttons rad_buttons "Deal:" columns:1 \
   labels:#("Big", "Bigger", "Biggest", "Huge") \
   offsets:#([0,0], [0,0], [10,5], [10,5])
 button btn_dosomething "Do Something..."
)
createDialog testRollout
|
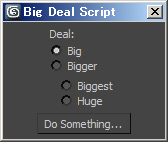
| オフセットは、1 列使用する場合には累積されません。3 番目のラベルを水平方向に 10 オフセットしても、4 番目の項目には影響しません。また、水平方向のオフセット
10 を行内に収める必要があります。同様に、最後の 2 つのラベルをブロックとして垂直方向にオフセットするには、両方のラベルの垂直方向オフセットを同じ 5 にする必要があります。同じにしないと、重なって表示されます。
|
|
| 例:
|
rollout testRollout "Big Deal Script"
(
 radiobuttons rad_buttons "Deal:" columns:2 align:#left \
   labels:#("Big", "Bigger", "Biggest", "Huge") \
   offsets:#([30,-16], [0,-16], [30,-16], [0,-16])
 button btn_dosomething "Do Something..."
)
createDialog testRollout
|
| 水平方向のオフセットは、複数列を使用する場合には累積されます。1 番目と 3 番目の項目を 30 オフセットすると、2 列目の水平位置もシフトするため、そのラベルをオフセットする必要はありません。同時に、4
つのラベルを上方にブロックとして移動するには、4 つすべての垂直オフセットを 16 にする必要があります。垂直方向のオフセットは累積されません。ダイアログ ボックス内の同じ場所にコントロールを固定するため、align:#left
を使用します。
|
|
プロパティ:
<radiobuttons>.state Integer
この番号は labels: 配列で指定されている順番になります。何も選択されていない場合は、0 になります。
| 例:
|
rollout testRadioButtons "Test RadioButtons"
(
-- Define 2 radio buttons with the first button selected
radiobuttons radButtons labels:#("First","Second") default:1
-- When the button is pressed, clear the radio buttons selection!
button setToNone "Clear Buttons Selection"
on setToNone pressed do radButtons.state = 0
)
createDialog testRadioButtons
|
イベント
on <radiobuttons> changed <arg> do <expr>
セット内のラジオ ボタンの 1 つをクリックすると呼び出されます。 <arg> 引数には、ラジオ ボタン配列の新しい状態が入ります。新たに選択されたボタンの番号は 1 から始まります。
on <radiobuttons> rightClick do <expr>
ユーザがラジオボタン コントロールを右クリックしたときに呼び出されます。
3ds Max 2010 以降で使用可能です。

