MassFX provides tools for animating objects to behave as they do in the physical world. To start learning MassFX, it's best to begin with the rigid body, which simulates hard objects such as wood, plastic, and metal.
In this tutorial you create a simple simulation in which a falling sphere (maybe a child's toy ball) causes a bowl to fall off a coffee table.

The exercise highlights a few aspects of using MassFX:
- Adding objects to a simulation by making them rigid bodies.
- Distinguishing between Dynamic and Static rigid bodies.
- Configuring the physical shape of a concave object.
Skill level: Beginner
Time to complete: 20 minutes
Preparation for This Tutorial
- If you have not already downloaded the tutorial files (MAX scenes and other assets), download them now and unzip them into a project folder called \Autodesk 3ds Max 2018 tutorials. See Where to Find Tutorial Files.
- Click and set your current project to Autodesk 3ds Max 2018 Tutorials.
Set up the lesson:
- Click
, navigate to the
\animation\massfx
folder, and open
coffeetable_disaster_start.max.
Note: If a dialog asks whether you want to use the scene’s Gamma And LUT settings, accept the scene Gamma settings, and click OK. If a dialog asks whether to use the scene’s units, accept the scene units, and click OK.
The scene contains three objects: A ball in mid-air, a box that is also in mid-air that will serve as a static table, and a bowl that rests on the table.

Set up the coffee table:
- If the MassFX toolbar isn't already visible, right-click the area to the right of the main toolbar, and from the pop-up menu, choose MassFX Toolbar.

3ds Max opens the toolbar.

MassFX toolbar
-
 Select the
Coffee Table object.
- On the MassFX toolbar, open the Rigid Bodies flyout (the second button), and from the flyout list choose Set Selected As Static Rigid Body.

A static rigid body is part of the simulation, but otherwise it doesn't move or change.
- Go to the
 Modify panel. MassFX sets up objects by applying a modifier, MassFX Rigid Body, to the objects you choose.
- Look at the Physical Shapes rollout. The default Shape Type for this static body is Box, because it started out as a box primitive.
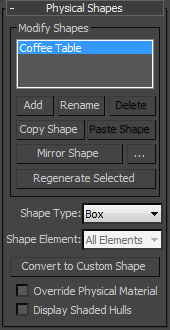
MassFX works with two kinds of geometry:
- The
graphical mesh is the original object geometry.
Typically, you use graphical meshes (Original) for Static bodies, which do not move in the simulation.
- The
physical shape is the geometry that MassFX uses in the simulation to represent the graphical mesh.
Typically, you use physical shapes for all moving bodies in the simulation.
The rule of thumb is to use the simplest geometry you can get away with. In this case, the coffee table is a simple box that is static, so Original will work fine. Open the Shape Type drop-down list and choose Original.
The other two objects in the simulation are Dynamic rigid bodies: They can respond to forces such as gravity and can interact physically with other objects in the simulation.
- The
graphical mesh is the original object geometry.
The table is a box that doesn't move, so it is the simplest object in this simulation.
Set up the ball:
 Select the
Ball object.
- On the MassFX toolbar, open the Rigid Bodies flyout, and from the list choose Set Selected As Dynamic Rigid Body.
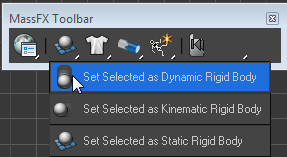
Dynamic rigid bodies are the objects that move under physical forces. In the case of the ball, the force is gravity.
- On the Modify panel
 Physical Shapes rollout, check the Shape Type.

The default mesh type for most dynamic bodies is Convex. This is a fair approximation of the shape of the ball, as you can see in the viewports.
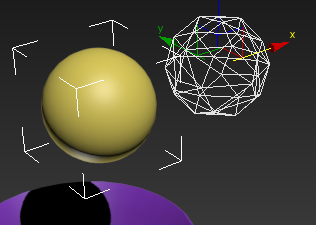
Convex physical shape approximates the ball
Note: Mesh Transform sub-object level was used to offset the physical shape for clarity.
However, the default shape is not one that will roll very well. The MassFX Rigid Body modifier has a better shape for spherical objects.
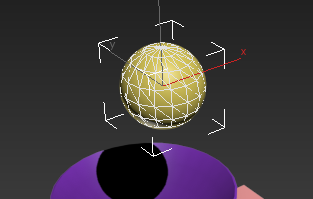
- On the Physical Shapes rollout, open the Shape Type drop-down list and choose Sphere.
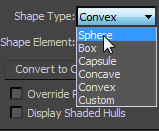
Now the physical shape matches the shape of the original ball.
Set up the bowl:
- Select the Bowl object.
- On the MassFX toolbar, click
 (Set Selected As Dynamic Rigid Body).
(This button should be displayed after you used the same option for the ball.)
The default Convex physical shape is not a good approximation of the bowl, because it is a convex shape, as you can see in the viewports.
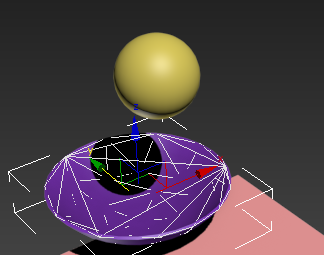
A Dynamic rigid body must be represented in MassFX with convex physical shapes. To model a concave shape such as the bowl, you can approximate it with a collection of smaller convex shapes. The MassFX Rigid Body modifier provides the Concave shape type, which lets you create this collection automatically.
- On the Modify panel
 Physical Shapes rollout, open the Shape Type drop-down list and choose Concave.
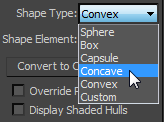
The Convex physical shape disappears. There is no default "Concave" shape: You need to construct a custom Concave shape collection for every concave object in your simulation.
- On the Modify panel, scroll down to the Physical Mesh Parameters rollout. On this rollout, click Generate.
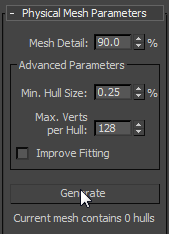
3ds Max calculates for a little while. During this time it displays the status message "Calculating" and the progress as a percent. When the physical shape is complete, the status line displays information about the new Composite mesh: "Current mesh contains 14 hulls." In the viewports, however, you can see that the new physical shape is still convex.

With certain auto-generated concave shapes, it's necessary to turn on a switch that improves the fit.
- On the Physical Mesh Parameters rollout, turn on Improve Fitting (just above the Generate button) and then click the Generate button again.
Now the shape is truly concave, but it's also needlessly complex, with 115 hulls.
- Make the following settings on the Physical Mesh Parameters rollout:
- Mesh Detail: 0.0
- Min. Hull Size: 5.0
- Max Verts per Hull: 10
- Click Generate again.
Now the mesh contains only 10 hulls, which will simulate faster. As you'll see, it's enough to create a convincingly concave physical shape for the bowl.
 Tip: In a simulation like this, where the interaction between the ball and the bowl affects the movement of both, the shapes of the individual hulls can make a significant difference. After you run the simulation in the next part of this tutorial, try changing the mesh parameters (be sure to click Generate each time), then run the simulation again to see the changes in behavior.
That is all it takes to set up this simulation. Now you are ready to see it in action.
The bowl requires a bit more setup because it is concave.
Play the simulation:
- On the MassFX toolbar, click
 (Start Simulation).
There is a brief pause while 3ds Max does the calculations, then the ball falls into the bowl, bounces a bit, and ends by rolling off the table, taking the bowl with it.
- To play the simulation again, you can click MassFX toolbar

 (Reset Simulation), and then click
 (Start Simulation) once again.
Another way to make the simulation repeatable is to bake it as a 3ds Max animation. The next procedure shows you how to do this.
Bake the animation:
- On the MassFX toolbar, click
 (World Parameters).
3ds Max opens the MassFX Tools dialog to the World Parameters panel.

- On the MassFX Tools dialog, click the
 (Simulation Tools) tab.
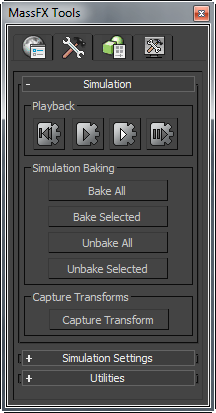
- On the Tools tab, click Bake All.
3ds Max converts the simulation to keyframes. While doing so, it displays a progress bar at the bottom of the window.
Once the baking is complete, you can play the simulation as a regular animation, by clicking
 (Play Animation) near the lower-right corner of the
3ds Max window. You can also render the baked animation to a video file. And if you want to go back and tweak the simulation, you can unbake any or all objects.
Tip: A baked MassFX simulation is a "heavy" animation, with a key on each frame for every moving object. If you plan to edit the animation further, you can make the animation more manageable by using the Track View
 (Simplify Curve) tool on each animated object.
"Baking" a procedural animation involves recording the transforms of each object in the animation as keyframes. Typically this is done on a frame-by-frame basis, resulting in a renderable animation that is identical to the original simulation.
Save your work:
- Save the scene as
my_coffeetable_spill.max.
The file coffeetable_disaster_setup.max includes the MassFX setup described in this tutorial, without baked animation.
To see a version of the coffee table aninimation, play this movie:
Summary
MassFX creates animation by simulating real-world physics.
Properties of objects in the simulation are provided by the MassFX Rigid Body modifier. Simple static objects can be represented by a geometric (Original) mesh; dynamic objects are represented by a physical shape that can take a number of different forms, depending on the original geometry. To simulate a concave object, choose the Concave physical shape type, then click Generate to construct a set of convex hulls that approximates the concave object.
Once objects are set up, click
 (Start Simulation) to view the results.
You can bake the simulation into a standard 3ds Max animation.