In this lesson, you'll use the Walkthrough Assistant to animate a camera, simulating a walk or run along the Great Wall of China. The scene contains a camera path ready for constraining the camera, but you will first need to create a sufficient number of frames to hold your animation.
Set up this lesson:
- On the Quick Access toolbar, click
 (Open File) and from the \animation\walkthrough_asst folder, open
great_wall_start.max.
Note: If a dialog asks whether you want to use the scene’s Gamma And LUT settings, accept the scene Gamma settings, and click OK. If a dialog asks whether to use the scene’s units, accept the scene units, and click OK.
(Open File) and from the \animation\walkthrough_asst folder, open
great_wall_start.max.
Note: If a dialog asks whether you want to use the scene’s Gamma And LUT settings, accept the scene Gamma settings, and click OK. If a dialog asks whether to use the scene’s units, accept the scene units, and click OK.
Calculate the number of frames:
- On the Scene Explorer panel, click to select the Camera Path. The camera path object is a spline that the camera will follow.
 Tip: By default, the Scene Explorer panel appears to the left of the viewports, but if it has been hidden, you can press the H key to display a floating version of the Explorer.
 - On the
 Utility panel, click the Measure tool.
 This tool reports the length of the camera path is roughly 900 feet.
Note: For a comfortable walking pace, which is useful in architectural walkthroughs, you'll need about a second for every 3 feet of distance. For a jog or a fast run, you can go as far as 9 feet for a second. In NTSC format, that translates into 30 frames for every 9 feet of distance traveled, or 3000 frames for 900 feet. - Click
 (Time Configuration), next to the Current Frame Field.
 - In the Animation group in the Time Configuration dialog, change Start Time to 1. Change End Time to 3000 to increase the number for frames in the animation, and then click OK.
This will provide sufficient frames for your walkthrough animation.
The time slider frame indicator now displays 3000 frames.
Creating a basic setup using Walkthrough Assistant:
- From the Animation menu, choose Walkthrough Assistant.
A modeless dialog displays.
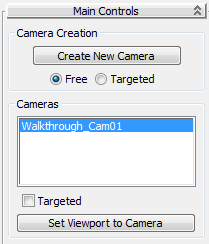
- In the Camera Creation group in the Main Controls rollout, ensure the Free Camera option is chosen, and then click Create New Camera.
A new camera is created in the scene. The camera name, Walkthrough_Cam001, displays in the Cameras group.
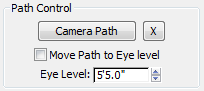
- In the Path Control group, click Pick Path and then in a viewport, click the Camera Path spline.
The Pick Path button label changes to reflect the name of the selected spline. This constrains the Camera Position to the path. It also aligns it to follow the direction of the path.
 Note: By default, the camera will travel at a constant speed and will always point in the direction of travel. This is shown in the Advanced Controls rollout at the bottom of the dialog where both these options are enabled.
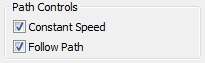
- Right-click the lower-right Perspective viewport to activate it. In the Main Controls rollout, click the Set Viewport To Camera button to switch the viewport to the Camera view.
- Click
 (Play Animation) to view the results in the Camera view.
 The camera travels along the path but the motion seems unnatural, almost robotic. This is because the aim or target of the camera is controlled by the path constraint. It is far better to control the target manually, and choose the direction you want to look at any given time. As an analogy, as you walk in a straight line down a museum hallway, you would turn your head to look at the paintings on the wall instead of keeping your head pointed in the direction of your feet as you walk.
Save your work:
- Save the scene as my_walkthrough_camera.max.
In the next lesson, you learn how to animate the camera using the Walkthrough Assistant.