By default, any injection molding simulation in Moldflow predicts the formation and movement of 3D weld surfaces. However, this prediction does not include any information about the temperature or pressure history of the points that lie on the weld surface. The temperature and pressure histories are necessary to map the weld surface to the structural model in Advanced Material Exchange.
Activate Weld Surface Strength Analysis
We need to activate the weld surface strength analysis to obtain the temperature and pressure histories. This must be done before running the Moldflow simulation.
- Click Process Settings
- Click Advanced Options
- Click Edit in the Solver Parameters frame
- Select the Interface tab
- Turn ON the Weld surface strength analysis option
- Click OK

When the Weld surface strength analysis option is activated, Moldflow will create a .ws3 file during the analysis. This .ws3 file is read by Advanced Material Exchange when the study file is imported.
Add Weld Surface Coefficients
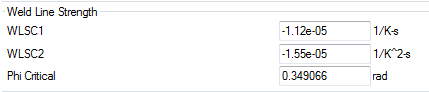
Before you can use Advanced Material Exchange to automatically predict the strength reduction factor of the weld surface points, you must specify three data points associated with your material. Specifically, you must provide cT1, cT2, and θc which are used in the Robbins method calculations. To add this data to your Moldflow material:
- Right-click the material name in the browser and select Edit.
- Switch to the Mechanical Properties tab.
- Provide values for
WLSC1,
WLSC2, and
Phi Critical.
- Click OK.
Now you are ready to run your Moldflow simulation.