You can edit bridges individually by entering specific values in the Selected Bridge area of the Tool Settings: Create Bridges panel, or by using the cursor to drag the bridges into new positions, and alter their length. Bridges can be edited in the 2D and 3D views.
To edit bridges:
- Select the vector which contains the bridges you want to edit.
- Open the Tool Settings: Create Bridges panel:
- Click Edit Bridges
 in the Manual Bridges area of the Profiling, Bevel Carving, Female Inlay, or Male Insert panels; or
 - Click Create Bridges
 in the Toolpaths Operations area of the Toolpaths panel.
The bridge location icons on the vector change from
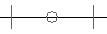 to
to 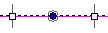 and the Tool Settings: Create Bridges panel is displayed.
 - Click Edit Bridges
- Select Update Bridges.
When the Tool Settings: Create Bridges panel is displayed, you can start editing bridges.
To edit all bridges simultaneously:
- Update the values you want to change in the top section of the panel.

- Click Update all to update the bridges on the vector.
Editing individual bridges:
Click the dark blue circle on the bridge you want to edit. The circle changes from to 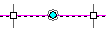 to indicate it is selected.
- To edit the bridge length, either:
- Enter a new value in the Length box in the Selected Bridge area of the Tool Settings: Create Bridges panel and click Apply; or
- Drag one of the white handles either side of the cyan circle. Release the mouse button to position the handle.
- To edit the bridge's thickness, enter a value in the Thickness box in the Selected Bridge area of the Tool Settings: Create Bridges panel and click Apply.
- To change the location of bridge, drag the turquoise circle. Release the mouse button when the bridge is in the correct location.
- To insert a new bridge, move the cursor to the position on the vector at which you want to add the bridge and either:
- Left-click the vector. The centre of the new bridge is positioned under the cursor; or
- Press the I key. The centre of the new bridge is positioned under the cursor.
- To delete a bridge, either:
- Right-click a bridge and select Delete Bridge from the context-menu; or
- Position the cursor over a bridge and press the D key.