Select this menu option to reposition vectors in a way that is most economical with your material. The Nesting panel is displayed.
 button on the
Vector and
Vector Creation toolbars is a shortcut for this menu option.
button on the
Vector and
Vector Creation toolbars is a shortcut for this menu option.
For example, if you have an area of material that cannot contain a block of vector text as it is normally written, or a group of vectors, you need not treat it as waste material. Rather than creating the space to fit the vector text or group of vectors in the conventional sense, you can manipulate them to fit into the available space.
You can nest vectors within another vector or the model area. If you are nesting vectors within another vector, you must create a closed vector that represents the shape of material you have available in which to machine. You can use the vector creation tools to specify its shape. For example, if you have an odd shape of material available in which you want to nest vector text, use the Create Polyline tool to reproduce its outline.
The Nesting panel contains the following settings:
- Toolpath dimensions — To cut out the nested parts, you must leave a gap between the nested vectors. Enter values in these boxes to specify the size of the gap.
- Tool diameter — Enter the diameter of the cutting tool that you are using to machine the nested vectors.
- Toolpath clearance — Enter the amount of additional material with which you want to surround each nested vector.
- Edge clearance — Enter the minimum distance between the nested vectors and the boundary.
- Settings
- Allow part rotation — Select to enable the vectors to be rotated during the nesting process. In the
Step angle box, enter the increment by which you want
ArtCAM to rotate the part. For example, if the
Step angle
is set as 90
 ,
ArtCAM attempts to nest the vectors by rotating them by 0, 90, 180 and 270 in sequence.
,
ArtCAM attempts to nest the vectors by rotating them by 0, 90, 180 and 270 in sequence.
- Allow mirrored parts — Select to enable
ArtCAM to mirror vectors during nesting if this makes the most economical use of the material. This option is useful if your material is reversible.
In this example, a letter E is mirrored to fit inside another letter E.
- Allow parts in parts — Select to enable the vectors to be nested inside of those vectors within the selection that have a central cavity.
In this example, a small letter a is nested inside a large letter O.

- Guillotine cut — Select this option to attempt to line up rectangular parts and minimise the length of cuts.
- Nest from — Select the corner from which to nest the vectors. Select:
bottom left to begin nesting the vector artwork from the boundary's bottom-left corner.
bottom right to begin nesting the artwork from the boundary's bottom-right corner.
top left to begin nesting the vector artwork from the boundary's top-left corner.
top right to begin nesting the vector artwork from the boundary's top-right corner.
- Nest direction — Select the axis along which you want to nest the vectors. Select:
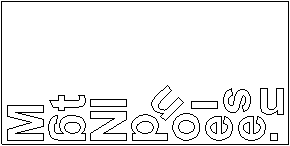
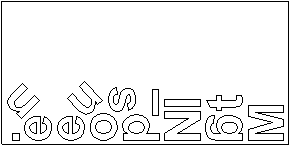
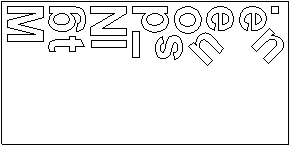
X to nest the selected vectors along the X-axis. This is selected by default. Selecting this option causes the nested vectors to be stacked horizontally within the specified boundary; progressing along the model's X-axis from the corner selected from the Nest From list. For example, nesting the vector text from the bottom left along X looks as follows:
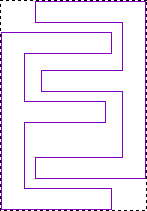
Y to nest the selected vectors along the Y-axis. Selecting this option causes the nested vectors to be stacked vertically within the specified boundary; progressing along the model's Y-axis from the corner selected from the Nest From list. For example, nesting the vector text from the bottom left along Y looks as follows:

- Curve tolerance — This box determines how closely the shapes of any Bézier curves are followed. Entering excessively small values increases calculation times.
- Allow part rotation — Select to enable the vectors to be rotated during the nesting process. In the
Step angle box, enter the increment by which you want
ArtCAM to rotate the part. For example, if the
Step angle
is set as 90
- Boundaries and grouping
- Use model as boundary —Select this option to use the model area as the material boundary. Deselect this option to use the first vector selected as the material boundary.
- Group inside and outside of shapes on nesting — Select this option to group and preserve shapes that have outer and inner vectors defining the shape outline. If deselected, you can use the Group Now button to identify and group vectors that form the inside and outside of shapes, which is useful if you want multiple copies of specific parts as it reduces the need to group vectors manually.
- Group nested vectors — Select to group the vectors after they are nested.
- Create leftover material vector — Select to create a vector from the material that remains after the vectors are nested. If you want to send this vector to the vectors library, select Send to vector library.
- Copies
- All parts— To nest multiple copies of each vector, enter the number of copies you want to create.
- Selected part — If you have deselected Group inside and outside of shapes on nesting, you may specify a separate number of copies for each part. Each part count is displayed in blue.
- Sheets — Enter a value in the
Maximum number of sheets box to limit the number of sheets.
Note: If you limit the number of sheets, ArtCAM may not nest all of the selected vector artwork. If ArtCAM is unable to nest all selected vectors, a message gives details of how many selected vectors are and are not nested. All un-nested vector artwork remains associated with the Default Sheet and is shown in its original position.
- Nest — Click to nest the selected vectors according to your settings in the Nesting panel.