To nest vectors:
- Select
Edit > Select or click the
Select
 button.
- Select
Vector > Nest Vectors or click the
Nest Selected Vectors
 button. The
Nesting panel is displayed.
button. The
Nesting panel is displayed.
- If the current
ArtCAM model area does not represent the piece of material in which you want to nest objects:
- Draw and select the vector representing the piece of material you have available to machine.
- Press and hold the Shift key while selecting the vectors you want to nest within the selected vector.
Note: By default, selected vectors are always nested within the vector you select first. - If the model area shown in the 2D view is representative of your exact material dimensions:
- In the Boundaries and Grouping area, select Use model as boundary.
- Select each vector you want to nest within the model area.
In the following example, the model area represents the material. All of the vectors you want to nest within the model area are selected:

- Specify the settings in the Nesting panel.
- Click
Nest to nest the selected vectors onto sheets.
The calculation time depends on the nestingoptions you have selected.
The arrangement of the rows and columns of sheets shown in the 2D view will vary according to the most economical use of the available workspace.
In this example, we have allowed for part rotation using a step angle of 45 degrees only. The default sheet and the four sheets of nested vectors are arranged as shown:

Each sheet of nested vectors is listed under the Sheets item in the Project Tree. You can control which sheet of nested vectors is active in the 2D view by clicking to select the name of the specific Sheet you want to view from the list. Only one sheet can be active at any given time, although it is possible to preview the contents of all sheets simultaneously. You can only edit the vector artwork on the active sheet.
All identical sheets of nested vectors are merged into a single sheet. For example, if three sheets of nested vectors were found to be identical during the nesting process, all of them would be merged into a single sheet named Sheet 1 (3 Copies).
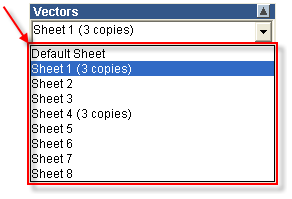
During the manufacturing process, you need only create the necessary toolpaths using this single sheet, and then machine it three times to produce the required number of pieces.