In the Tools List area, you can select the roughing or engraving tools you want to use and define their parameters.
- Tools List — The
Tools List displays all the tools which have been selected. Click
Add to display the
Tool Database dialog and select a tool. You can add as many tools as are needed for the job. Select a tool in the
Tools List to display its parameters.
In the Tools and Groups window, select the tool you want to use. Information about the tool is displayed in the Tool / Group Description area of the dialog. Click Select to close the dialog and return to the 2D Area Clearance panel.
The name of the selected tool is displayed in the Tools List window. Below the Tools List area, the selected tool's machining parameters and the Tool Clearance Strategy area is displayed.
To add another tool, click the Add button again and select another tool from the Tool Database. To remove a tool, select the tool from the Tools List window and click Remove.
- Allowance — If you want to leave extra material around the vector, enter the distance between the boundary of the selected vector and the roughing or engraving tool in the Allowance box.
- Tool Clearance Strategy — Select the tool for which you want to set the clearance strategy. You must select a separate tool clearance strategy for each tool in the
Tools List window.
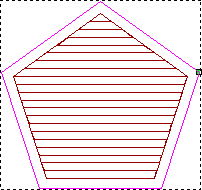
- Raster — This strategy machines in passes back and forth along the X axis at a specified angle. If you select this strategy, enter the angle at which you want the tool to move in the
Angle box.
Raster angle of 0

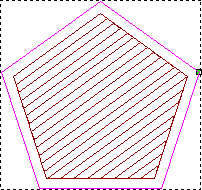
Raster angle of 36
 Tip: You can set the default raster angle using the Options panel.
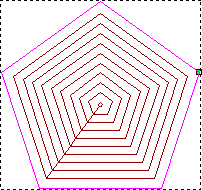
 - Offset — This strategy machines in repeated passes, each time moving inwards by the selected tool's
Stepover value. You can see the stepover value of the selected tool when its machining parameters are displayed.
Select a Cut direction option:
Climb mill — Select the option to rotate the cutter in the same direction as the feed motion. The option is selected by default.
Conventional — Select the option to rotate the cutter in the opposite direction to the feed motion.
Tip: Set the default cutting direction on the Options panel.
- Raster — This strategy machines in passes back and forth along the X axis at a specified angle. If you select this strategy, enter the angle at which you want the tool to move in the
Angle box.
- Do Corner Sharpening — If selected, the engraving tool sharpens the corners of vectors during the machining pass. The engraving tool is lifted in the Z direction to minimize the curvature in the corners of the vector.
Do Corner Sharpening DESELECTED…
Do Corner Sharpening SELECTED…
 Note: You cannot use the Do Corner Sharpening option in an engraving toolpath without using a 3-axis machine. For more information, consult a member of staff or your machine-tool supplier.Note: This option is available only if you have an engraving tool selected, and if the Vectors are on surface option is selected.
- Extend Above Start Depth — If selected, corner sharpening moves which attain the start depth are linearly extended. Moves are extended by the specified Z height above the start depth.
- Only Smart Engrave Profile — If selected, only sections of vector artwork which have not been machined with a larger tool are machined.
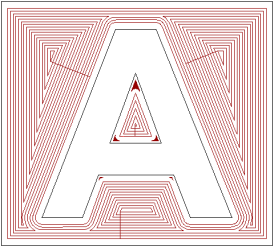
- Profile Only — If selected, the engraving tool makes only a single pass around the selected vectors.
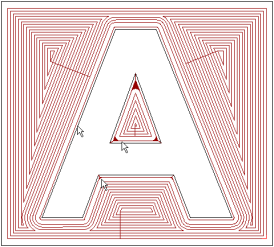
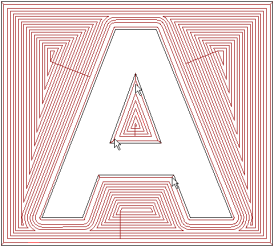
In the following, the number of machining passes is reduced, particularly in the central cavity of the vector text A, when the Profile Only option is selected.
Profile Only OFF…
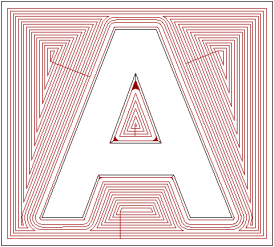
Profile Only ON…
- Independent Finish Depth — If you want the selected tool to cut to a different depth than that displayed in the Finish Depth box, select the Independent Finish Depth option, and then, in the Finish Depth box, enter the relative depth (Z) of the bottom of the area you want to clear.
- Add Ramping Moves — Select the check box to add ramping moves to the toolpath. This displays the ramping settings. All of the ramping move settings are selected by default. Deselect any of the settings you do not require. The boxes for the deselected options are unavailable.
- Max Ramp Angle (A) — Enter the maximum angle of descent for each zig and zag movement of the tools.
- Max Ramp Length (L) — Enter the maximum distance that you want the tools to zigzag across the material surface.
- Min Ramp Length (Lmin) — Enter the minimum distance that you want the tools to zigzag across the material surface.
- Zig Start Height (S) — Enter the height at which the ramping moves start.
Note: If you do not select the Zig Start Height (S) option, the Safe Z level specified in the Machine Safe Z area is used instead.