- Click the Features
 step in the Steps panel.
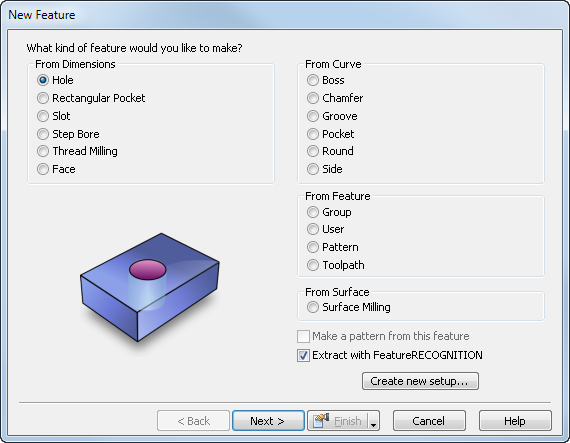
This displays the New Feature wizard.

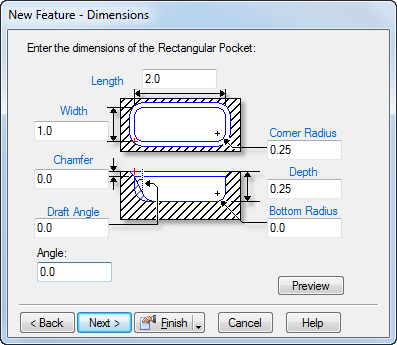
- Select Rectangular Pocket and click Next to open the New Feature - Dimensions page. Enter the following attributes:

- Length — Enter the X dimension of the feature.
- Width — Enter the Y dimension of the feature.
- Depth — Enter the distance cut into the material in Z.
- Corner radius — Enter the radius for all four corners of the Rectangular Pocket.
- Chamfer — Optionally enter the depth of a 45
 chamfer cut at the top edge of the feature. Leave this value at the default, 0, for no chamfer.
 - Draft angle — Optionally set an angle for the feature wall. Use only positive numbers.
- Bottom Radius — Optionally set a bottom radius for the feature. The radius corresponds to the shape of the cutter. By default, the material is milled using a flat-bottomed mill, making stair-step passes when close to the radius. Then a rough and finishing pass is made with the radiused mill. The default value is 0, which cuts a square corner.
- Click Next to open the New Feature - Location page.
- Click Next to open the New Feature - Strategies page.
- Click Next to open the New Feature - Operations page.
- Click Next to open the New Feature - Default Tool page for the first operation.
- Click Next to open the New Feature - Feed/Speed page for the first operation.
- If you have more than one operation, clicking Next opens the New Feature - Default Tool page for the next operation. If you have no more operations, clicking Next opens the New Feature - Summary page.
- Click Finish to create the feature and exit the wizard or click Back to return to previous pages.
Tip: If a dimension field has a blue label, you can click it and 'pick' the dimension from objects in the graphics window.
Note: You can edit the feature later.
If you want the wall of your feature to have a special cross section:
- After you have created the feature, open the Feature Properties dialog and click the Dimensions tab.
- Click the X Section button to open the Select Side Curve dialog.
- Select the curve that matches your cross-section shape.
- Click OK.
See also:
Cross section (X section) for Boss, Side, or Pocket for restrictions on the curve