The Convert to Assets feature lets you convert imported CAD models into factory assets. If, for example, you receive component data from a supplier that you want to evaluate or run through collision detection, you can use this feature to quickly convert that data to a factory asset for placement in your layout designs.
The convert process:
- Creates an asset for each selected model
- Publishes the asset to the asset library
- Replaces the selected model with the newly created asset, if indicated
- Open the assembly you want to convert.
- Select
Convert to Assets in the Factory Ribbon to display a list of parts or subassemblies contained within the model that are eligible to convert to assets. You can also right-click on an asset and select
Factory
 Convert to Assets to access the list.
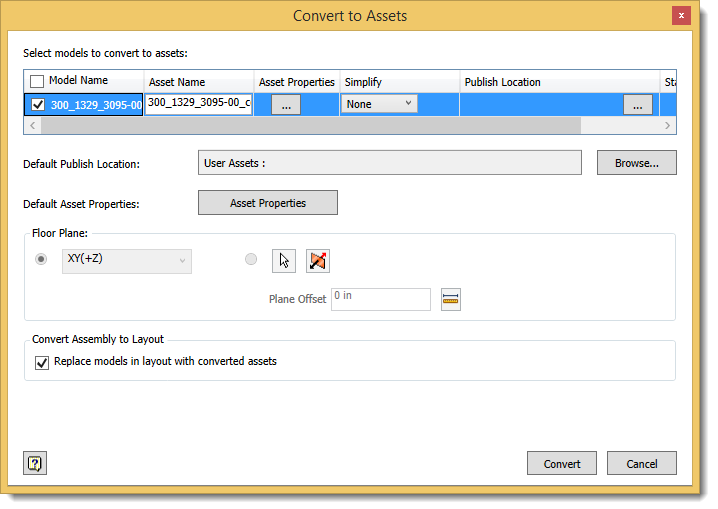
- Select the items to convert under the Model Name heading or click the checkbox next to the heading to select all items.
- Change the asset name as desired. The name automatically defaults to the imported model name.
- Click the Asset Properties column to enter Summary, Project, Descriptor, Process, Layer, and Customizable properties for the new asset. See Defining Asset Properties for details. If you are creating multiple assets (multiple models are selected), you can define default properties for all selected assets by clicking Asset Properties next to the Default Asset Properties field.
- Select a
Simplify option from the drop-down list to publish an assembly as a single part or to save the part as mesh. Simplify can improve performance and simplify file management because fewer files are created. Medium and Coarse options automatically appear in the drop-down list. Custom options might also appear and are defined in the User App Data folder (%AppData%\Autodesk\Factory Design 2018\Simplification\).
If you select an option other than None, ellipses (...) appear in the field. Click to enter the simplification settings to shrinkwrap the model or save it as mesh. Parts can only be saved as mesh.
For detailed information about how to complete the shrinkwrap fields, see Shrinkwrap Assemblies Dialog Box in the Inventor help. For information about the Save as Mesh fields, see Save As Export Options Reference in the Inventor help.
- Specify a Default Publish Location to publish the selected assets to the same location. To publish a specific asset to a different location, enter the location in the asset's Publish Location field in the model selection list.
- Click Default Asset Properties to define properties to apply to all the select assets.
- If you are converting an Inventor assembly file, select the
Floor Plane or a planar landing surface so that the new asset orients properly when placed on the factory floor. If your assembly is already oriented to the XY(+Z) plane, you do not need to make a selection here because it is the default orientation for a converted asset. This drop-down is not active if the file is already a Factory layout. If selecting a planar surface, select Flip direction
 to switch the floor plane direction by flipping the assembly. Select
Plane Offset
to switch the floor plane direction by flipping the assembly. Select
Plane Offset
 to define the landing surface at either a positive or negative distance from the selected plane.
- Select Replace models in layout with converted assets to automatically replace the model in the current layout with the newly created assets. If you do not select this option, the assets are still created and added to your user asset library, but the model remains in the layout.
- Click Convert to create the assets.
To convert assembly components to assets: