- Click
Asset Builder tab
 Publish panel
Publish Asset
Publish panel
Publish Asset
 to display the
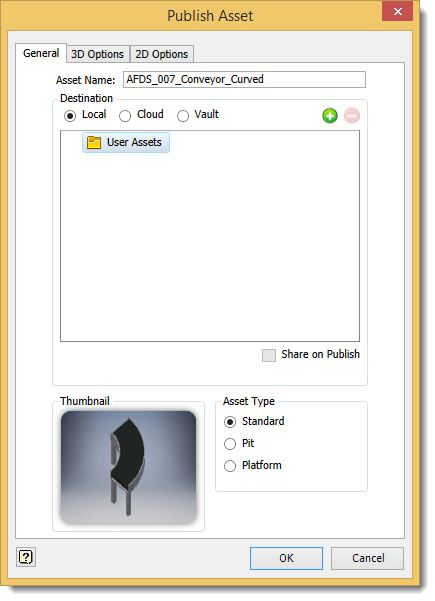
Publish Asset dialog box.
to display the
Publish Asset dialog box.
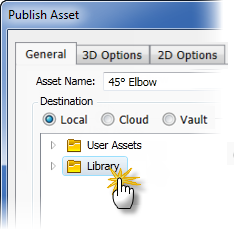
- On the
General tab, select the
User Assets folder as the target folder for the published asset. (By default, authored assets are published to the
User Assets library.)
To specify a different folder for your published asset, right-click the User Assets folder and select New from the pop-up context menu. The new folder appears as a subfolder in the User Assets folder. To provide a more descriptive name for the new folder, right-click over the new folder name and select Rename from the pop-up context menu. Enter the new folder name and press Enter.Note: The pop-up context menu also provides the option to create an additional subfolder under the new folder you have created. You can also delete any custom folder from the User Assets folder structure using the context menu. Be aware that any assets stored in a subfolder are also deleted. The Explore context menu option opens the selected folder using Windows Explorer. - After specifying the default
User Asset folder, or creating a new subfolder for the asset, determine whether the asset is to be local, published to the cloud, or published to Vault.
If publishing to the cloud, select the desired asset collection from the list. (To display the members within a collection, click the expand button
 to the right of the asset collection name.)
Asset collections can be created from within the Publish Asset dialog box, or by using the Web-based Factory Asset Warehouse. Use the Add
 and
Remove
and
Remove
 buttons if you wish to add or remove a collection from the list. Adding a collection creates a new folder that can be named at creation time or renamed later, as required.
Tip: The Add and Remove buttons can be used to create and delete folders for local assets also.
buttons if you wish to add or remove a collection from the list. Adding a collection creates a new folder that can be named at creation time or renamed later, as required.
Tip: The Add and Remove buttons can be used to create and delete folders for local assets also. - If you wish to share your asset with other users on the cloud, activate the
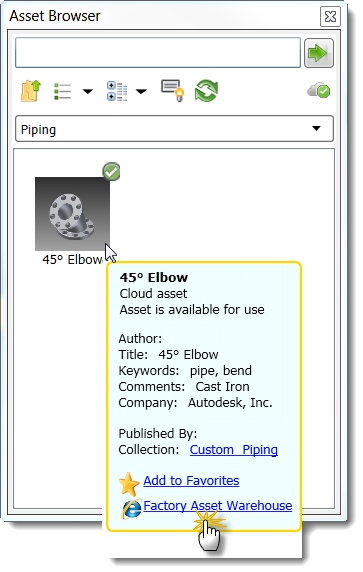
Share on Publish check box. When an asset is shareable, other users can rate it or comment on it. The asset ratings and comments are viewable both within the
Assets Browser and the
Asset Information page of the Web-based
Factory Asset Warehouse. For more information on rating and commenting on shareable assets, see the Inventor Factory Help topic:
Inserting Factory Assets.
Note: Public sharing of assets can also be toggled on and off using the Factory Asset Warehouse.
Once the asset has been published to the cloud, it becomes available for download in the Assets Browser. Access to the Factory Asset Warehouse is also provided through the browser for cloud-based assets.
- Click the appropriate option button to specify the Asset Type - Standard (the default), Pit, or Platform.
- Click the 3D Options tab. Select Simplify to publish an assembly as a single part or to save the part as mesh, and then choose a setting from the drop-down menu. Selecting Simplify can improve performance and simplify file management because fewer files are created. Medium and Coarse options automatically appear in the drop-down list. Custom options might also appear and are defined in the User App Data folder (
- AppData%\Autodesk\Factory Design 2018\Simplification\).
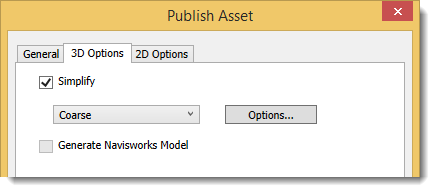
If this is an assembly, click Options to enter the simplification settings to shrinkwrap the assembly or save it as mesh. Parts can only be saved as mesh.
For detailed information about how to complete the shrinkwrap fields, see Shrinkwrap Assemblies Dialog Box in the Inventor help. For information about the Save as Mesh fields, see Save As Export Options Reference in the Inventor help.
Select Generate Navisworks Model if you use Navisworks and want to generate a Navisworks compatible model when publishing an asset.
- Click the
2D Options tab if you want to publish a 2D drawing of the asset in DWG format. Publishing a 2D drawing of a 3D asset creates a 2D asset for use in AutoCAD Factory. The asset is automatically placed in the
User Folder of the AutoCAD Factory
Asset Browser.
Note: Mesh drawing support is not currently available. If the model from which you are creating a 2D representation only contains mesh data, this process will generate an empty DWG.
The Publish 2D Asset check box can be enabled or disabled on the Asset Builder tab in the Factory Options dialog box. By default, this setting is enabled.
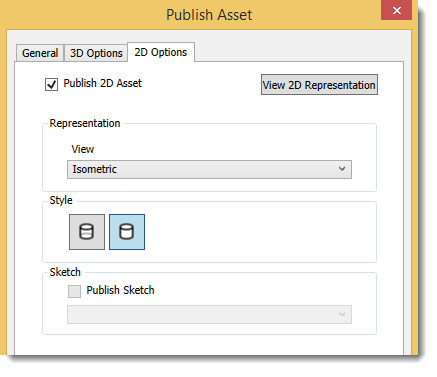
- Select a saved view, or accept the default Master view, from the View drop-down list. Then click the appropriate Style button to choose between a hidden line or non-hidden line representation for the published drawing.
- Activate the Publish Sketch check box if you want to publish a specific sketch from the part or assembly browser of the asset. Select the browser sketch name from the drop-down list.
- Click the View 2D Representation button in the upper right corner of the dialog box to see a preview of the asset in 2D. When you are finished previewing the asset, click the OK button to close the View 2D Representation box.
- Click OK to add the model to the Factory Assets library and close the Publish Asset dialog box.
-
 Click
Asset Builder tab
Exit panel
Finish Asset Builder to exit the environment.
Click
Asset Builder tab
Exit panel
Finish Asset Builder to exit the environment.
Use project libraries for published factory assets
A Project Library is a folder that contains frequently used standard parts that are referenced and used, but not modified as part of a project. Project libraries usually contain off-the-shelf parts like fasteners, o-rings, retaining clips, electrical components, etc. You can create your own factory assets and store them in a specially designated Project library folder on your local machine, or on a network to be shared with others.
Once the folder is created, use the Project Editor to specify the location of your Project Library.
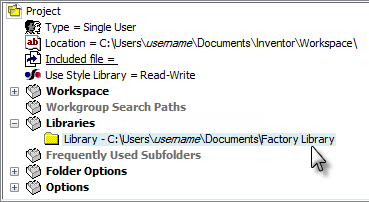
When the project is active, the Project Library appears with the name Library in the Publish Asset dialog box.
Any new factory assets that you create and publish can now be added directly to the Library folder. For more information on Inventor projects, see the Inventor help.