
The following section describes the properties for items on the Sculpt Tools tray.
General
- Size
-
Sets the radius of the tool. By default, size is measured in world space units (for example, a brush Size of 100 = a radius of 100 centimeters). When Screen Pixels is selected, size is measured in screen space based pixels. Hotkeys: B + drag , or press the square bracket keys, [ to reduce size and ] to increase size.
- Paint, lasso, and region modes
-
Apply only to the Freeze and Mask sculpting tools, the Weights posing tool, and the Faces and Objects selection tools. Lets you set how the tool is applied to the mesh. See also Mask or freeze regions on a model, Select and move items, Adjust a joint's region of influence.
- Regular stroke

- Lets you apply the tool with the default painting stroke.
- Lasso

- Lets you drag to create a free-form area where you want to apply the tool.
- Region

- Lets you drag to create rectangular region where you want to apply the tool.
- Strength
-
Determines how much the tool affects the surface. Depending on the tool, this value represents either a percentage of the maximum power available or a height expressed in world space units. Hotkeys: M + drag , or press ; (to reduce strength) and ' (to increase strength).
- Mirror
-
Reflects a stroke from one side of a model to the other, along the specified axis.
- Off
-
Strokes are not reflected.
- X
-
Reflects strokes across the world space X-axis.
- Y
-
Reflects strokes across the world space Y-axis.
- Z
-
Reflects strokes across the world space Z-axis.
- Local X
-
Reflects strokes across the local space X-axis.
- Local Y
-
Reflects strokes across the local space Y-axis.
- Local Z
-
Reflects strokes across the local space Z-axis.
- Tangent
-
Reflects strokes across the topological center line of a topologically symmetrical model. To use tangent space mirroring on a model, you must first define the model's topological center. See Set a topological axis.
- Invert Function
-
Inverts the function of the tool. For example, if the primary function of the tool is to pull vertices up, its inverse is to push vertices down. Not all tools have an inverse function. Default hotkey: press Ctrl to invert function while sculpting.
- Use Stamp Image
-
Turns on the selected stamp for the tool. Stamps modify the strength of the sculpt brush according to the gray scale values in the stamp image. The darker the overall values the lower the strength of the tool. Not all sculpt brushes work with stamps.
- Orient To Stroke
-
When on, the stamp orientation follows the direction of your brush stroke.
- Rotate
-
Rotates the stamp image clockwise.
- Horizontal Flip
-
Flips the stamp image horizontally.
- Vertical Flip
-
Flips the stamp image vertically.
- Randomize
-
Turns the Randomize options for the tool stamp on or off.
- Random Horizontal Offset
-
Randomizes the horizontal position of the brush tip dynamically through the stroke.
- Random Vertical Offset
-
Randomizes the vertical position of the brush tip dynamically through the stroke.
- Randomize Rotate
-
Randomizes the rotation of the brush tip dynamically through the stroke.
- Randomize Scale
-
Randomizes the size of the brush tip dynamically through the stroke.
- Randomize Strength
-
Randomizes the strength of the brush tip dynamically through the stroke.
- Horizontal Flips
-
Randomly flips the position of the brush tip along its X axis dynamically through the stroke.
- Vertical Flips
-
Randomly flips the position of the brush tip along its Y axis dynamically through the stroke.
- Constrain to Surface
- Stamp Spacing
-
Controls the stamp frequency/continuity on a stroke. Depending on the Size and Falloff settings for a tool, the Stamp Spacing can be set to a higher value to refine the tool behavior and improve the appearance of the stroke. The default setting is 6.25 and ranges between 0 and 100. The higher the setting, the more gaps appear on the stroke, depending on the tool settings.
- Steady Stroke
-
Helps to produce a smoother stroke by filtering mouse/stylus movement. When on, a vector displays on the tool cursor and no stroke appears until you drag a distance equal to the length of the vector. The length of the vector is set by the Steady Stroke Distance property.
- Steady Stroke Distance
-
Sets the length of the Steady Stroke vector on the tool cursor.
- Snap to Curve
-
When on, the tool snaps to an active curve when the cursor travels within the specified Distance. See also Sculpt or paint using curves.
- Snap to Curve Distance
-
Sets the distance your cursor can be from a curve before snapping occurs. Default is 60.
- Buildup
-
Specifies the rate at which the brush deformation grows to reach the Strength value (assuming a constant pen pressure).
- Flood
-
Applies the tool uniformly across the entire surface. Does not apply to areas of the surface that are hidden, frozen or concealed by a stencil.
- Reset
-
Resets the tool properties to default values.
- Grab Silhouette
-
Specific to the Grab brush. When on, the tool grabs the front and back sides of the mesh silhouette together to modify it evenly. For better control, use an orthographic view (top, side) when applying this tool.
- Follow Path
-
Specific to the Grab brush. Makes the mesh follow the path of your stroke as you pull extensions out with a sweeping gesture. Stroke more slowly to extend the mesh further. When off, the Grab brush pulls extensions out along a straight line.

Image courtesy of Andrei Cirdu
- Twist
- Specific to the
Grab tool. Rotates using the brush radius and falloff. The direction of the rotation is determined by the
Direction setting.
Hotkeys: Ctrl-drag left or up to rotate in a counterclockwise direction. Ctrl-drag right or down to rotate in a clockwise direction.
Falloff
Lets you specify how the tool effect diminishes (or not) from its center point to its outer edge. The falloff is represented as a curve that can be edited. See also Adjust tool falloff.
Falloff presets are available in the Falloff tray.
- Snap
-
Constrains points to the grid.
- Store To
-
Saves the current falloff curve to the tray.
- Falloff image
-
Right-click the falloff image in the Properties window for the following options:
- Insert Point
-
Inserts a new point under the cursor.
- Select Point
-
Selects the point under the cursor.
- Delete Point
-
Deletes the point under the cursor.
- Falloff Type
- how the strength of sculpting tool's strength diminishes from the center of the brush towards its outer edge. The sculpting tool assigns a falloff value to each vertex within the brush radius, depending on its distance from the center point.
The following falloff types use different methods to measure this distance, and produce unique results.
- Surface/Volume
- (Default) This is a combination of the
Surface and
Volume falloff types.
To determine which vertices to affect, the brush walks along the surface until it reaches the end of the surface or the edge of its radius, whichever comes first.
- Surface
- To find vertices, the brush measures the distance by starting at its center point and walking along the surface. It searches for vertices until it reaches the end of the surface or the edge of the brush radius, whichever comes first. Surface falloff is useful when you want the sculpting tool to confine to a surface.
- Volume
-
The brush measures the distance by drawing a straight line from the center of the brush to each vertex within the brush radius. Volume falloff affects one mesh with separated parts, which are within the brush radius.
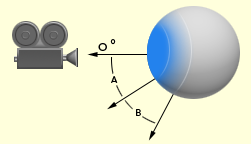
- Falloff based on Facing Angle
-
When on, Mudbox reduces the effect of the Sculpt or Paint tool on parts of the model that face away from the camera. You can define the threshold values for the falloff using Falloff Start Angle and Falloff Range values.
For example, if the Falloff Start Angle is set to 85, and the Falloff Range is set to 5, faces with a facing angle from 0 to 85 degrees have no falloff. From 85 to 90 degrees, the falloff goes from nothing to full. For faces with facing angles over 90 degrees, the brush has no effect at all.
- Falloff Start Angle
- Sets the maximum angle below which no falloff is applied. The allowed range of values is 0 to 90.
- Falloff Range
- The number of degrees over which the falloff goes from minimum to maximum. The allowed range of values is between 0 and 180, minus the Falloff Start Angle value. For example, if you set the Falloff Start Angle to 45, the Falloff Range can be from 0 to 135.
Tessellation

- Tessellate
- Turn this on to dynamically tessellate the mesh as you stroke over it. Using Tessellate lets you add or remove mesh detail as you sculpt.
- Choose the stroke behavior for the current brush:
- Divide Threshold
-
Set the amount of detail added to the mesh as you sculpt. Reducing this value generates higher resolution polygons in the stroke area. Use this to control the overall resolution of the tessellated mesh.
Divide Threshold sets the maximum length edges can be before tessellation splits them into smaller edges. For example, when you set Divide Threshold to 5, all edges above 5 units split, which generates more polygons.
Hotkey: N + click to adjust Divide Threshold for areas under the brush.
Hotkey: N + middle-click to set the Divide Threshold value to the average length of edges of the polygon under the cursor. Drag to adjust the value from this starting point.
Note: Pin this value with the icon to make the current settings unique to the Tessellation
Divide Threshold value. That is, if this property is
not pinned, this value will be used for any other Sculpt tool property that has a
Divide Threshold setting. Changes to any other tool's
Divide Threshold properties also will affect this setting if it is not pinned. This setting is off (shared) by default.
icon to make the current settings unique to the Tessellation
Divide Threshold value. That is, if this property is
not pinned, this value will be used for any other Sculpt tool property that has a
Divide Threshold setting. Changes to any other tool's
Divide Threshold properties also will affect this setting if it is not pinned. This setting is off (shared) by default.
- Units
- Set whether Divide Threshold uses World Space or Screen Pixels as Mudbox's unit of measurement.
- The default (and recommended) setting is Screen Pixels, because normally you don't adjust the Divide Threshold multiple times for most scenes.
- When you set Units to World, you must adjust the Divide Threshold frequently. This is because the World setting is an absolute value; if you set Divide Threshold to 5, all edges brushed over will split once the threshold (in this case, 5 units,) is reached.
- Screen Pixels takes into account how close or far your view is to your mesh. So, if you set the Divide Threshold to 5, all edges brushed are split when they are over 5 pixels in length. Because, an edge near the camera is shown with more pixels than an edge that is further away, edges that are further from the camera view are more likely to split. Again, we recommend Screen Pixels because once you become used to this relative behavior, you are adding detail to you mesh based on your current view. This accommodates the tendency to zoom in to add smaller details (and more resolution), or zoom out to make more large-scale changes for the overall mesh.
- Collapse Threshold (%)
-
Set the amount of detail removed from the mesh as you sculpt. Increasing this value increases the minimum edge length of the mesh in the stroke area as a percentage of the Max Edge Length value, effectively lowering the resolution.
Collapse Threshold (%) sets the minimum length edges can be before they get merged. For example, when you set Divide Threshold to 5 and Collapse Threshold (%) to 20%, edges must be at least 1 unit in length or they will be merged, which results in fewer polygons.
Note: Pin this value with the icon to make the current settings unique to the Tessellation
Collapse Threshold (%) tool. That is, if this value is
not pinned, this value is also used for any other Sculpt tool property that has a
Collapse Threshold (%) setting, and changes to any other tool's
Collapse Threshold (%) also will affect this setting. This setting is off (shared) by default.
- Smoothing
- Adjust the amount of smoothing applied to the mesh after it gets tessellated. Increasing this value generates more equilateral triangles in the tessellated mesh, which results in a smoother surface.
When set to 0, no smoothing gets applied. When set to 100, all generated triangles are equilateral.
- Algorithm
- Lets you set the method used to generate equilateral triangles. The Mudbox smoothing algorithm tries to place vertices at an equal distance from adjacent ones, creating equilateral triangles with no regard for surface smoothness.
- There are two methods, Average and Projection. We recommend Projection, as it works better with the tessellated result than Average. When reducing resolution, the higher the Smoothing setting, the lower the tessellation-smoothing quality.
- Frequency
- Set how frequently tessellation is applied during a sculpting brush stroke. When set to
High, tessellation is applied each brush step,
Medium every 4th. step, and
Low every 16th step.
When set to Auto, tessellation frequency is linked to your current tool's Stamp Spacing setting. For example, if your sculpting tool is using a high Stamp Spacing value, the Frequency automatically uses its High setting.
When set to Custom, use the Steps property to specify Frequency.
- Steps
- When Frequency is set to Custom, use this to set the tessellation frequency in steps.
- Max Face Count
- Adjust the maximum face count for tessellation. Use this to control the overall face count of the tessellation results.
Setting Max Face Count is particularly important if you use a very low Max Edge Length value, which generates dense meshes and reduces performance.
Advanced
- Remember Size
-
Preserves the size of the tool after use. When off, the brush inherits the size of the previously used brush.
- Orient To Surface
-
Orients the tool cursor display (in the 3D View) along the normal of the face under the center of the cursor ring. Influences cursor display only, does not influence the effect of the brush on the surface.
- Draw From Center
-
Specific to the Imprint tool. Sets how the stamp image expands outward from where you click-drag to apply it. When on (default), the center of the stamp is anchored where you click. When off, the edge of the stamp is anchored. Keeping this option on can be useful especially when using an extracted vector displacement map as your stamp.
- Affects All Layers
-
Specific to the Smooth tool. When on, all sculpt layers are affected by the tool. When off, Smooth affects only the current sculpt layer.
- Update Plane
-
Specific to the Flatten, Wax, Scrape, Fill, and Contrast tools. Recalculates the underlying tool plane (that affected vertices within the tool cursor move toward) for each stamp in a stroke. When off, the underlying plane is determined by the initial stamp and remains fixed for the duration of the stroke.
- Whole Stroke
-
Specific to the Flatten, Wax, Scrape, Fill, and Contrast tools only when Update Plane is on. Continuously recalculates the underlying tool plane from all the vertices affected during the stroke.
- Smooth Values
-
Specific to the Freeze, Mask, and Erase tools. Switches the current brush from applying freezing or masking (depending on which tool is selected) so the stroke blurs the color per vertex information on any existing freezing or masking. This only works if Smooth&Paint Values is off. Hotkey: Shift.
- Smooth & Paint Values
-
Specific to the Freeze, Mask, and Erase sculpt tools. Applies freezing or masking (depending on which tool is selected) while blurring the color per vertex information.
Pen Pressure
- Min Size
-
Specifies how small the tool is when the lightest pressure is applied to the pen, expressed as a percentage of the tool’s Size property. For example, a Min Size of 100 indicates there is no size variance, regardless of the pressure applied.
- Min Strength
-
Specifies how weak the tool strength is when the lightest pressure is applied to the pen, expressed as a percentage of the primary tool Strength value. For example, a Min Strength of 100 indicates there is no strength variance, regardless of the pressure applied.
- Direction
-
Specifies the direction vertices move when affected by a tool:
- Center Normal
-
Moves vertices in the direction of the normal of the face directly under the center of the tool.
- Averaged Normal
-
(Default) Moves vertices in the direction of the average of the normals of all affected faces.
- Vertex Normal
-
Moves each vertex in the direction of its own normal.
- Forward
-
Moves vertices in the direction of the stroke.
- Right
-
Moves vertices perpendicular to the direction of the stroke.
- X
-
Moves vertices along the world space X-axis.
- Y
-
Moves vertices along the world space Y-axis.
- Z
-
Moves vertices along the world space Z-axis.
- Camera
-
Moves vertices toward the camera.
- Screen
- (This is the default setting for the Grab brush.) Moves vertices along the screen plane.
- XY
- (This setting is only available for the Grab brush.) Moves vertices along the XY plane.
- XZ
- (This setting is only available for the Grab brush.) Moves vertices along the XZ plane.
- YZ
- (This setting is only available for the Grab brush.) Moves vertices along the YZ plane.